Self Help
Replacing the tail light bulbs
In this manual: Self Help
17steps
~102min
4/5difficulty
Done 0 of 17
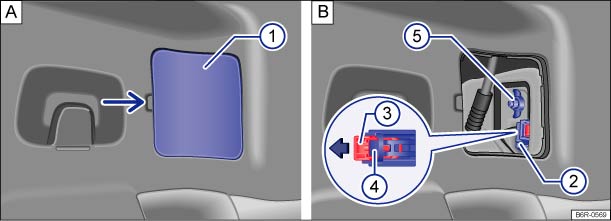 Fig. 164
At the side in the luggage compartment: : remove cover, : remove tail light.
 Fig. 165
Tail light: : remove bulb holder,
: remove bulbs.
 Read and observe the introductory information
and safety warnings first⇒
 Introduction
to the topic
Carry out the actions only in the specified order.
Removing the tail light- Observe checklist and carry out steps ⇒ Information on changing bulbs.
- Open the tailgate ⇒ Tailgate.
- Carefully pry off cover ① ⇒ Fig. 164
 .
- Pull the lock ③ on the connector ② in the direction of the arrow ⇒ Fig. 164
 . Use the screwdriver from the on-board tool kit
to help. - Press the latch ④ and disconnect connector ② ⇒ Fig. 164.
- Unscrew wing nut ⑤ ⇒ Fig. 164.
- Carefully release the tail light from the body by moving it toward the rear.
- Remove the tail light and place it on a clean, smooth surface.
- Unlock the bulb holder at the locking tabs (arrows) ⇒ Fig. 165
 and remove the bulb holder from the tail light.
- Replace the failed bulb with a new bulb of the same type ⇒ Fig. 165
 .
- Insert the bulb holder into the tail light. The locking tabs (arrows) must audibly engage ⇒ Fig. 165.
- Carefully insert the tail light into the body opening.
- Hold the tail light in its installed position with one hand and tighten the wing nut ⑤ with the other ⇒ Fig. 164.
- Check that the tail light is installed correctly and is secure.
- Push connector ② onto the bulb holder and press the lock ③ into the connector against the direction of the arrow ⇒ Fig. 164.
- Install the cover. The cover must engage and be secure.
- Close the tailgate ⇒ Tailgate.
Was this page helpful?