Wheels, Tires
Tightening torque for wheel bolts
Wheel bolt to wheel hub for all vehicles
Tightening torque: 110 N·m
Wheel change
Wheel change, protecting wheel centering seat against corrosion
Applies to alloy and steel wheels.
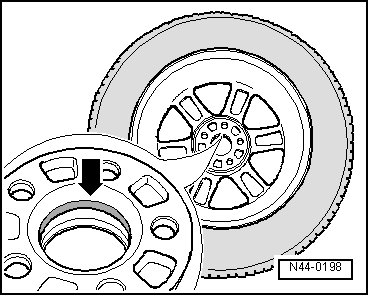
When changing wheels, the wheel centering seat should be waxed with wax spray to prevent corrosion between the wheel centering seat and the rim → Electronic Parts Catalog "ETKA.".
waxed to prevent corrosion between the wheel centering seat and the rim.
- Remove wheel.
- Thoroughly clean the wheel centering seat on the wheel hub and the centering of the rim.
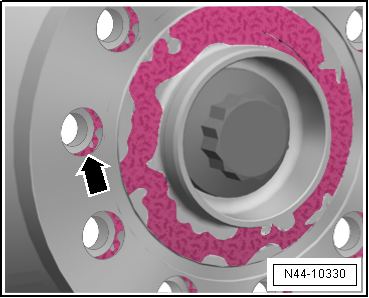
- Apply the wax to the centering area -arrow- with a brush.
Make sure that only the centering -arrow- is waxed and not the contact surface of the rim. Otherwise the brakes will become contaminated during driving, resulting in poor braking performance.

WARNING!
Wheel bolts, contact surfaces of wheel/wheel hub and threads in the wheel hub must not be waxed. Never treat wheel bolt threads with lubricants or anti-corrosion agents!
- Install wheel and tighten.
Wheel change, installation notes for wheel change

WARNING!
The wheel bolts and wheels are only secure if you follow the checks and instructions below.
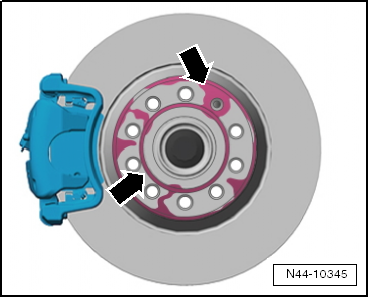
- Check that the contact surfaces -arrows- on the brake disc are free of corrosion and dirt.
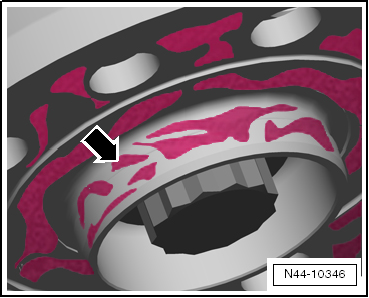
- Check that the contact surface -arrow- of the brake disc centering seat is free of corrosion and dirt.
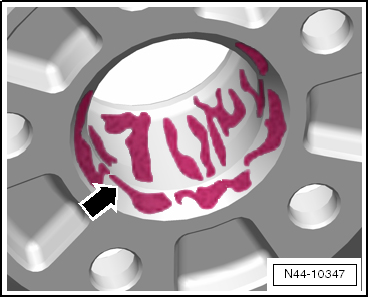
- Check that the contact surface -arrow- on the inner side of the wheel (rim) and the centering seat in the rim are free of corrosion and dirt.
- The ball seats * in the wheel bolt holes and the threads of the wheel bolts must also be free of corrosion, dirt, oil or grease.
* A ball seat is the curved surface of a spherical segment.
- Check that the wheel bolts can be screwed in easily by hand. The thread of the wheel bolt must not contact the bore in the brake disc -arrow-.
If the thread of the wheel bolt contacts the bore -arrow-, the brake disc must be rotated accordingly.
If necessary, remove dirt and corrosion:
- Oil or grease from the contact surfaces
- Threads in the wheel hub
- Threads of the wheel bolts

WARNING!
Heavily corroded, stiff-running and/or damaged wheel bolts must be replaced!
Wheel change, mounting the wheel
- Preserve the wheel centering seat.
- When mounting the wheel, tighten all wheel bolts evenly by hand.
- Tighten the wheel bolts in a crisscross pattern to approx. 30 N·m.
- Lower the vehicle to the ground and tighten all wheel bolts in a crisscross pattern to the specified tightening torque using the torque wrench.

WARNING!
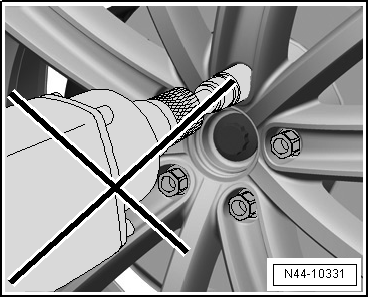
Do not use an impact wrench to screw in the wheel bolts!
Wheel change, position of the anti-theft wheel bolt on steel wheels

Caution!
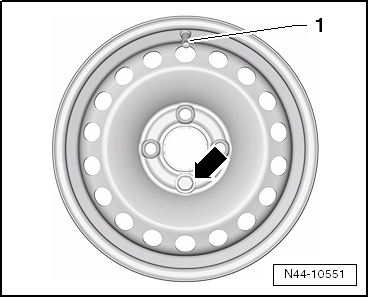
The position of the anti-theft wheel bolts relative to the tire valve on steel wheels must be observed without exception.
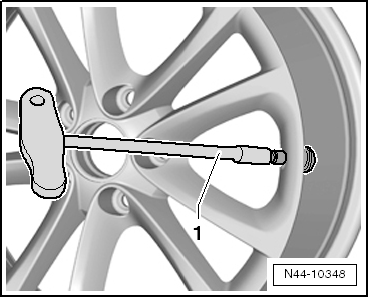
The anti-theft wheel bolt -arrow- may only be installed opposite the valve -1- on steel wheels.
Only if the anti-theft wheel bolt is installed in this position can the wheel trim cap be securely fitted to the steel wheel.
Vehicles with tire repair kit
Depending on equipment, the vehicles are fitted either with a spare wheel or with a tire repair kit.
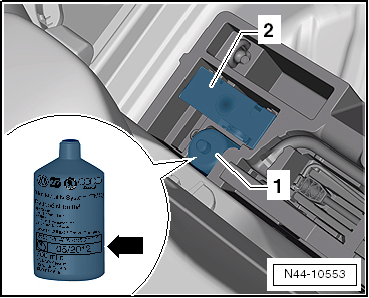
The tire repair kit is located in the luggage compartment, where the spare wheel would otherwise be. In addition to the compressor -2-, the tire repair kit contains a bottle of tire sealant -1-.
The tire sealant in the bottle has a limited shelf life.
The best-before date -arrow- is therefore stated on the bottle -1-.
Replace the tire sealant when the best-before date has been reached (the tire sealant must not be older than 4 years).
If the bottle has been opened, e.g. after a tire puncture, it must also be replaced.
Observe the disposal regulations.
Removing tire
Tires that have been filled or sealed with tire sealant must be emptied before removal.

WARNING!
- Avoid eye and skin contact with the tire sealant.
- Tyre sealant is harmful to health and can cause eye irritation and allergies.
- Wear protective gloves and safety goggles during the fitting work.
- Place the wheel on a level surface.
- Unscrew the valve core from the tyre valve.
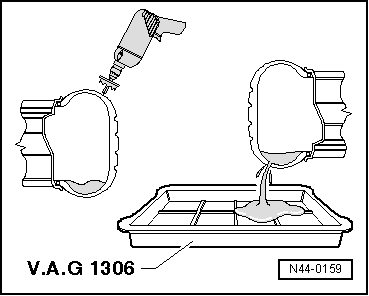
- Carefully drill a hole in the shoulder area of the tyre with a suitable drill or milling cutter.
- Hold the wheel over a drip tray and let the sealant run out.
- Remove the tyre from the rim.
- Clean the rim, for example with a damp cloth.
Disposing of tyre sealant
- Tyre sealant or residues of it must not be mixed with other waste/fluids.
- Collect any residual liquid tyre sealant and fill it into plastic containers. The plastic containers can be sent for recycling together with the repair kits (if the expiry date has passed).
- Take-back or recycling can be carried out through the existing workshop waste disposal systems.
- Contact your service provider or ask the waste officer of your sales centre or importer.
Fitting the tyre
Fitting the tyre, fitting the tyre valve
- Make sure that the rim is clean.
- Use the -VAS 6459--1- to fit a new tyre valve.
- Unscrew the valve core.
- Inflate the tyre to approx. 3...4 bar; the tyre bead must audibly slide over the safety hump of the rim.
- Screw in the valve core.
- Check the tyre pressure against the specified pressure.
- Balance the wheel.
Fitting the tyre, fitting conditions
Warming cold tyres to the minimum fitting temperature

Note
These instructions also apply to run-flat tyres and ultra-high-performance tyres (aspect ratio less than or equal to 45 % and speed symbol greater than or equal to V).

WARNING!
The minimum fitting temperature of a tyre should be between 15 °C and 30 °C in the core of the tyre.
- For injury-free tyre fitting, the upper sidewall and the upper bead on the inside in particular must be at least 15 °C warm.
- This internal temperature is referred to as the core temperature.
- Rubber is a poor conductor of heat. For this reason, a cold tyre must stay in a temperature-controlled environment long enough for the inner rubber layers to warm up to at least 15 °C.
- The surface temperature of the tyre during the warm-up phase is not a measure of the internal temperature.
- So that cold tyres absorb heat from the ambient air as quickly as possible, they should not be stacked but stored individually, so that warm air can flow around them well.
- Never place tyres in front of a radiant heater or hot-air blower to warm them, as critical surface temperatures can be reached very quickly.
- Apart from warming with warm water or warm circulating air (maximum 50 °C), there is no method by which a tyre can be warmed without damaging it!
- If cold tyres (below 0 °C) are brought into a warm environment (above 0 °C), a layer of frost forms immediately on the tyre surface. This frost layer shows that the tyre is absorbing a large amount of heat from its surroundings by condensation of the air humidity.
- Once the frost layer has thawed, condensation water forms. Wipe the frost layer dry with a cloth so that the warming process is not delayed by evaporative cooling.
Warm-up times:
- Starting from a room temperature of at least 19 °C and a tyre temperature of 0 °C or higher, a tyre must be stored at at least 19 °C for at least 2 hours.
- Starting from a room temperature of at least 19 °C and a tyre temperature below 0 °C, a tyre must be stored at at least 19 °C for at least 2.5 hours.
Warm-up recommendations:
- If possible, store the tyres in the workshop one day before fitting (job preparation).
- Store them as high as possible on an insulated base, pallet or similar.
- Position the tyres individually so that warm air can flow around them well.
- Wipe off condensation water.
- Never warm up with a radiant heater or hot-air blower!