Vibration caused by wheels/tires - Causes and remedies
Causes of vibration
There are many causes of vibration. Vibration can also be caused by tire wear. Tire wear from driving does not always occur evenly across the entire tread surface. This creates slight imbalances that disturb the smooth running of the originally precisely balanced wheel.
These slight imbalances cannot yet be felt at the steering wheel, but they are present. They increase tire wear and reduce tire service life.
Recommendation
To ensure
- optimal safety,
- optimal smooth running and
- even wear
throughout the tire's service life, it is recommended to balance the wheels/tires at least twice during the tire's service life.
Perform a test drive before balancing
If the vehicle comes to the workshop with the complaint "vibration", a test drive is essential before balancing.
- This gives you information about the type of vibration.
- Note the speed range in which the vibration occurs.
- Lift the vehicle on the lift immediately after the test drive.
- Mark the installation position on the tire.
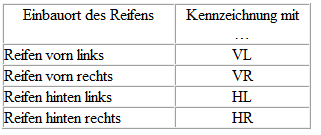
- Remove the wheels from the vehicle.
- Balance the wheels.
Balancing the wheel
Balancing the wheel, conditions
The following conditions must be met before balancing.
- The tire pressure must be correct.
- The tread must not be worn unevenly and should be at least 4 mm deep.
- The tire must not have any damage, such as cuts, punctures, foreign objects, etc.
- The wheel suspension, steering and steering linkage, including dampers, must be in perfect condition.
- You have carried out a test drive.
Balancing the wheel on the stationary balancing machine
- Test drive carried out.
Clamping the wheel onto the balancing machine

Note
As with any other repair you perform, cleanliness is paramount when balancing. Only then can you achieve a flawless result!
Dirt and rust on the contact surfaces and centering of the wheel will distort the result.
- Clean the contact surface, the centering and the wheel bowl, for example with the brush blaster set, pneumatic -VAS 6446- → Volkswagen ServiceNet; Workshop Equipment, Catalog, before clamping the wheel onto the balancing machine!

Note
It is very important that the correct system for centering and clamping wheels is used on the wheel balancing machine. Please obtain information about the appropriate centering system for wheel balancing machines before starting work → Volkswagen ServiceNet; Workshop Equipment, Catalog.
- Clamp the wheel with tire onto the balancing machine.

Note
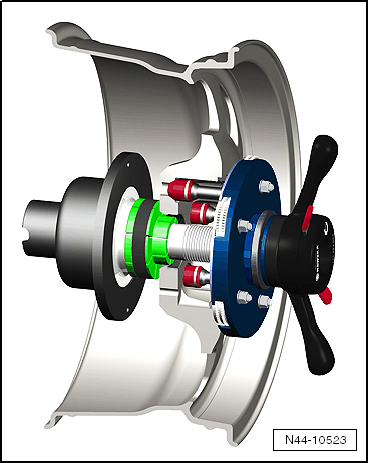
- To clamp the wheel, for example use the wheel balancing machine centering system -VAS 5271-.
- This enables 100% centering of the wheel and gentle clamping!
- Conical clamping elements do not allow 100% centering on the balancing machine.
- An off-center deviation of 0.1 mm results in an imbalance of 10 grams on the wheel/tire.
Procedure for balancing the wheel/tire
- Let the wheel/tire rotate on the balancing machine.
- Check the course of the contour lines on the tire sidewalls in the area of the rim flange.
- Check the tire tread wear pattern while the wheel/tire is rotating.

Note
If there is uneven wear, flat spots from braking, or heavy cupping, balancing cannot achieve smooth running. In this case, replace the tire.
- Check the radial and lateral runout of the wheel/tire. If the wheel with tire runs out of round even though there are no flat spots from standing, radial runout or lateral runout may be the cause.
- Check the wheel with tire for radial and lateral runout.
- If radial and lateral runout are within the permissible tolerance, balance the wheel and tire.

Note
- No more than 60 grams of weight should be used per wheel.
- If more weight is required, you may be able to achieve better smooth running by matching. Match the tire.
- The display on the balancing machine should show 0 grams.
- As an alternative to matching, you can use the vibration control system -VAS 6230 A-.
- Install the wheel on the vehicle.
- First tighten the bottom wheel bolt hand-tight, then to approx. 30 N·m.
- Now also tighten the remaining wheel bolts in a crisscross pattern to approx. 30 N·m. This centers the wheel on the wheel hub.
- Lower the vehicle onto its wheels.
- Now tighten the wheel bolts in a crisscross pattern to the specified tightening torque using the torque wrench.
Perform a test drive
- After balancing the wheel/tire, perform a test drive.
If you still feel vibration during the test drive, it may be caused by tolerances present in the wheel centering.
In unfavorable cases, component tolerances of wheels and wheel hubs can add up. This can also cause vibration. These can be eliminated with a fine balancer.
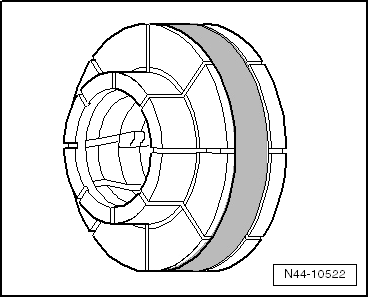
Balancing the wheel with the fine balancer (finish balancer)

Note
- Working with a fine balancer requires instruction from the device manufacturer.
- For balancing, the wheels of the driven axle must be placed on the balancing adapters, i.e. the front wheels on front-wheel-drive vehicles.
If, when balancing on the vehicle, you determine that the residual imbalance is more than 20 grams, you should turn the wheel on the wheel hub.
- Mark the position where the imbalance is indicated.
- Then loosen the wheel and turn it on the wheel hub so that the marked position points downward.

Note
The wheel hub must not turn during this process.
- First tighten the bottom wheel bolt hand-tight, then with approx. 30 N·m.
- Now tighten the remaining wheel bolts, also in a crisscross pattern, to approx. 30 N·m. This centers the wheel well on the wheel hub.
- Check again with the fine-balancing unit whether the imbalance is less than 20 grams.

Note
The imbalance must in any case be less than 20 grams before you change the balancing weight.
- If necessary, loosen the wheel bolts again.
- Turn the wheel relative to the wheel hub again by 1 or 2 wheel bolt holes.
- Tighten the wheels using the method described above.

Note
Only when the imbalance is less than 20 grams should you reduce the imbalance by changing the balancing weight.
- Balance the wheels to under 5 grams of imbalance.
- If not already done, tighten the wheel bolts to the specified tightening torque.

WARNING!
Always tighten the wheel bolts with a torque wrench to the specified tightening torque.
Vibration Control System
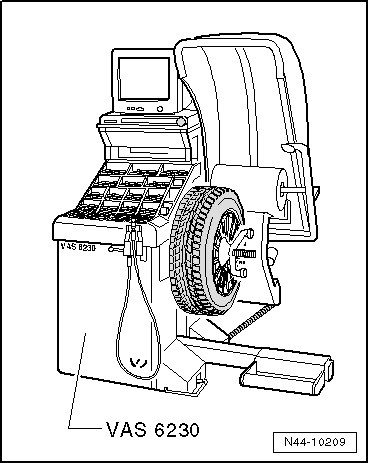
With the Vibration Control System -VAS 6230 A-, you can perform further functions in addition to the previously known static balancing.
A special feature of this system is the testing of the radial force of the wheel/tire while rolling.
A roller presses against the wheel with a force of approx. 635 kg. This simulates the tire contact force against the road surface while driving.
Radial and lateral runout in the wheel/tire and differing stiffness in the tire cause the tire contact forces to fluctuate.
The -VAS 6230 A- detects and stores the position of the maximum measured radial force in the tire. Then the position of the smallest dimension between the rim flange and the wheel center is measured.
Checking Radial and Lateral Runout of Wheel/Tire
Checking Radial and Lateral Runout of Wheel/Tire
Radial and lateral runout is caused by inexact concentricity of the wheel and tire.
For technical reasons, 100% concentricity is not possible.
For this reason, the manufacturer permits a precisely defined tolerance for these components.
If the wheel and tire are mounted in an unfavorable position, this can be the cause of exceeding the maximum permissible tolerance for the wheel with tire.
The table shows the maximum permissible tolerance values for the wheel with the mounted tire.
Tolerance Values for Radial and Lateral Runout of Wheels with Tires

Checking Radial and Lateral Runout of Wheel/Tire with Dial Gauge
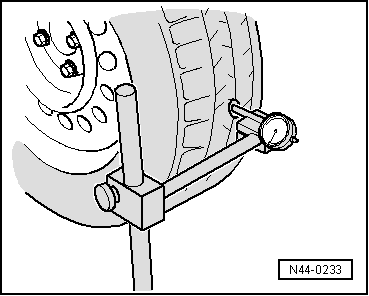
Checking Lateral Runout
- Preload the tire dial gauge -V.A.G 1435- by approx. 2 mm.
- Place the tire dial gauge -V.A.G 1435- against the side wall of the tire.
- Turn the wheel slowly.
- Note the smallest and the largest needle deflection.

Note
If the difference is greater than 1.3 mm, the lateral runout is too large.
In this case, you can reduce the lateral runout by matching.
Peak deflections of the dial gauge caused by small unevenness in the rubber do not need to be taken into account.
Checking Radial Runout
- Preload the dial gauge by approx. 2 mm.
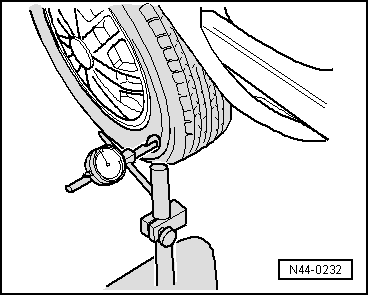
- Place the dial gauge on the tread of the tire.
- Turn the wheel slowly.
- Note the smallest and the largest needle deflection.

Note
If the difference is greater than 1 mm, the radial runout is too large.
In this case, you can reduce the radial runout by matching.
Checking Radial and Lateral Runout of the Rim
- Clamp the wheel onto the wheel balancer.
- Use the centering system for wheel balancers -VAS 5271-.
- Preload the dial gauge by approx. 2 mm.
- Turn the wheel slowly.
- Note the smallest and the largest needle deflection.
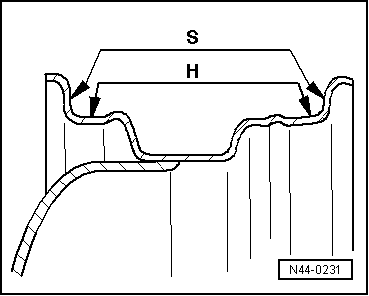
- S - Lateral runout
- H - Radial runout
- Compare the determined value with the nominal values in the table.

Note
Peak deflections of the dial gauge caused by small unevenness do not need to be taken into account.
Nominal Values for Radial and Lateral Runout of the Wheel


Note
If the measured value exceeds the nominal value, acceptable smoothness of running cannot be achieved.
Matching Wheel and Tire
General
When radial or lateral runout of the wheel and tire coincide, the out-of-round running of a wheel with tire is amplified.
For technical reasons, 100% concentricity is not possible.
Before matching wheels that are already mounted and have been driven on the vehicle, you must warm up the tires by driving. This eliminates any flat spots that may be present.
Matching Procedure
- Release the air from the tire.
- Press the tire beads off the rim flanges.
- Coat the tire beads all around with tire mounting paste.
- Turn the tire 180° relative to the wheel.
- Inflate the tire to approx. 4 bar.
- Clamp the wheel with tire onto the balancing machine.
- Check the concentricity, i.e. the radial and lateral runout.

Note
- If the nominal values for radial and lateral runout are not exceeded, you can balance the wheel to 0 grams. The nominal values can be found on.
- If the radial and/or lateral runout is outside the nominal values, you must turn the tire again.
- Release the air and press the tire beads off the rim flanges.
- Turn the tire 90° (quarter turn) relative to the wheel.
- Inflate the tire again to 4 bar and check the concentricity.

Note
- If the nominal values for radial and lateral runout are not exceeded, you can balance the wheel to 0 grams.
- If the radial and/or lateral runout is still outside the nominal values, the tire must be turned again.
- Press the tire off the rim flanges again.
- Turn the tire 180° (half turn) relative to the wheel.
If the radial and/or lateral runout is still outside the nominal values, check the wheel for radial and lateral runout.
If the measured values for radial and lateral runout of the wheel are within the nominal values, the tire has impermissibly large radial or lateral runout. In this case, the tire must be replaced.

Note
- Due to the tyre mounting, mounting paste is present between the tyre and the rim flanges.
- Therefore avoid heavy braking and acceleration during the first 100 to 200 km of driving. Otherwise the tyres may twist on the rim and the work would have been in vain!
Locating a flat spot in the tyre
What is a flat spot?
The terms flattening and flat section are also used for flat spot.
Flat spots also cause running unevenness, like an incorrectly balanced wheel. It is important that you recognise a flat spot on the tread as such!
Flat spots cannot be balanced; they can reappear at any time due to various circumstances. Flat spots can be eliminated without complex special tools, provided it is not a brake flat spot caused by an emergency stop → Guide Wheels, Tyres - Series.

Note
Brake flat spots are irreparable damage to the tyre! Tyres with such damage must be replaced.
Causes of flat spots
- The vehicle stands in one place for several weeks without being moved.
- The tyres have too low a tyre inflation pressure.
- The vehicle was parked in a drying booth of a paint shop after painting.
- The vehicle was parked for a long time with warm tyres in a cool garage or similar. In this case a flat spot can develop overnight.
Eliminating flat spots
- Flat spots cannot be removed from the tyre with workshop equipment.
- Flat spots can only be driven out by warming up the tyres.
- It is recommended not to use the method described below in cold and wintry weather.
Requirements/conditions
- If necessary, check and correct the tyre inflation pressure.
- If possible, drive the vehicle onto a motorway.
- If traffic and road conditions permit, drive a distance of 20 to 30 kilometres at a speed of 120 to 150 km/h.

WARNING!
- Do not endanger yourself or other road users during this test drive.
- During the test drive observe the applicable road traffic regulations and speed limits!
- After driving, lift the vehicle immediately.
- Unscrew the wheels from the vehicle.
- Balance the wheels on the stationary wheel balancing machine.