Second Generation On-Board Diagnostics (OBD II) Self-Diagnosis
GENERAL INFORMATION
For a description of the electronic ignition and fuel injection control system components, refer to Fuel and Exhaust Systems.
(If your vehicle is equipped with OBD II, the label under the hood must read "OBD II compliant" and a 16-pin connector must be present. As a rule, models starting from the 1996 model year are equipped with OBD II.)
1. The OBD system includes several diagnostic devices that monitor individual parameters of the emission control systems and store detected faults in the on-board processor memory as individual diagnostic trouble codes. The system also checks sensors and actuators, monitors vehicle service cycles, makes it possible to record malfunctions that occur even briefly during operation, and clears the memory.
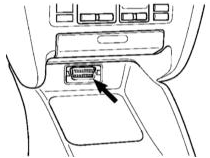
Location of the Data Link Connector (DLC)
2. All models described in this Manual are equipped with the second-generation On-Board Diagnostics system (OBD-II). The main component of the system is the on-board processor, more commonly called the Electronic Control Module (ECM) or the Powertrain Control Module (PCM). The PCM is the brain of the engine control system. Input data is received by the module from various information sensors and other electronic components (switches, relays, etc.). Based on analysis of the data received from the information sensors and in accordance with the basic parameters stored in the processor memory, the PCM issues commands to activate various control relays and actuators, thereby adjusting the engine operating parameters and ensuring maximum engine output efficiency with minimum fuel consumption. Reading of the OBD-II processor memory data is performed using a special scan tool connected to the 16-pin Data Link Connector (DLC), located under the instrument panel, near the heater control unit.
CAUTION
On some models, stored diagnostic trouble codes can be read using the "Check Engine" lamp.3. Components of the engine control/emission control systems are covered by special extended warranty obligations. Do not attempt to diagnose PCM faults or replace system components yourself until these warranty obligations have expired. Contact authorized dealer service centers. Information on diagnostic tools: Using a digital multimeter with high input impedance significantly improves the accuracy of measurements when diagnosing these systems.
4. Checking the operation of the fuel injection and emission control system components is performed using a digital multimeter. A digital meter is preferred for several reasons. First, analog instruments make it very difficult (sometimes impossible) to read results accurate to hundredths or thousandths of a unit, whereas when testing circuits that include electronic components, such accuracy is particularly important. The second, equally important reason is that the internal circuit of a digital multimeter has a high input impedance (internal resistance of the meter is 10 MΩ). Since the voltmeter is connected in parallel to the circuit under test, measurement accuracy is higher the less current flows through the meter itself. This factor is not significant when measuring relatively high voltages (9 to 12 V), but becomes decisive when diagnosing components that output low-voltage signals, such as the O2 sensor, where measurements are in fractions of a volt.
Signal, resistance and voltage parameters in all control circuits can be monitored in parallel using a breakout box connected in series with the engine control module connector. With the engine off, running, or the vehicle being driven, measure the signal parameters at the breakout box terminals and determine possible faults from the results.
5. For diagnosing engine, automatic transmission, ABS and SRS electronic systems, special diagnostic scan tools (Pointer) or testers (Retriever) with a specific cartridge (if provided), universal cable and connector are used. In addition, an expensive specialized automotive diagnostic computer designed for complete diagnosis of most modern vehicle systems may be used (for example, ADC2000 by Launch HiTech, or ESA560, FSA, BEA by Bosch), or a standard computer with a special cable and OBD-II diagnostic software (for example, Bosch ESI[tronic] software in Russian (www.ESItronic.com, ESItronic@msw-stuttgart.de, fax: +49(0) 711 2580488), Motor-tester, Mytester, VagCom and VagTool programs, or programs offered on the websites www.carsoftinternational.com/ or www.obd-2.com).
Universal K-L-line adapter (www.autoelectric.ru) (see illustration at the bottom of the page) is used to match the signals of the RS-232 port with the ISO-9141 (K-line) and ALDL interfaces. Various cables required for diagnostics of a specific vehicle make can be connected to the adapter connectors. The switches and indicator elements installed in the adapter allow selecting the required operating modes and roughly assessing the operation of the output lines. For example, the green LED marked L-line indicates that line L is connected to vehicle ground. The red LED marked K-line indicates high potential on line K at that moment. When communication with the vehicle is established, the indicator flashing may not be visible to the eye due to the high data exchange rate. Connect to the computer directly to the 25-pin COM port, or to the 9-pin COM port using the "RS-232 Cable 25 pin – 9 pin".
Some scan tools, in addition to standard diagnostic functions, allow, when connected to a personal computer, printing of wiring diagrams stored in the control module memory (if available), programming of the anti-theft system, and monitoring of signals in vehicle circuits in real time.
The free version of the OBD II browser for diagnosing your vehicle can be downloaded from our website arus.spb.ru
6. On some vehicles, diagnostic trouble codes stored in the self-diagnostic system memory can also be read using the "Check Engine" indicator on the instrument panel.
7. The following tools from ToolRama, Inc. (3500 NW Boca Raton Blvd., Boca Raton, Florida, 33431, USA 1 877 866 5726 – 561 750 4511 – 561 338 8447 FAX) can also be used for diagnostics:
tester R000 or scan tool P000 with cartridge T043 or T053, universal cable N000, black or white connector N003; multiplexer N002A; connector N
004.
8. The scan tool only reads stored trouble codes and clears trouble code memory. In addition, the scan tool supports the ISO protocol only. The tester can also activate and display live data, and supports SAE and ISO protocols.
All cartridges for the tester can also be used with the scan tool. In this case, functions are limited to reading and clearing memory only.
9. For most vehicles manufactured from 1996 that support the SAE/ISO 9141 OBD II protocol, the OBD II cartridge can be used. It performs the following functions: · Reading and clearing OBD II trouble codes. Display of oxygen sensor test results. · Continuous monitoring of ignition, injection and components. · Display of live data list and recorded intermittent faults:
Intake manifold absolute pressure; Oxygen sensor voltage; Engine coolant temperature; Calculated engine load; Vehicle speed; Fuel quality; Mass air flow; Ignition timing advance; Throttle position; Intake air temperature.
In addition to "P0" trouble codes, the tool also displays enhanced "P1" codes for Acura, Audi, BMW, Chrysler, Dodge, FORD, Geo, GM, Honda, Hyundai, Infinity, Kia, Lexus, Lincoln, Mercury, Mazda, Mercedes, Mitsubishi, Nissan, Porsche, Saturn, Seat, Skoda, Subaru, Suzuki, Toyota, Volvo, VW models.
10. Features of the ADC2000 specialized automotive diagnostic tool: · Built-in 4-channel oscilloscope with standard presets for 19 sensors. · Ignition system analyzer for checking primary and secondary circuits (with voltage up to 100 kV) on systems with a distributor or individual ignition coils – with monitoring of dwell time, peak voltage, ignition advance angle, current, and RPM. · Two-channel multimeter with digital and graphic data display for voltage (150 V), frequency (1100 kHz), current (150 A). · Built-in scan tool for the main systems of vehicles: VAG, MB, BMW, Volvo, Toyota/Lexus, Mitsubishi, Nissan, Honda, Mazda, GM, Ford, Chrysler, Daewoo, Hyundai, Kia, Samsung, as well as vehicles supporting the OBD-II protocol. · No cartridges required – you can update the tool software yourself by downloading the necessary updates from the Internet. · Software for communication with a personal computer.
11. Information on using these tools is contained in the enclosed documents. Details about the tools can be found on the websites www.programatools.com, www.bosch.de
12. For diagnostics, we recommend contacting qualified service station specialists. ISO 9141-2 (Chrysler, European and most Asian models) Pins 4, 5, 7, 15, 16
Pin No.
Use
4
Ground connection 5
Signal ground – pin 7
K-line, ISO 9141 15
L-line, ISO 9141 16
Battery positive through fuse. Live at any ignition switch position
Reading Diagnostic Trouble Codes
Information Content of Code Digits
Format P 0 3 8 0 from left to right:
1st digit (left)
P Powertrain B Body C Chassis
2nd digit: Code source
0 Standard SAE 1 Enhanced – manufacturer-defined
3rd digit: System
0 Entire system 1 Air/fuel induction
2 Fuel injection 3 Ignition system or misfire 4 Auxiliary emission control 5 Vehicle speed and idle control 6 Control module input/output signals 7 Transmission
4th and 5th digits
Sequential number of component or circuit fault (00–99)
PROCEDURE
1. If a fault recurs in two consecutive trips, the PCM commands the "Check Engine" warning lamp on the instrument cluster to illuminate. This lamp is also called the malfunction indicator lamp. The lamp will remain on until the self-diagnostic memory is cleared of stored fault codes (refer to Specifications). If the lamp flashes, a fault has been registered that may damage the catalytic converter. Reduce speed until the lamp goes out or remains on steadily. Fault codes in the OBD-II system can be read in several ways. The main method is reading with the tools described above connected to the 16-pin OBD-II DLC connector. Other methods are not available on all models. On some models, a flashing code (manufacturer-defined, not SAE standard) can be read with a digital voltmeter or LED. The code can also be read from the "Check Engine" lamp.
2. Without starting the engine, turn the ignition on. The "Check Engine" lamp should illuminate. If it does not, replace the lamp. After checking the lamp, turn the ignition off again.
If the system memory is clear, the lamp will not illuminate.
Starting the engine automatically interrupts access to the diagnostic system. Clearing OBD-II memory
3. When a fault code is stored in the PCM memory, the "Check Engine" lamp on the instrument panel illuminates. The code remains stored in the module memory.
4. To clear the ECM memory, connect a scan tool to the system and select CLEAR CODES in its menu. Then follow the prompts on the tool, or immediately remove the EFI fuse from its holder in the fuse block for 30 seconds. Alternatively, memory can be cleared by removing the fusible link (main fuse of the vehicle electrical system), or simply by disconnecting the positive battery cable.
CAUTION
Clearing the OBD memory by disconnecting the negative battery cable is not recommended, as this will erase the engine's learned settings and cause idle speed instability for a short time after the initial start. If the vehicle's audio system is equipped with an anti-theft code, make sure you have the correct code before disconnecting the battery to reactivate the audio system! Disconnecting the battery also erases the radio's preset stations.CAUTION
: To prevent damage to the ECM, disconnect and reconnect it only with the ignition OFF!5. Make sure the memory is cleared before installing new emission control components on the engine. If the fault memory is not cleared before starting the system after replacing a faulty sensor, the PCM will store a new fault code. Clearing memory allows the processor to adapt to the new parameters. During the first 10–20 minutes after the initial engine start, the engine speed may be somewhat unstable.
Test yourself
A quick Audi A3 quiz: every answer comes with an explanation and a link to the manual page.