Removal and Installation of Injectors
GENERAL INFORMATION
Faulty injectors can cause strong knocking while the engine runs, resembling the sound of a damaged bearing. If such symptoms occur, run the engine at idle and loosen the high-pressure line union nuts one at a time. If the knocking disappears when a particular nut is loosened, this indicates a defect in the corresponding injector.
A faulty injector can also be identified by loosening the union nuts while the engine runs at fast idle. If the engine speed does not change when a particular nut is loosened, this indicates a defect in the corresponding injector. The injector is checked with a pressure gauge (dealer work).
CAUTION
Damaged injectors must be replaced, as they cannot be adjusted or repaired.The first signs of an injector malfunction are as follows:
– Misfiring; – Knocking in one or more cylinders; – Engine overheating; – Loss of engine power; – Excessively black exhaust gases; – High fuel consumption; – Thick blue smoke during cold start. REMOVAL
PROCEDURE
1. Clean the high-pressure lines with cold cleaner.
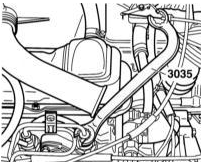
2. Remove the high-pressure lines as an assembly by loosening the union nuts with an open-end wrench, for example, HAZET 4560 or VW–3035.
CAUTION
Do not bend high-pressure lines. The line must always be removed as a complete set.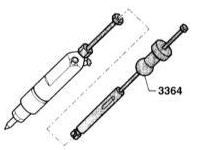
3. Unscrew the injector hold-down bolt, remove the clamp and pull out the injector.
CAUTION
If it is difficult to remove the injector, a slide hammer puller can be used, for example, VW–3364 or HAZET.1966. To install the slide hammer puller, an auxiliary tool that screws onto the injector is required.
The auxiliary tool can be made as follows. Cut off the old high-pressure line behind the union nut at a distance of approximately 5 cm. Braze an M6 nut onto the cut end.
CAUTION
Clean the tool thoroughly. Dirt entering the injector will cause it to fail!4. Screw the auxiliary tool onto the injector in place and install the slide hammer puller on the brazed nut. Pull out the injector.
5. Remove the heat shield seal. INSTALLATION

6. Always install new heat shield seals between the cylinder head and the injector. The recess of the seal must face upward; the arrow in the illustration points toward the cylinder head.
7. Insert the injector into place.
8. Install the injector clamp, making sure the support is positioned correctly.
9. Insert the bolt with the spherical washer and tighten to 20 N·m.
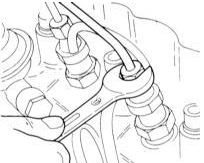
10. Tighten the high-pressure lines to 25 N·m.
Test yourself
A quick Audi A3 quiz: every answer comes with an explanation and a link to the manual page.