Temporary tyre repair kit
Complete system, consisting of a compressor and a sealant cartridge, which allows temporary repair of the tyre so that you can reach the nearest garage.
It is designed to repair most punctures that may affect the tyre, located on the tread or on the shoulder of the tyre.
Access to the kit
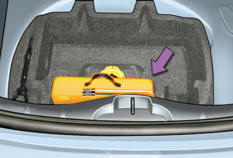
The kit is installed in the storage compartment, under the boot floor.
Description of the kit
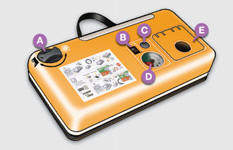
A. “Repair” or “Inflation” position selector.
B. On “I” / off “O” switch.
C. Deflation button.
D. Pressure gauge (in bar or p.s.i.).
E. Compartment containing: - a cable with 12 V socket adapter,
- various inflation nozzles for accessories, such as balls, cycle tyres...
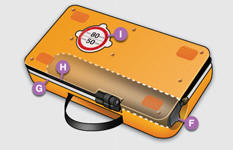
F. Sealant cartridge.
G. White hose with repair cap.
H. Black hose for inflation.
I. Speed limit sticker.
The speed limit sticker I must be stuck to the steering wheel of the vehicle to remind you that a wheel is in temporary use.
Do not exceed a speed of 80 km/h when driving with a tyre repaired using this type of kit.
Repair procedure
1. Sealing
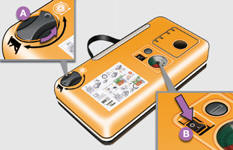
- Switch off the ignition.
- Turn selector A to the “Repair” position.
- Check that switch B is set to “O”.
Avoid removing any foreign body that has penetrated the tyre.
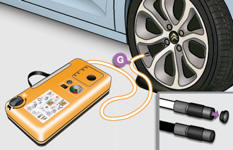
- Fully unroll white hose G.
- Unscrew the cap from the white hose.
- Connect the white hose to the valve of the tyre to be repaired.
Caution: this product is harmful if swallowed (e.g. ethylene glycol, rosin...) and irritates the eyes.
Keep this product out of reach of children.
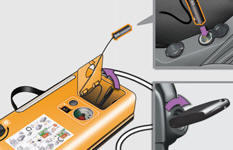
- Connect the compressor power plug to the vehicle's 12 V socket.
- Start the vehicle and let the engine run.
Do not switch on the compressor before connecting the white hose to the tyre valve: the sealant would spill outside.

- Switch on the compressor by setting switch B to “I” until the tyre pressure reaches 2.0 bar.
The sealant is injected into the tyre under pressure; do not disconnect the hose from the valve during this operation (risk of splashing).
If after approximately five to seven minutes you cannot reach this pressure, the tyre is not repairable; contact a CITROËN dealer or a qualified workshop to have your vehicle recovered.
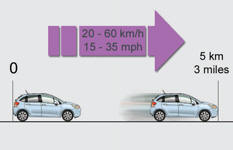
- Remove the kit and screw the cap back onto the white hose.
Take care not to soil your vehicle with traces of fluid.
Keep the kit within easy reach.
- Drive immediately for approximately five kilometres, at reduced speed (between 20 and 60 km/h), to seal the puncture.
- Stop to check the repair and the pressure using the kit.
2. Inflation
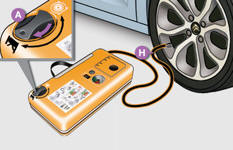
- Turn selector A to the “Inflation” position.
- Fully unroll black hose H.

- Connect the black hose to the valve of the repaired wheel.

- Reconnect the compressor power plug to the vehicle's 12 V socket.
- Start the vehicle again and let the engine run.
- Go to a CITROËN dealer or a qualified workshop as soon as possible.
You must inform the technician that you have used this kit. After diagnosis, the technician will tell you whether the tyre can be repaired or must be replaced.
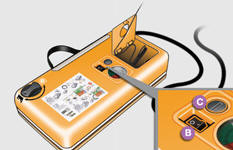
- Adjust the pressure using the compressor (to inflate: switch B to “I”; to deflate: switch B to “O” and press button C), in accordance with the tyre pressure label on the vehicle, located on the driver's door.
A significant loss of pressure indicates that the leak is not properly sealed; contact a CITROËN dealer or a qualified workshop to have your vehicle recovered.
- Remove the kit, then store it.
- Drive at reduced speed (maximum 80 km/h) and limit the distance travelled to approximately 200 km.
Removing the cartridge
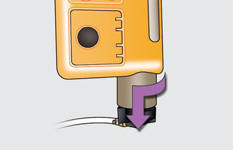
- Store the black hose.
- Release the angled base of the white hose.
- Hold the compressor vertically.
- Unscrew the cartridge from the bottom.
Take care with fluid leakage.
The expiry date of the fluid is printed on the cartridge. The fluid cartridge is single-use; even if partly used, it must be replaced. After use, do not dispose of the cartridge in the environment; return it to a CITROËN dealer or to an organisation responsible for its collection.Remember to restock with a new cartridge, available from a CITROËN dealer or a qualified workshop.
Pressure check / Occasional inflation
You can also use the compressor, without product injection, to: - check or occasionally inflate your tyres, - inflate other accessories (balls, bicycle tyres...).
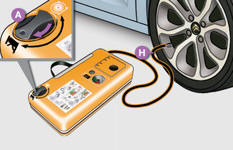
- Turn selector A to the “Inflation” position.

- Fully unroll black hose H.
- Connect the black hose to the valve of the wheel or accessory.
If necessary, first fit one of the adapters supplied with the kit.
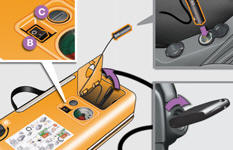
- Connect the compressor power plug to the vehicle's 12 V socket.
- Start the vehicle and let the engine run.
- Adjust the pressure using the compressor (to inflate: switch B to position “I”; to deflate: switch B to position “O” and press button C), in accordance with the tyre pressure label of the vehicle or accessory.
- Remove the kit, then store it.
Test yourself
A quick Citroen C1 quiz: every answer comes with an explanation and a link to the manual page.