Replacing a bulb
- do not clean them with a dry or abrasive cloth, nor with a detergent or solvent product,
- use a sponge and soapy water,
- when using high-pressure washing on stubborn dirt, do not concentrate on the light units, the lights and their surrounds, to avoid damaging their coating and sealing gasket.
- Do not touch the bulb directly with your fingers, use lint-free cloths.
Replace a bulb only when the light unit has been switched off for several minutes (risk of serious burns).
It is essential to use only anti-ultraviolet (UV) type bulbs, so as not to damage the light unit.
Always replace a faulty bulb with a new bulb having the same part number and specifications. Front lights Model with xenon headlights (D1S)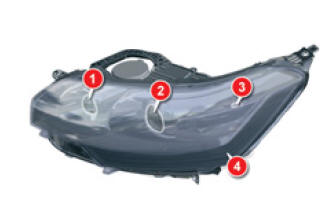
Model with xenon headlights (D1S)
- Position lights:
W5W
- Bi-function xenon lights (dipped/main beam)
: D1S
- Cornering lights:
HP19
- Daytime running lights:
HP24
For servicing the front light units and replacing HP19, D1S and HP21 bulbs, consult the CITROËN network.
Risk of electric shockXenon bulb replacement must be carried out by the CITROËN network.
It is recommended to replace the D1S bulbs at the same time if one of them fails.
Replacing the position lights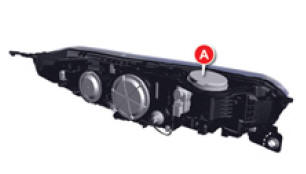
Replacing the position lights
- Remove protective cap A.
- Pull on the bulb holder to remove it.
- Replace the bulb and refit the bulb holder.
- Refit protective cap A.
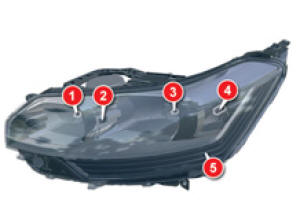
Model with halogen headlights
- High beam: H1
- Position lights: W5W
- Dipped beam: H7
- Cornering lights: H7
- Daytime running lights: HP24
For servicing the front light units and replacing HP24 bulbs, consult the CITROËN network.
Replacing the main-beam bulbs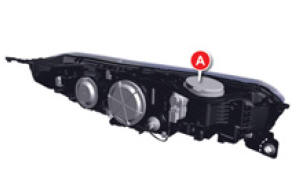
Replacing the main-beam bulbs
- Remove protective cap A.
- Release the retaining spring.
- Release the retaining spring.
- Refit the retaining spring.
- Refit protective cap A.
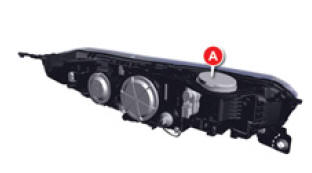
Replacing the position lights
- Remove protective cap A.
- Pull on the bulb holder to remove it.
- Replace the bulb and refit the bulb holder.
- Refit protective cap A.
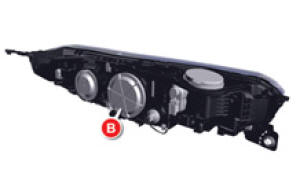
Replacing the dipped-beam bulbs
- Remove protective cap B.
- Disconnect the connector by pressing it between thumb and index finger.
- Release the bulb from its two metal clips.
- Remove the bulb.
- Insert the new bulb applying light axial pressure.
- Reconnect the connector until it clicks fully into place.
- Refit protective cap B.
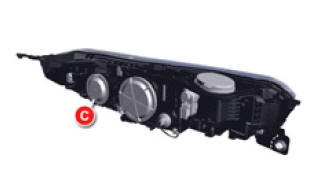
Replacing the cornering light
- Remove protective cap C.
- Disconnect the connector by pressing it between thumb and index finger.
- Release the bulb from its two metal clips.
- Remove the bulb.
- Insert the new bulb applying light axial pressure.
- Reconnect the connector until it clicks fully into place.
- Refit protective cap C.
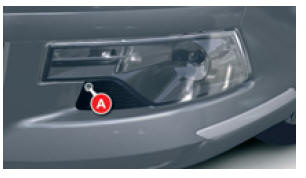
Changing the direction indicators
- Remove the fixing screw of cover A using a Torx tool, tilt the cover, then remove it.
- Remove the fixing screw of cover A using a Torx tool, tilt the cover, then remove it.
- Unclip bulb C by pressing tabs 1 and 2.
- Disconnect the connector (pull while pressing the grey tab using a flat-blade screwdriver).
- Replace the bulb.
- Connect the connector (push the grey tab in fully).
- Refit the light unit into the bumper.
- Tighten the light unit screw.
- Position the cover using its guides and tighten the screw.
HP24W
Changing the fog lights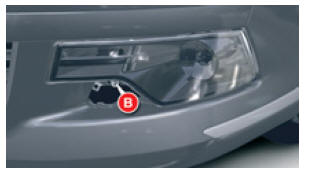
Changing the fog lights
- Remove the fixing screw of cover A using a Torx tool, tilt the cover, then remove it.
- Remove the fixing screw of light B using a Torx tool, and pull the light unit out of the bumper.
- Disconnect connector D.
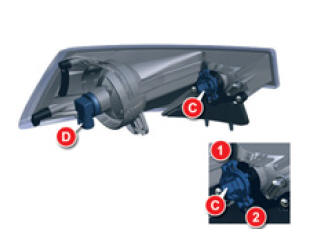
- Remove the bulb by turning it a quarter turn.
- Replace the bulb.
- Connect connector D.
- Refit the light unit into the bumper.
- Tighten the light unit screw.
- Position the cover using its guides and tighten the screw.
H8
Changing the side indicator repeaters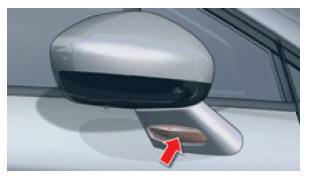
Changing the side indicator repeaters
The turn signal repeater is sealed.
If the bulb is faulty, replace the turn signal repeater.
Consult a CITROËN dealer.
When refitting, take care not to pinch the electrical wiring.
Rear lights (Saloon)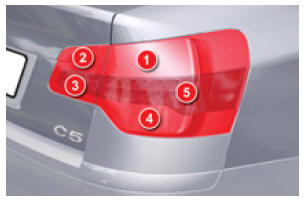
Rear lights (Saloon)
Identify the faulty bulb.
- Brake and position lights: P 21 W / 5 W
- Position lights: R 5 W
- Reversing light: H 21 W
- Fog lights: H 21 W
- Turn signals: P 21 W

Changing the boot lights
- Open the luggage compartment.
- Using a flat-blade screwdriver, remove the 3 clips securing the trim in the light area.
- Partially release trim F .
- Disconnect connector G .
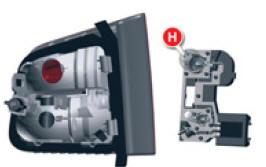
- Unclip the bulb holder H .
- Replace the bulb.
- Refit the bulb holder H .
- Reconnect connector G .
- Reconnect connector G .
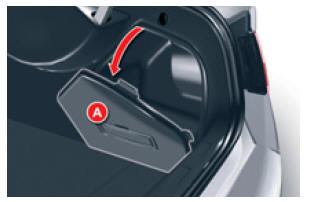
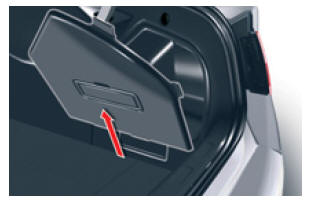
- Release the luggage compartment side trim cover A. To do so, pull it towards the inside of the luggage compartment, then pull it upwards.
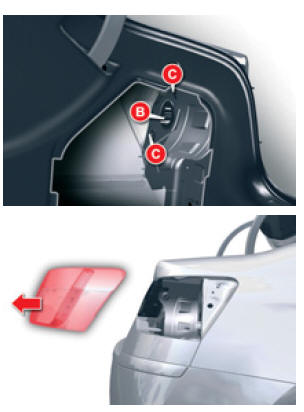
- Disconnect connector B .
- Unscrew the 2 fixings C .
- Release the light from its housing.
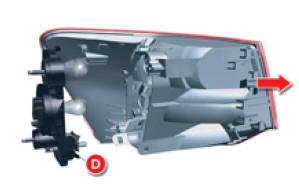
- Unclip the bulb holder D .
- Replace the bulb.
- Refit the bulb holder D .
- Position the light in its housing.
- Tighten the 2 fixings C .
- Reconnect connector B .
- Refit the trim A .
You can use the spare wheel crank to tighten or loosen fixings C .
Rear lights (Tourer)
Rear lights (Tourer)
Identify the faulty bulb.
- Brake and position lights: P 21 W / 5 W
- Position lights: R 5 W
- Reversing light: H 21 W
- Fog lights: H 21 W
- Turn signals: P 21 W

Changing the boot lights
- Open the luggage compartment.
- Using a flat-blade screwdriver, remove the 3 clips securing the trim in the light area.
- Partially release trim F .
- Disconnect connector G .
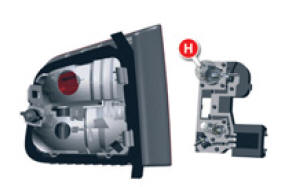
- Unclip the bulb holder H .
- Replace the bulb.
- Refit the bulb holder H .
- Reconnect connector G .
- Refit and secure trim F with its clips.

Changing the wing lights
Release the luggage compartment side trim cover A .
To do so:
- Pull towards the inside of the luggage compartment.
- Pull upwards.
- Disconnect connector B .
- Unscrew fixing screw C .
- Release the light from its housing.

- Unclip the bulb holder D .
- Replace the faulty bulb.
- Refit the bulb holder D .
- Position the light in its housing.
- Tighten fixing screw C .
- Reconnect connector B .
- Refit the trim A .
You can use the spare wheel crank to tighten or loosen fixing screw C .
Changing the number plate lights (W5W)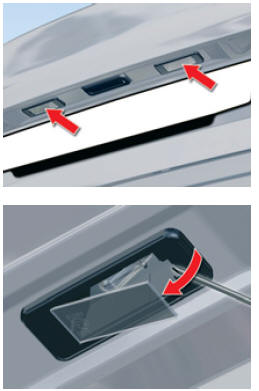
Changing the number plate lights
- Insert a thin screwdriver into one of the outer holes of the lens.
- Push it outwards to unclip it.
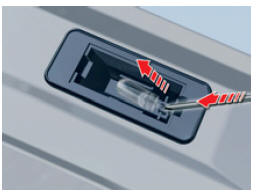
- Remove the lens.
- Replace the faulty bulb.

Changing the third brake light (LEDs)
To replace this type of LED light, consult the CITROËN dealer network.
Changing the interior lights
Changing the interior lights Ceiling lights
- Unclip the dome light cover to access the bulb.
- Unclip the cover.
- If necessary, unclip the partition of the relevant spotlight.
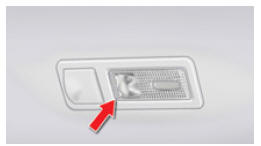
Rear reading lights (Tourer)
- Unclip the reading light cover to access the bulb.

Boot light
- Unclip the cover and use a W 5W bulb.
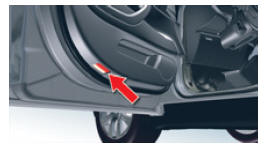
Door entry light
- Unclip the cover and use a W 5W bulb.
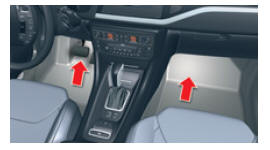
Floor light
- Unclip the cover and use a W 5W bulb.

Glove box
- Unclip the cover and use a W 5W bulb.
Test yourself
A quick Citroen C5 quiz: every answer comes with an explanation and a link to the manual page.