Wheel change
The wheel change on the Citroën C6 (1st generation) is well organised, from access to the spare wheel to reuse of the original wheel. The tools are stored in the luggage compartment and include everything needed: jack, centring guide, towing eye and special tools. The instructions show exactly how to secure the vehicle, which steps are required when loosening and tightening the bolts, and which hazards can arise from incorrect handling. Special notes apply to vehicles with a tyre pressure monitoring system, which must be serviced by a qualified workshop. A well-designed chapter for safe handling in the event of a breakdown.
Access to the spare wheel
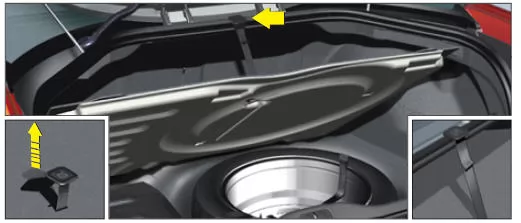
To access the spare wheel
- Lift the luggage compartment floor using the retaining strap.
- Hook the retaining strap onto the upper part of the luggage compartment.
- To remove the spare wheel, release the strap, push the spare wheel forwards and then lift it out.
Refitting the wheel
To refit the spare wheel in the luggage compartment
- Lay the spare wheel flat in the luggage compartment, then slide it forward.
- Then place the tool box in the wheel and secure everything with the strap.
- Release the retaining strap to return the luggage compartment floor to its original position.
Tire inflation pressure
The tyre inflation pressure is shown on the sticker on the A-pillar. See "Identification" and "Operating notes". (This sticker lists an inflation pressure for normal speeds and an inflation pressure for high speeds.)
Tools
The tools are stored in a protective case in the spare wheel.
Remove the strap to access the tools.
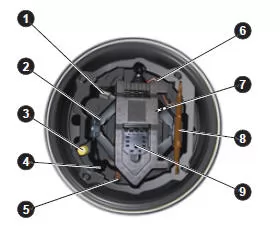
- Jack handle
- Jack
- Tool for removing/fitting bolts
- Tool for removing the cover of the anti-theft wheel bolt
- Centring guide
- Tool for removing the rear fog lamp and reversing lamp
- Jack handle extension
- Towing eye
- Folding wheel chock
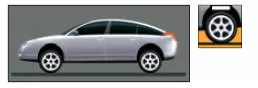
Removal
- Park the vehicle on level, firm ground.
Apply the parking brake.
- Make sure all occupants have got out and are in a safe area.
- With the engine idling, set ground clearance to maximum. See "On board" and "Ground clearance adjustment".
Switch off the ignition and engage first gear or reverse gear depending on the gradient (on vehicles with automatic transmission, select P).
- Place the wheel chock at the wheel diagonally opposite the wheel to be changed.
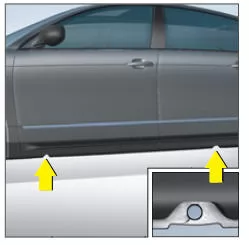
- Position the jack at one of the four jacking points on the sill near the wheel. Use the jack handle to extend it until it rests on the ground.
- Insert tool 4 into the notch and lever off the cover of the anti-theft wheel bolt. See illustration. The handle can be fitted to the end of tool 4.
- Loosen the wheel bolts.
- Continue raising the jack until the wheel is a few centimetres off the ground.
- Unscrew the bolts and remove the wheel.
Before fitting the jack, set the suspension height to "maximum height" and keep it there for as long as the jack is under the vehicle (do not use the hydraulic settings any more).
Never get under a vehicle that is supported only by the jack.
The jack and tools are specifically designed for your vehicle. Do not use them for other purposes.
Refit the repaired original wheel as soon as possible.
When using a spare wheel, do not exceed 80 km/h.
Emergency wheel
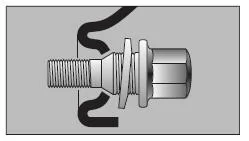
If the vehicle is fitted with an emergency wheel, it is normal to find that the washers of the wheel bolts do not sit on the rim when this wheel is fitted.
The spare wheel is held by the conical seat of the wheel bolt. See illustration.
When refitting the original wheel, make sure the wheel bolt washers are clean and in good condition.
Refitting a wheel
- Place the wheel on the hub using the centring guide. Make sure the surfaces of the hub and wheel are clean.
- Insert the bolts until they contact the rim, but do not tighten them fully yet.
- Lower the jack and remove it.
- Tighten the wheel bolts with the wheel brace.
- Refit the cover.
- Set ground clearance back to the normal position.
WHEEL WITH TYRE PRESSURE SENSOR
These wheels are fitted with a tyre pressure sensor. Have them repaired by a CITROËN dealer or a qualified workshop.
Anti-theft wheel bolt
Each wheel is fitted with an anti-theft wheel bolt.
To remove this bolt
- Remove the cover using tool 4 "Anti-theft bolt cover removal tool".
- Use the centring guide and the jack handle.
When using a spare wheel, do not exceed 80 km/h.
The wheel bolts are specifically matched to the wheel type.
When changing wheels, check with a CITROËN dealer or a qualified workshop that the bolts are suitable for the new wheels.
Note: Record the code stamped on the wheel brace. This code can be used to order a second key.
Changing a wheel on the Citroën C6 1st generation is easy and safe thanks to its well-thought-out design and cleverly integrated tools. The Citroën C6 2005–2012 supports the driver with clear instructions for changing a wheel safely, even on the road.
Special features such as the centring guide, the anti-theft wheel bolts and the ground clearance adjustment show the high technical standard of the Citroën C6 1st generation. This keeps the vehicle easy to handle even in an emergency.
These solutions make the Citroën C6 2005-2012 an ideal companion for any situation that calls for flexibility and safety.
Test yourself
A quick Citroen C6 quiz: every answer comes with an explanation and a link to the manual page.