Tripod Type Inner Joint Boot
Remove or disconnect
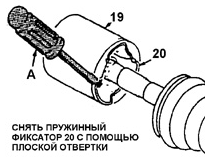
Removing the Tripod Type CV Joint Snap Retainer. A. FLAT-BLADE SCREWDRIVER.
19. CV JOINT HOUSING.
20. SNAP RETAINER
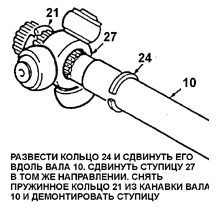
Removing the CV Joint Hub
10. SHAFT
21. CIRCLIP
24. CIRCLIP
27. TRIPOD HUB
PROCEDURE.
1. Using side cutters, remove clamps 7 and 9 securing the protective boot
25..
Discard the clamps..
2. Disconnect boot 25 from joint housing 19 and slide the boot along shaft 10, fully exposing the joint..
3. Wipe excess grease from tripod hub 27 and from inside the housing
19..
4. Use a screwdriver to remove snap retainer 20 as shown in the illustration.
Tripod type CV joint snap retainer removal..
5. Slide housing 19 relative to hub 27 and shaft
10..
6. Spread snap ring 24 and slide it along the shaft.
10. Slide hub 27 in the same direction, see illustration. Removal of CV joint hub..
Warning.
Handle the CV joint hub carefully. Spherical rollers and..
needle bearings may come off the hub journals and fall out..
7. Remove boot 25 and spring retainer from the shaft.
10..
8. Clean the cavity of housing 19 of grease..
Install or connect
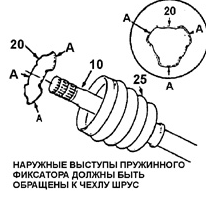
Correct position of spring retainer during installation A. OUTER PROJECTIONS
10. SHAFT
20. SPRING RETAINER
25. BOOT
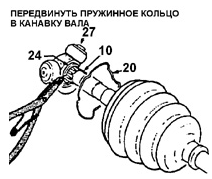
Installation of CV joint hub
10. SHAFT
20. SPRING RETAINER
24. CIRCLIP
27. TRIPOD HUB
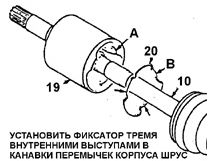
Installation of tripod type CV joint spring retainer A. SPRING RETAINER INSTALLATION GROOVES.
B. INTERNAL RETAINER PROJECTIONS.
10. SHAFT
19. TRIPOD TYPE CV JOINT HOUSING.
20. SNAP RETAINER
PROCEDURE.
1. Small clamp 9 onto the boot neck
25. Do not tighten the clamp..
2. Install boot 25 onto shaft 10 and slide it into position so that the small neck of the boot
is positioned over the shaft groove..
3. Tighten clamp 9 using clamp tool KM-J-
22610..
4. Slide spring retainer onto shaft 10.
20..
Warning.
Check correct position of spring retainer 20, outer projections.
must face the shaft
10..
5. Install hub onto shaft and push it until it contacts the snap ring..
Warning.
Make sure that after installation hub 27 faces the end of shaft 10.
machined end..
6. Install snap ring 21 into the groove of shaft 10 using snap ring pliers.
7. Slide hub 27 onto the end of shaft 10 and install it into the mounting groove.
snap ring
24..
8. Place approximately half of the total joint grease quantity into boot 25..
Fill housing 19 of the joint with the remaining grease.
9. Place large clamp 7 onto the boot neck.
25..
10. Slide housing 19 onto the hub assembly with spherical rollers,.
installed on shaft 10, and insert spring retainer 20 into the grooves of housing 19.
11. Install the larger diameter neck of boot 25 into the mounting groove on the housing.
19..
Warning.
Boot 25 must not be twisted or have folds..
12. Clamp 7 onto the boot neck.
25. Tighten clamp using clamp tool KM-J-22610.
Test yourself
A quick Daewoo Nexia quiz: every answer comes with an explanation and a link to the manual page.