Stabilizer
GENERAL INFORMATION
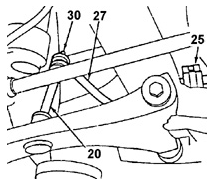
Stabilizer mount
20. Spacer sleeve.
25. Clamp.
27. Stabilizer bar.
30. NUT
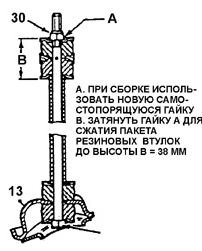
Stabilizer strut
8. Bolt.
13. Lower arm.
30. NUT
Remove or disconnect:
PROCEDURE.
1. Loosen the front wheel mounting bolts.
2. Raise the vehicle and support the front wheels.
3. Remove the front wheels.
4. Remove nut 30, then remove parts 29 and 28 of the stabilizer attachment to the lower arm.
13..
5. Remove clamp 25 and bushing.
26..
6. Remove the stabilizer.
27..
Installation
PROCEDURE.
1. Stabilizer 27, bushing 26 and clamp
25..
2. Install bolts 24 without fully tightening them, and align the position of the
stabilizer. Tighten bolts 24 with the suspension in the static position.
3. Install stabilizer 27 to the lower arm.
13. When installing, use a new
self-locking nut.
30. Tighten nut 30 to compress the rubber bushing stack to height B (see Stabilizer Strut figure).
4. Front wheels.
5. Tighten bolts 24 of the stabilizer attachment to the body to a torque of 40 N·m.
6. Tighten nuts 30 of the stabilizer attachment to the lower arm to compress the rubber bushing stack to height B (see Stabilizer Strut figure).
7. Lower the vehicle.
8. Tighten the wheel mounting bolts to a torque of 90 N·m.
Test yourself
A quick Daewoo Nexia quiz: every answer comes with an explanation and a link to the manual page.