Rear Suspension Pivot Bushings
GENERAL INFORMATION

Installation and removal of bushing from rear suspension arm eye. A. CUT GROOVES WITH A HACKSAW FOR THE WASHER DC4500 PROJECTIONS.
B. DURING INSTALLATION, ALIGN THE ARROWS ON TOOLS J29376-1 AND HJ29376-11.
INSTALLATION FIXTURE WITH THE MARK ON THE END OF THE ARM EYE.
C. REAR SUSPENSION ARM EYE.
22. REAR SUSPENSION ARM BUSHING.
26. REAR SUSPENSION ARM
Remove or disconnect:
Always replace both bushings whenever the parts are disassembled.
PROCEDURE.
1. Raise the vehicle and secure it properly.
2. Raise one of the suspension arms with a hydraulic jack and a suitable support.
Remove bolt 8 and nut
9..
3. Position the hydraulic jack under the second arm and remove the mounting.
shock absorber
7..
4. Slightly lower the hydraulic jack and remove spring 28 and the upper rubber ring.
29..
5. Slightly raise the arm with the hydraulic jack and reattach shock absorber 7 to crossmember 26 with the bolt.
8..
6. Perform steps 3, 4 and 5 on the other side of the vehicle. Position the hydraulic jack in the center under suspension crossmember 26.
7. Brake line brackets on the underbody. Place the brake hoses and parking brake cables in the recess of the underbody.
8. Remove bolt 23 and nut 21 from the underbody bracket. If necessary, use a screwdriver as a lever to press the bushing eye.
9. Lower rear suspension crossmember 26 slightly and secure bracket 23 from kit KM-158 to the rear suspension pivot bracket with bolt 23. To ease bushing removal, heat the arm eyes to 50–75 °C using hot air from the pneumatic line.
10. To remove the bushing from the arm eye, perform the following steps.
10a. Install fixture KM-158 on the arm eye with the bushing.
22..
10b. Install the washer with end projections onto the bolt included in installation kit KM-158.
Insert the bolt into the bushing bore, then install the thrust washer onto it. 10c. Press the puller washer against the end of bushing 22 and thread the nut onto the bolt.
Warning.
Saw two grooves in the end of the old bushing 22 to accommodate the washer projections.
puller.
10d. Turning the KM-158 tool bolt, press the bushing out of the arm eye. Install or connect
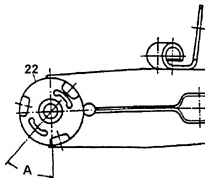
Bushing installation orientation A. ANGLE 45±.
22. REAR SUSPENSION ARM BUSHING
PROCEDURE.
1. To install the bushing in the arm eye, perform the following operations.
1a. Install KM-158 tool on the suspension arm.
1b. Prepare and partially assemble installation tool KM-
158..
1c. Install new bushing 22 on the bolt, first inserting it into the eye bore. Turn the bushing to the position shown in the figure. Bushing installation orientation.
position relative to the arm eye. Align the arrows on the parts.
158 in accordance with the end mark, see figure. Installation and
removal of the bushing from the rear suspension arm eye.
1d. Thread the nut onto the KM-158 tool bolt.
158..
1e. Turning the KM-158 tool bolt, press the bushing into the arm eye. When
installed correctly, the rear end face of the bushing must be flush with the
arm eye.
2. Remove the KM-158 yoke from the suspension bracket and install it on the opposite side of the vehicle.
3. Remove the old bushing and press the new bushing into the second suspension arm, performing the same procedure.
4. Raise the rear axle beam using a hydraulic jack and
connect the arm eyes to the suspension brackets with bolts
23. Install the nuts
21. Lower the jack.
5. Install the lower spring seat 27 on the arm, and the upper rubber ring 29 into the body
spring seat, and install the spring.
28..
6. Using a hydraulic jack, raise the suspension arm and connect the lower shock absorber eye to the arm.
7. Lower the jack, install spring 28 and shock absorber 7 on the opposite side of the vehicle, performing the same procedure. Lower
the vehicle.
7. Tighten the rear axle beam mounting bolts with the arms in the position
corresponding to the static suspension position at curb weight.
Test yourself
A quick Daewoo Nexia quiz: every answer comes with an explanation and a link to the manual page.