Weber 2V carburettor automatic choke unit - adjustment
3 Unscrew and remove the three screws which hold the automatic choke housing cover in position (see illustration). Withdraw the cover and bi-metal coil, followed by the internal heat shield.
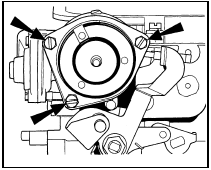
14.3 Weber 2V carburettor automatic choke housing cover screw locations - XR3 models
4 The choke plate vacuum pull-down should now be adjusted. To do this, fit a rubber band to the choke plate lever, open the throttle to allow the choke plates to close and then secure the band to keep the plates closed (see illustration).
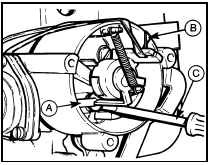
14.4 Weber 2V carburettor vacuum pulldown check - XR3 models
A Diaphragm connecting push-rod B Rubber band holding choke plates closed C Screwdriver
5 Using a screwdriver, push the diaphragm open to its stop and measure the clearance between the lower edge of the primary choke plate and the air horn using a twist drill or other gauge rod. Where the clearance is outside that specified, remove the plug from the diaphragm housing and turn the screw, now exposed, in or out as necessary (see illustration).
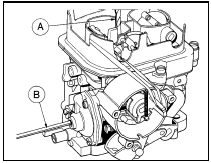
14.5 Weber 2V carburettor vacuum pulldown adjustment - XR3 models
A Twist drill
B Adjusting the pull-down setting
7 The choke phasing must now be checked and adjusted. Hold the throttle partially open and set the fast idle cam so that the fast idle screw is located on the centre step of the cam. Release the throttle so that the cam is held in this position (see illustration).
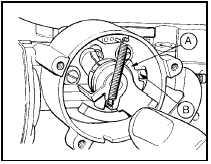
14.7 Weber 2V carburettor choke phasing check - XR3 models
A Fast idle cam
B Fast idle adjustment screw positioned on centre step of cam
9 Where necessary, bend the tag to adjust the clearance (see illustration).
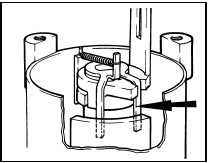
14.9 Weber 2V carburettor choke phasing adjustment - XR3 models
Bend tag (arrowed) to achieve specified clearance
10 Refit the heat shield, making sure that the locating peg is correctly engaged in the notch in the housing (see illustration).

14.10 Weber 2V carburettor heat shield reassembly - XR3 models
A Heat shield
B Locating peg engaged with housing notch
12 Screw in the retaining screws finger tight and then rotate the cover to set the cover mark opposite the centre index line (see illustration).
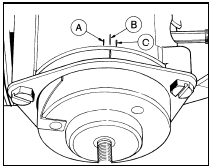
14.12 Weber 2V carburettor choke housing alignment marks - XR3 models
A Rich position
B Index mark
C Weak position
18 Fit a rubber band to the choke plate lever, open the throttle to allow the choke plate to close, and then secure the band to keep the plate closed (see illustration).
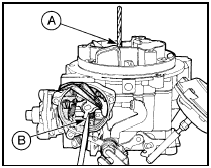
14.18 Weber 2V carburettor vacuum pulldown adjustment - 1.6 litre models
A Twist drill
B Diaphragm pushed fully open with rubber band holding choke plate closed
25 Check and if necessary top-up the cooling system as described in Chapter 1.
Test yourself
A quick Ford Escort quiz: every answer comes with an explanation and a link to the manual page.