Fuel Rail - Removal and Installation
Special Service Tools / General Equipment
 |
303-1567 Size, Teflon Seal TKIT-2010C-FLM |
 |
307-005 (T59L-100-B) Slide Hammer |
 |
310-205 Fuel Injector Brush |
 |
310-206 Puller, Fuel Injector TKIT-2009A-FLM |
 |
310-207 Installer, Fuel Injector Seal Assembly TKIT-2009A-FLM |
Materials
| Name | Specification |
|---|---|
| Engine Oil — SAE 5W-20 — Semi-Synthetic Engine Oil XO-5W20-Q1SP |
WSS-M2C945-B1 |
Removal
- Relieve the fuel system pressure.
Refer to: Fuel System Pressure Relief (310-00B Fuel System – General Information) – 1.6 L EcoBoost (132 kW/180 L hp) – Sigma, General Procedures). - Disconnect the battery.
Refer to: Battery Disconnect and Connect (414-01 Battery, Mounting and Cables, General Procedures). - Remove the ignition coil from the spark plugs.
Refer to: Ignition Coil-On-Plug (303-07B Engine Ignition System - 1.6 L EcoBoost (132 kW/180 L PS) - Sigma, Removal and Installation). - Remove the air cleaner outlet tube.
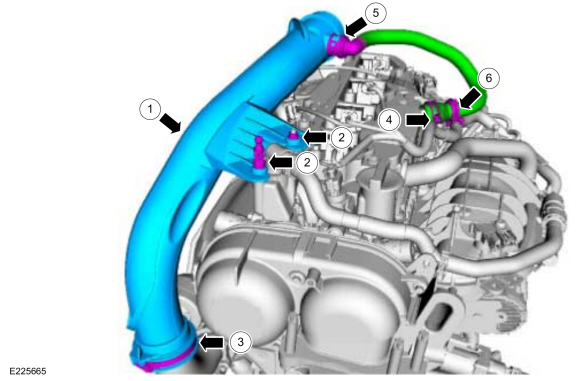
Refer to: Air Cleaner Outlet Tube (303-12B Intake Air Distribution and Filtration – 1.6 L EcoBoost (132 kW/180 L hp) – Sigma, Removal and Installation). - Quickly disconnect the positive crankcase ventilation (PCV) tube. Release the quick-release coupling. Release the hose retainer, loosen the clamp, and then remove the PCV tube.
Refer to: Quick-Release Coupling (310-00B Fuel System - General Information. Information - 1.6 L EcoBoost (132 kW/180 L PS) - Sigma, General Procedures).
- Remove the TC intake air duct lock nut, ball stud, and loosen the TC intake tube clamp, then remove the TC intake tube.
Torque: 44 lb-in (5 N·m)
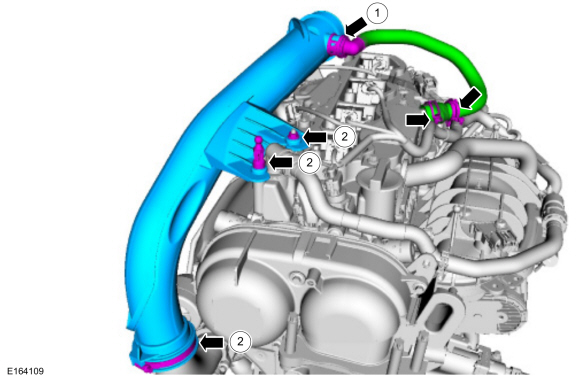
- Quickly disconnect the positive crankcase ventilation (PCV) tube. Release the quick-release coupling. Release the hose retainer, loosen the clamp, and then remove the PCV tube.
- Remove the high-pressure fuel pump heat shield.
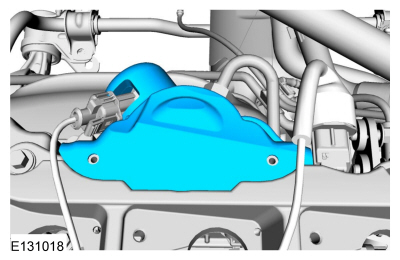
- Release the wiring harness retainers. Disconnect the FRP sensor electrical connector, the high-pressure fuel pump electrical connector, and the CMP electrical connector. Set the wiring harness aside.
- Remove the ignition coil-on-plug mounting bracket lock nut. Loosen the captive remaining ignition coil-on-plug mounting bracket retainers, then remove the ignition coil-on-plug mounting bracket.
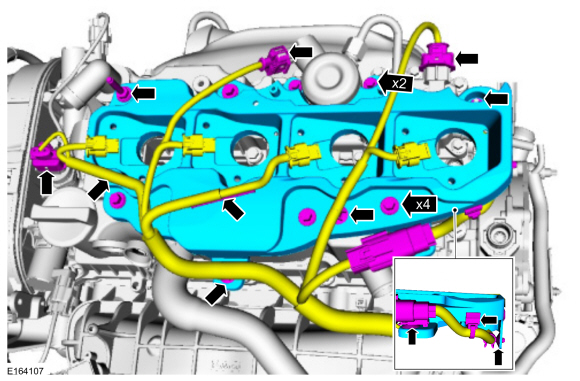
- Remove the ignition coil-on-plug mounting bracket insulator.
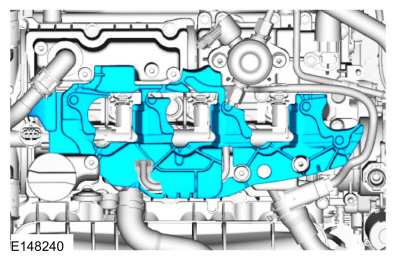
NOTICE: To release the fuel pressure in the high-pressure fuel system, wrap the high-pressure fuel pump fuel line nut with a shop towel to absorb any residual fuel pressure while loosening the fuel pump nut.
Disconnect the high-pressure fuel tube flare nuts. Remove and discard the high-pressure fuel tube.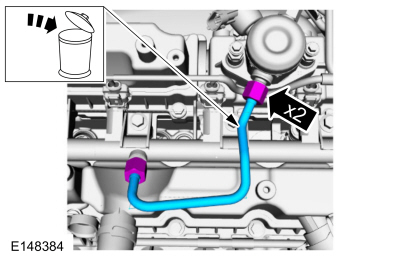
- Disconnect the fuel injector electrical connectors.
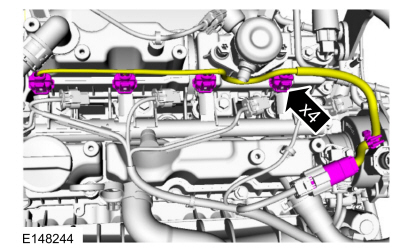
NOTICE: Pull the fuel rails straight off along the injector axis, otherwise the fuel injectors may be damaged.
Remove the fuel rail bolts, then remove the fuel rail.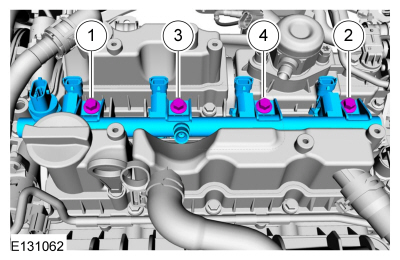
- Remove the fuel injectors from the fuel rail.
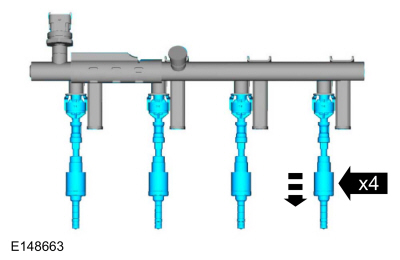
- Remove and discard the fuel injector clips.
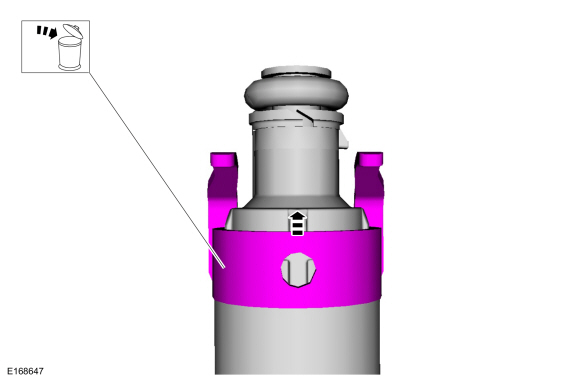
NOTICE: Use minimum force to remove fuel injectors that remain in the cylinder head with the Fuel Injector Remover tool, or damage to the fuel injector assembly may occur. Rocking the injector by hand to disconnect it may remove the injector manually.
- Using the special tools, remove all fuel injectors remaining in the cylinder head.
Use Special Service Tools: 307-005 (T59L-100-B) Slide Hammer, 310-206 Fuel Injector Remover.
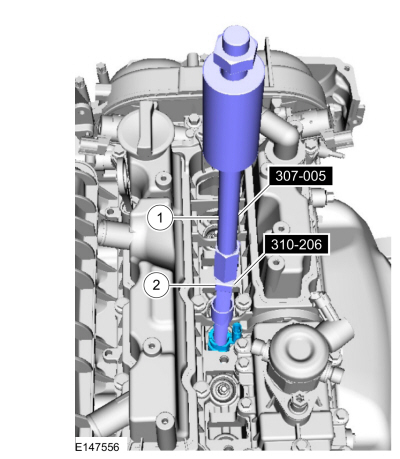
- Using the special tools, remove all fuel injectors remaining in the cylinder head.
- Using the special tool, clean the cylinder head fuel injector bores.
Use Special Service Tool: 310-205 Fuel Injector Brush.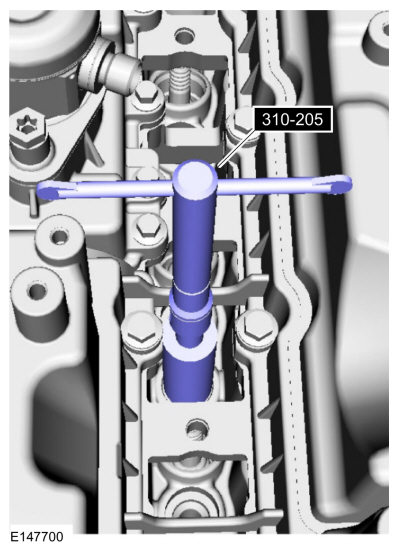
Installation
- Remove and discard the fuel injector O-rings. Remove and discard the fuel injector backup rings.
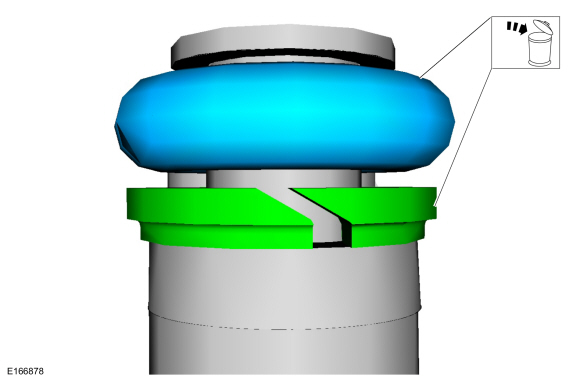
NOTICE: Use care when removing the lower Teflon® seals to avoid scratching, nicking or gouging the fuel injectors.
NOTICE: Do not attempt to cut the lower Teflon® seal without first pulling it away from the fuel injector, otherwise damage to the injector may occur.
- Pull the lower Teflon seal away from the injector.
- Carefully cut and discard the lower fuel injector Teflon seals.
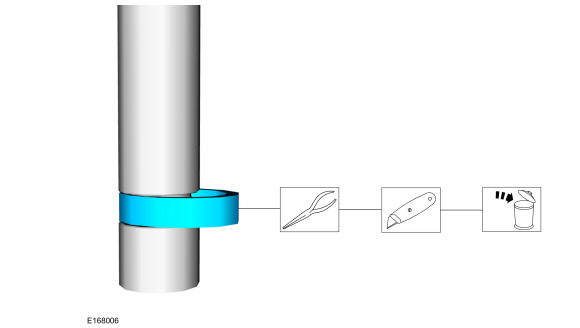
NOTICE: Do not lubricate the new lower Teflon® fuel injector seals.
- Install the mandrel onto the fuel injector tips.
Use Special Service Tool: 310-207 Installer, Fuel Injector Seal Assembly.
NOTICE: After installing the Teflon® seal on the Teflon® seal guide, install it on the fuel injector immediately to prevent excessive expansion of the Teflon® seal.
Install the new Teflon® seals onto the mandrel, using the pusher to slide the Teflon® seals along the mandrel.
- Using the pusher, slide the Teflon® seals along the Teflon® seal guide and into the groove on the fuel injectors.
Use Special Service Tool: 310-207 Installer, Fuel Injector Seal Assembly.
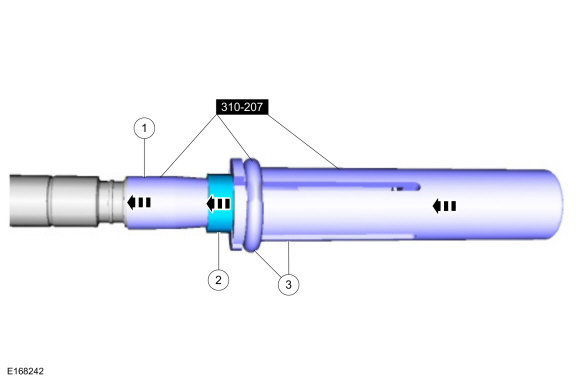
- Install the mandrel onto the fuel injector tips.
- Massage and warm the Teflon® seal with your fingers before installing the Teflon® seal sizing tool. This will help in installing the Teflon® seal sizing tool.
- Position the Teflon® seal sizing tool with the large opening facing the Teflon® seal. Press and turn the Teflon® seal sizing tool 180 degrees.
Use special service tool: 303-1567 Teflon® Seal Sizer.
- After installing the Teflon® seal sizing tool, check and make sure the Teflon® seal is in the sizing portion of the Teflon® seal sizing tool.
- After one minute, rotate the Teflon® seal sizing tool back 180 degrees and remove the Teflon® seal sizing tool.
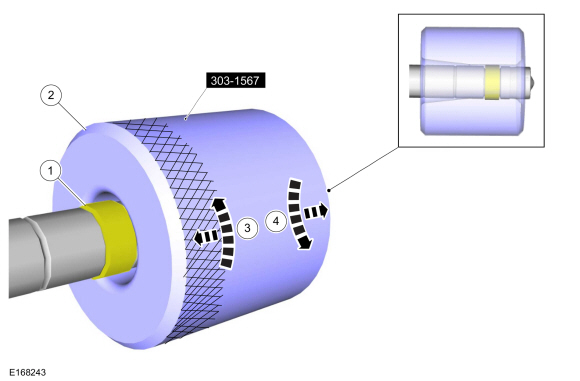
NOTICE: Use fuel injector O-rings made of special fuel-resistant material. Use of standard O-rings may cause a fuel system leak. Do not reuse the O-rings.
NOTICE: Do not lubricate the new lower Teflon® fuel injector seals.
NOTICE: The new fuel injector support rings must be installed with the wide side facing toward the fuel injector sealing rings. Incorrectly installed support rings may cause fuel system leaks.
- Install the new fuel injector support rings.
- Install the new fuel injector O-rings and lubricate them with clean engine oil.
Material: Engine Oil - SAE 5W-20 - Synthetic Engine Oil / XO-5W20-Q1SP (WSS-M2C945-B1)
- Install the new fuel injector clips.
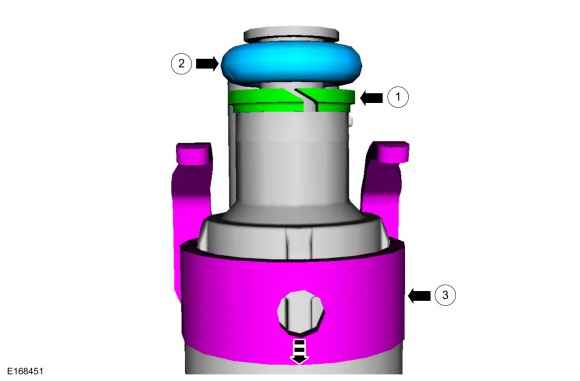
NOTICE: The FRP sensor must be replaced if it has been removed from the fuel rail.
Install the fuel injectors onto the fuel rail.
Refer to: Fuel Rail Pressure (FRP) Sensor (303-14B Electronic Engine Controls - 1.6 L EcoBoost (132 kW/180 L PS) - Sigma, Removal and Installation).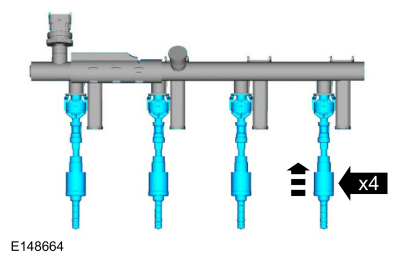
NOTICE: Do not lubricate the new lower Teflon® fuel injector seals.
Install the fuel rail, press the fuel rail down onto the fuel injectors. Install and tighten the fuel rail bolts in the following 2 stages and in the sequence shown.
Torque:
Stage 1: 44 lb-in (5 N·m)
Stage 2: 17 lb-ft (23 N·m)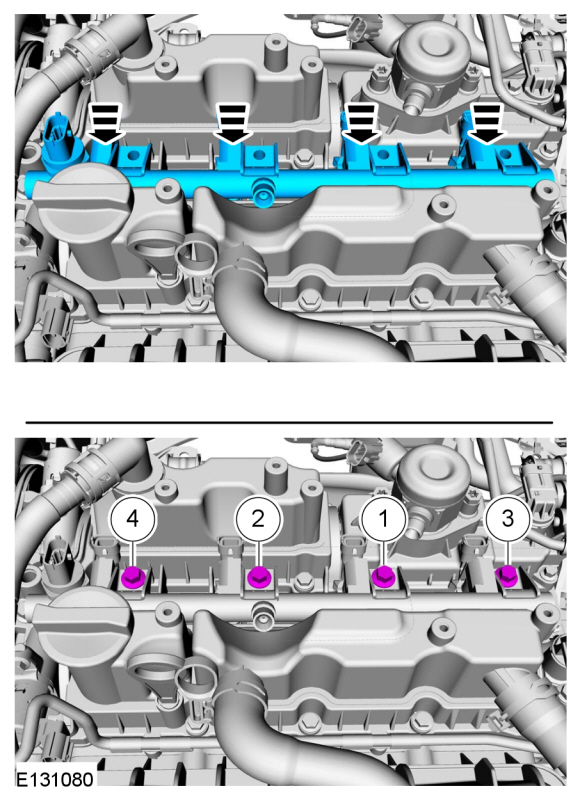
- Connect the fuel injector electrical connectors.
- Make sure a new high-pressure fuel tube is installed. Calculate the correct torque wrench setting for the following torque using the torque wrench adapter formulas. Install a new high-pressure fuel tube, then tighten the high-pressure fuel tube flare nuts in the following 3 steps.
Torque:
Step 1: 15 lb-ft (21 N·m)
Step 2: Wait 5 minutes
Step 3: 15 lb-ft (21 N·m)
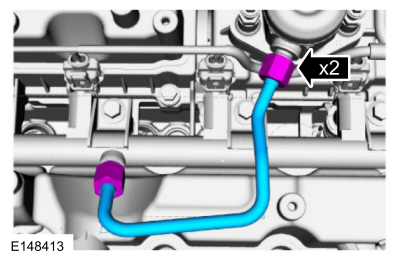
- Make sure a new high-pressure fuel tube is installed. Calculate the correct torque wrench setting for the following torque using the torque wrench adapter formulas. Install a new high-pressure fuel tube, then tighten the high-pressure fuel tube flare nuts in the following 3 steps.
- Install the ignition coil-on-plug mounting bracket insulator.
- Install the ignition coil bracket to the spark plug, then install and tighten the ignition coil bracket to the spark plug bolts.
Torque: 89 lb-in (10 N·m)
- Install and tighten the ignition coil bracket to spark plug fasteners.
Torque: 53 lb-in (6 N·m)
- Install the wiring harness, then attach the wiring harness retainers. Connect the FRP sensor electrical connector, the high-pressure fuel pump electrical connector, and the CMP electrical connector.
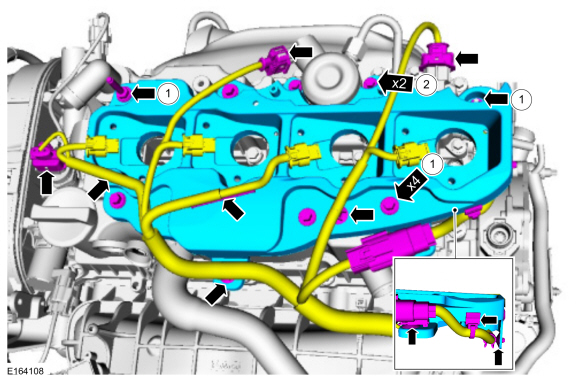
- Install the ignition coil bracket to the spark plug, then install and tighten the ignition coil bracket to the spark plug bolts.
- Install the high-pressure fuel pump insulator.
- Install the TC inlet tube.
- Install and tighten the TC inlet tube stud and lock nut.
Torque: 44 lb-in (5 N·m)
- Tighten the TC intake tube clamp.
Torque: 44 lb-in (5 N·m)
- Install the crankcase ventilation tube and clamp.
- Connect the crankcase ventilation tube quick-connect coupling.
Refer to: Quick Connect Coupling (310-00B Fuel System - General Information). Information - 1.6 L EcoBoost (132 kW/180 L PS) - Sigma, General Procedures).
- Attach the hose clamp.
- Install the air cleaner outlet pipe.
Refer to: Air Cleaner Outlet Pipe (303-12B Intake Air Distribution and Filtration — 1.6 L EcoBoost (132 kW/180 L hp) — Sigma, Removal and Installation). - Install the ignition coil onto the spark plug.
Refer to: Ignition Coil on Spark Plug (303-07B Engine Ignition System - 1.6 L EcoBoost (132 kW/180 L PS) - Sigma, Removal and Installation). - Connect the battery.
Refer to: Battery Disconnect and Connect (414-01 Battery, Mounting and Cables, General Procedures). - Pressurize the fuel system.
Refer to: Fuel System Pressure Release (310-00B Fuel System - General Information). Information - 1.6 L EcoBoost (132 kW/180 L PS) - Sigma, General Procedures).
Test yourself
A quick Ford Fiesta quiz: every answer comes with an explanation and a link to the manual page.