Wheel Replacement
Wheel Nuts
To obtain a locking wheel nut key and replacement locking wheel nuts, contact your dealer with the reference number certificate.
Vehicles with spare wheel
If the spare wheel is exactly the same type and size as the other fitted wheels, you can replace one of the wheels with the spare wheel and continue to drive normally.
If the spare wheel is not identical to the other wheels, a yellow label stating the speed limits to observe must be present.
Refer to the following information before changing a wheel.
WARNINGS
- Drive as short a distance as possible.
- Never fit more than one spare wheel to the same vehicle at the same time.
- Do not carry out repairs to the tyre of a spare wheel.
- Do not take a vehicle fitted in this way through a car wash.
- If you do not know the type of spare wheel you have, do not exceed a speed of 80 km/h.
- Only fit snow chains to the specified tyres.
- The ground clearance of the vehicle may be reduced. Take care when parking close to a kerb.
Note: Your vehicle may have unusual driving characteristics.
Lifting the Vehicle with the Jack
WARNINGS
Only use the jack supplied with the vehicle to change a wheel in an emergency.
Before using the jack, check that it is not damaged or deformed and that its thread is greased and free of dirt.
Do not place anything between the jack and the ground or between the jack and the vehicle.
Note: Vehicles fitted with a temporary mobility kit do not have a jack or a wheel nut wrench.
It is recommended to use a workshop hydraulic jack when swapping summer and winter tyres.
Note: Use a jack with a minimum lifting capacity of 1.5 tonnes and fitted with a lifting plate of at least 80 mm (3.1 in) in diameter.
Vehicles Without a Temporary Mobility Kit
The vehicle jack, wheel nut wrench and towing eye are located in the spare wheel compartment or behind the rear seat, with the fuel filler funnel.
Vehicle Lifting Points
WARNING
Only use the indicated lifting points. Using other lifting points may cause damage to the body, steering, suspension, engine, braking system and fuel supply lines.
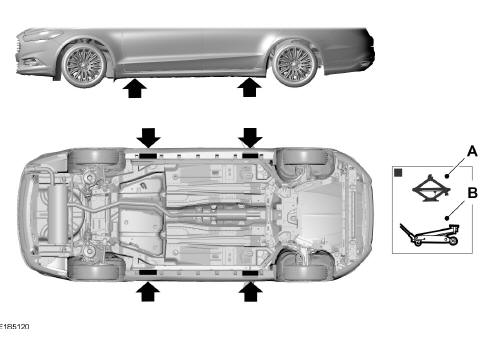
- For Emergency Use Only
- Maintenance
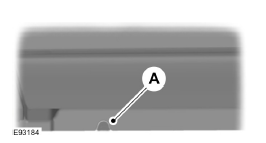
The indentations on the door sills show the position of the lifting points.
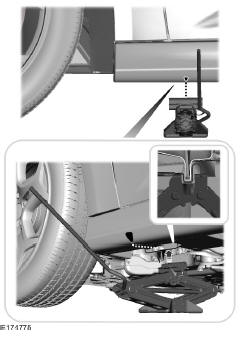
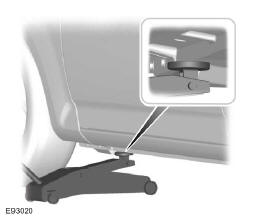
Vehicles with Side Skirts
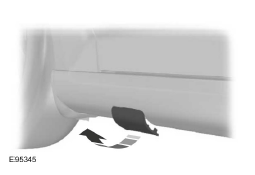
Removing a Wheel
WARNINGS
- Park the vehicle so that it does not obstruct other road users and does not put you at risk.
- Place a warning triangle.
- Make sure the vehicle is on a stable, level surface, with the wheels in the straight-ahead position.
- Switch off the ignition and apply the parking brake.
- If your vehicle has a manual gearbox, place the gear selector lever in first or reverse. If it has an automatic transmission, move the selector lever to position (P).
- No passengers should remain in the vehicle.
- Chock the diagonally opposite wheel using a suitable wheel chock.
- Never work under a vehicle supported only by a jack.
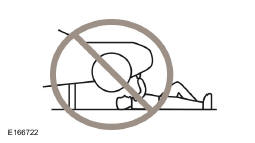
WARNINGS
- Make sure the jack is vertically aligned with the lifting point and that its base is flat on the ground.
- Do not lay alloy wheels face down on the ground, as this will damage the paint.
Note: The spare wheel is located under a floor panel in the luggage compartment.
- Fit the anti-theft wheel nut key.
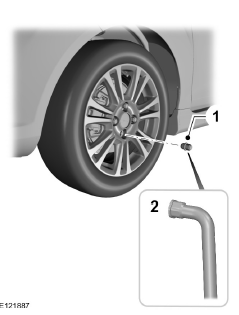
- Loosen the wheel nuts.
- Raise the vehicle until the tyre is off the ground.
- Remove the wheel nuts and the wheel.
Installing a wheel
WARNINGS
- Make sure the arrows on directional tyres point in the forward direction of rotation of the vehicle. If a spare wheel whose arrows point in the reverse direction of rotation must be fitted, have the tyre refitted in the correct direction by an authorised dealer.
- Use only wheels and tyres of approved dimensions. Using other dimensions could damage the vehicle and invalidate its type approval.
- Make sure there is no lubricant (grease or oil) on the threads or on the surface between the wheel nuts and the wheel rims. This may cause the wheel nuts to loosen while driving.
- Do not fit run-flat tyres to vehicles that were not originally equipped with them. Contact an authorised dealer for more details on compatibility.
- Never fit alloy wheels using wheel nuts designed for steel wheels.
- Wheel nuts may be replaced. Make sure you use only the wheel nuts and wheels specified for your vehicle. If in doubt, contact your authorised dealer.
Note: Wheel nuts for alloy wheels and steel spoked wheels may also be used on the steel-rim spare wheel for a short period (two weeks maximum).
Note: Make sure the contact surfaces of the wheel rim and hub are free of dirt and debris.
Note: Make sure the seats of the wheel nuts are in contact with the wheel rim.
- Fit the wheel.
- Fit the wheel nuts and tighten them by hand.
- Fit the anti-theft wheel nut key.
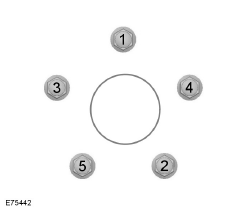
- Partially tighten the wheel nuts in the sequence shown.
- Lower the vehicle to the ground and remove the jack.
- Fully tighten the wheel nuts in the sequence shown.
- Fit the wheel trim by pressing it into place with the palm of your hand.
WARNING
Have the wheel nut torque and tyre inflation pressure checked as soon as possible.
Test yourself
A quick Ford Mondeo quiz: every answer comes with an explanation and a link to the manual page.