Body (Interior and Exterior)
Windshield Repair Procedures
In this manual: Body (Interior and Exterior)
13steps
~78min
3/5difficulty
Done 0 of 13
Removal
|


- Press the sunroof switch to fully open the sliding glass.
- Remove the roof side molding (Refer to Body Side Moldings - Roof Side Moldings).
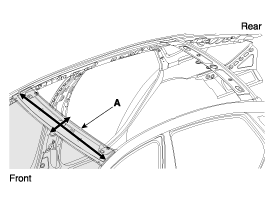
- Pull the piano wire (A) to the left and right, then apply force in the direction of the arrow to cut the remaining sealant.

- To apply force effectively to the cutting surface, make sure the wire is not too long, and remove the remaining sealant in two cuts by dividing the entire length into sections.
 and
 .

- Make sure to wear gloves to protect your hands from possible injury.
- Be careful to protect your hands from burns caused by heat generated while working with the wire.
- Be careful not to break the wiring.

- Be careful not to damage the body.

- To apply force effectively to the cutting surface, make sure the wire is not too long, and remove the remaining sealant in two cuts by dividing the entire length into sections.
- Carefully remove the windshield (A) without damaging it.

Installation
|

 Sealant Gun
- Install the roof side molding.
- Press the sunroof switch to fully close the sliding glass.
- Use a blade to cut away the remaining sealant (A) around the body panel.
- When cutting the remaining sealant around the body panel, leave sealant at a distance of approximately 2 mm from the surface.
- Make sure the body paint surface is not damaged.
- If damaged, apply paint or rust inhibitor for service.

- If the windshield (A) is reused, use a blade to remove the remaining sealant (B) around the body panel.

- Use alcohol or a pneumatic gun to clean the edges of the body panel and windshield.
- Using a sealant gun, apply sealant (B) around the body panel (A).
- When applying sealant with a sealant gun, make sure there are no gaps in the sealant bead to prevent water leakage.

- Install the windshield (A) loosely onto the body panel.
- Align the windshield (A) and the body panel before fully installing the windshield.
- Apply tape to the contact area between the windshield and the frame to adjust the windshield to the frame size.
- If too much sealant is applied, it may leak out of the body. Use alcohol or a cleaning agent to wipe off excess sealant.
- Install the windshield and park the vehicle on a level surface for at least 4 hours.
- If you need to drive the vehicle, be sure to drive SLOWLY for at least 8 hours after installation.
- Advise the driver to avoid aggressive driving for 2-3 days or driving on rough roads.
Test yourself
A quick Hyundai Genesis DH quiz: every answer comes with an explanation and a link to the manual page.
Was this page helpful?