Automatic Transmission System (A8LF1)

Automatic Transmission

30steps
~190min
5/5difficulty
2special tools
0204060801004936N·mlb·ft
Tightening torque found on this page
Done 0 of 30

Repair Procedures

Removal

Hyundai Palisade. Repair procedures
  • Carefully install the clamp so as not to damage the hose.
  • Install the clamp in the correct direction so that it does not interfere with other parts.
  • After installation, start the engine and check the hose for leaks.
  1. Turn the ignition switch OFF and disconnect the negative (-) battery cable.
  2. Remove the air duct and air cleaner assembly. (Refer to Engine Mechanical System - "Air Cleaner")
  3. Remove the battery and battery tray. (Refer to Engine Electrical System - "Battery")
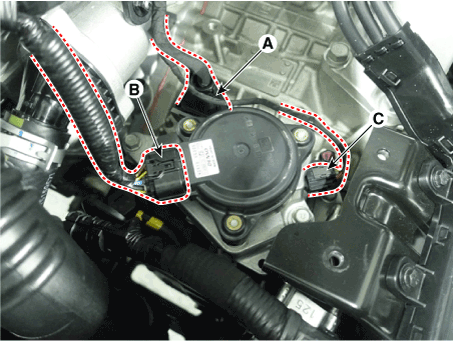
  4. Disconnect the main connector (A), the shift solenoid connector (B), and the position sensor connector (C).
    Hyundai Palisade. Repair procedures
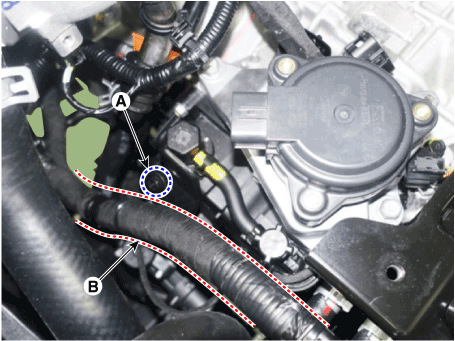
  5. Remove the bolt (A), then separate the wiring harness (B).
    Hyundai Palisade. Repair procedures
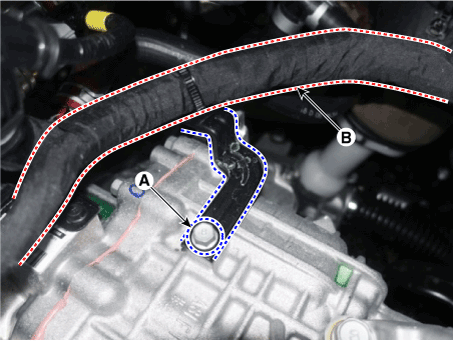
  6. Loosen the bolt (A), then separate the wiring harness (B).
    Hyundai Palisade. Repair procedures
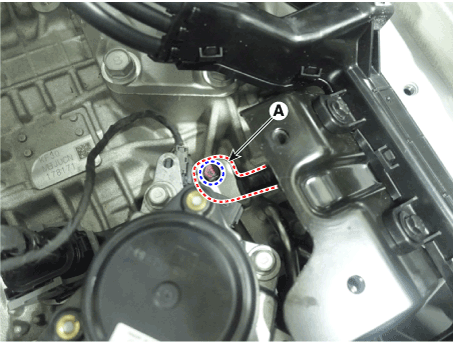
  7. Remove the ground line (A).
    Hyundai Palisade. Repair procedures
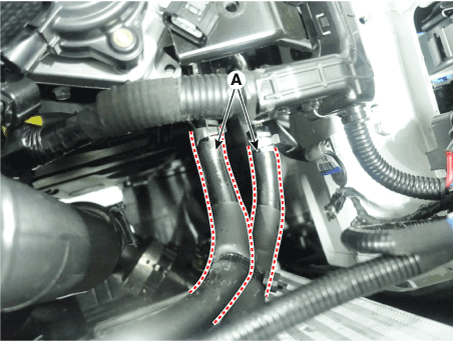
  8. Disconnect the ATF cooler hose (A).
    Hyundai Palisade. Repair procedures
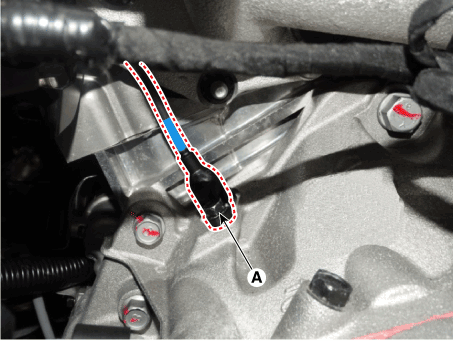
  9. Remove the crankshaft position sensor (A) after loosening the bolt.
    Hyundai Palisade. Repair procedures
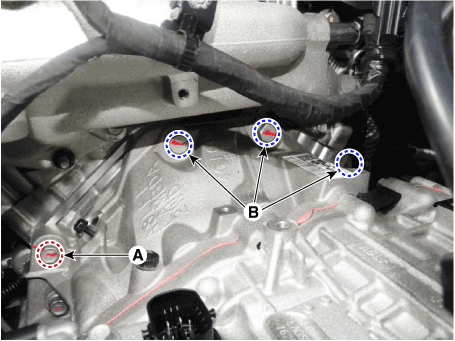
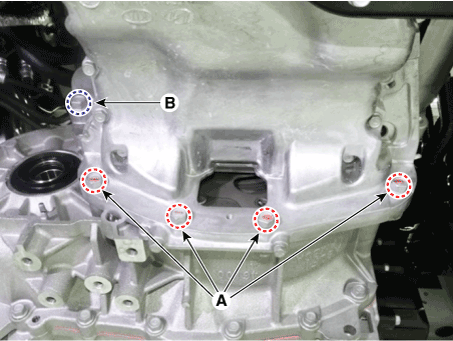
  10. Remove the transmission upper mounting bolts (A, B). Tightening torque: (A) 32.4–49 N·m (B) 63.7–83 N·m
    Hyundai Palisade. Repair procedures
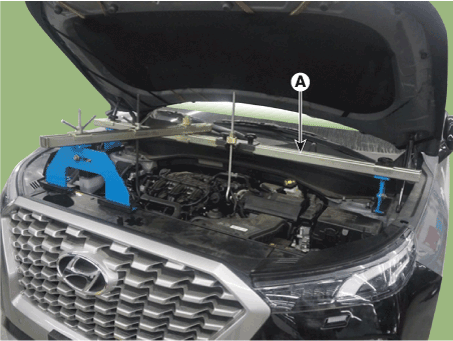
  11. Assemble the engine mount bracket using a (Beam SST No.: 09200-3N000, Holder SST No.: 09200-2S000, Adapter SST No.: 09200-2W000).
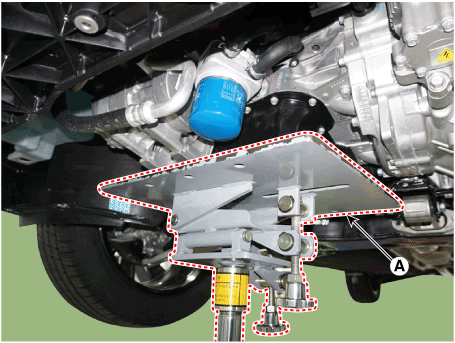
  12. Using the engine support, hold the engine and transmission assembly securely.
    Hyundai Palisade. Repair procedures
    Hyundai Palisade. Repair procedures
    • After installing the SST, make sure the nuts are securely tightened.
    • Support the jack (A) under the engine securely when working on the underside of the transmission.
      Hyundai Palisade. Repair procedures
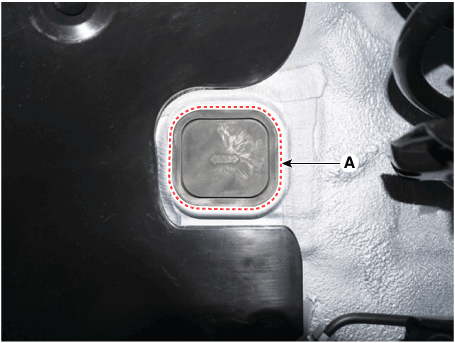
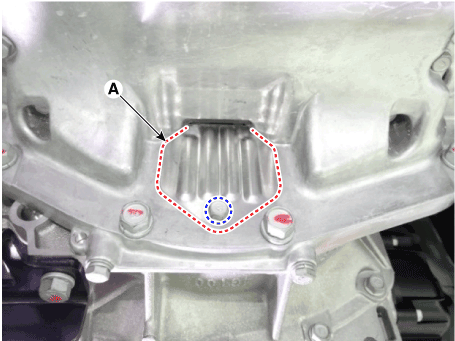
  13. Remove the cover (A).
    Hyundai Palisade. Repair procedures
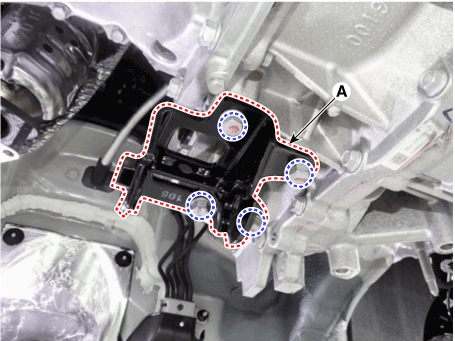
  14. Remove the transaxle bracket mounting bolts (A).

    Tightening torque: 107.9–128 N·m

    Hyundai Palisade. Repair procedures
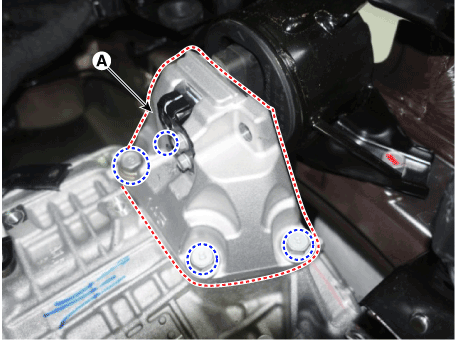
  15. Loosen the transmission support bracket mounting bolts, then remove the transmission support bracket (A).

    Tightening torque: 58.9–78 N·m

    Hyundai Palisade. Repair procedures
  16. Remove the under cover. (Refer to Engine Mechanical System - "Engine Room Under Cover")
  17. Remove the suspension member. (Refer to Suspension System - "Suspension Member")
  18. Remove the drive shaft assembly. (Refer to Drive Shaft and Axle - "Front Drive Shaft")
  19. On all-wheel drive vehicles, remove the transfer assembly. (Refer to Full-Time All-Wheel Drive System - "Transfer Assembly")
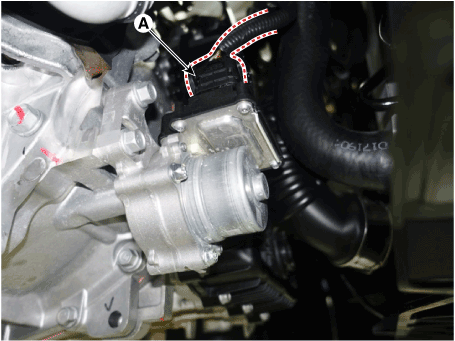
  20. Disconnect the EOP (Electric Oil Pump) connector (A).
    Hyundai Palisade. Repair procedures
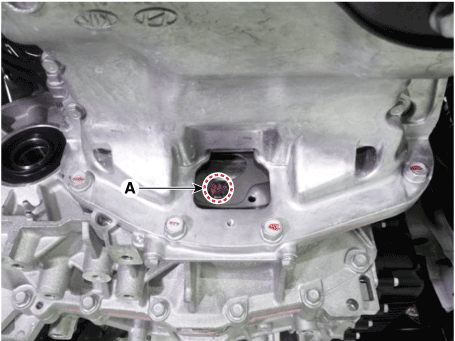
  21. Remove the dust cover (A).

    Torque: 39.2 – 46 N·m

    Hyundai Palisade. Repair procedures
  22. Remove the torque converter mounting bolts (A) while turning the crankshaft.

    Tightening torque: 45.1–52 N·m

    Hyundai Palisade. Repair procedures
  23. Remove the roller rod support bracket (A).

    Tightening Torque: 49.0–69 N·m

    Hyundai Palisade. Repair procedures
  24. Support the transmission securely with a jack.
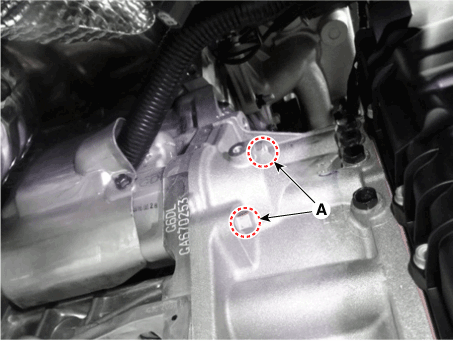
  25. Remove the starter motor mounting bolts (A).

    Tightening Torque: 49.0–64 N·m

    Hyundai Palisade. Repair procedures
  26. Loosen the transmission lower mounting bolts (A, B). Tightening torque: (A) 39.2–46 N·m (B) 78.5–98 N·m
    Hyundai Palisade. Repair procedures
  27. After separating the transmission from the engine, remove the transmission by slowly lowering the jack.
    Hyundai Palisade. Repair procedures
    • Be careful not to damage other nearby systems or components when removing the transmission assembly.

Installation

  1. To install, reverse the removal procedure.
    Hyundai Palisade. Repair procedures
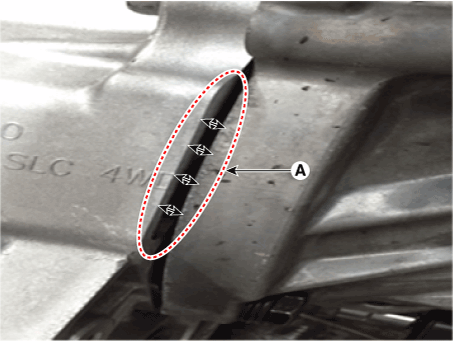
    1. Before installing the automatic transmission onto the engine assembly, make sure there is no gap (A) between the automatic transmission and the engine assembly, as shown in the illustration below. Do not install the automatic transmission onto the engine assembly when this gap (A) exists.
      Hyundai Palisade. Repair procedures
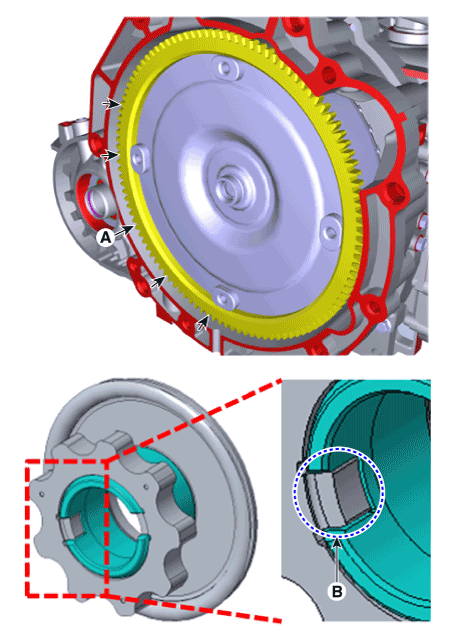
    2. If a gap exists, the oil pump drive gear key is not properly engaged with the torque converter hub. In this case, remove the automatic transmission assembly, then reinstall the torque converter so that it aligns with the oil pump drive gear key. [Correct installation (A) - Oil pump key (B) is properly engaged]
      Hyundai Palisade. Repair procedures
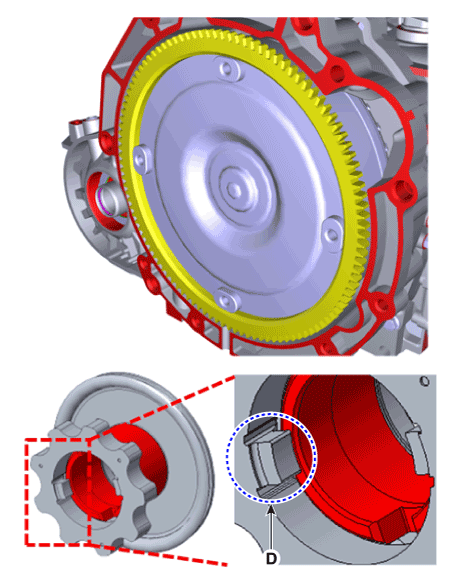
      [Incorrect installation (C) - Torque converter protrudes due to interference with the oil pump key (D)]
      Hyundai Palisade. Repair procedures
    3. If the mounting bolts are tightened forcibly despite the gap, the oil pump drive gear key will be damaged or broken. In this case, replace the automatic transmission assembly.
      Hyundai Palisade. Repair procedures
      • Follow the separate procedure for each step below when reinstalling or replacing the automatic transmission.
  2. When reinstalling the transmission.
    1. Replace the seal with a new one when ATF leaks, because the differential seal is damaged.
      Hyundai Palisade. Repair procedures
      • Use the Special Service Tool when installing the new seal.
    2. After filling the transmission with fluid, check the ATF level. (Refer to Automatic Transmission System - "Automatic Transmission Fluid")
    3. Erase the Diagnostic Trouble Codes (DTCs) using the diagnostic tool.
      Hyundai Palisade. Repair procedures
      • Even if the battery negative terminal is disconnected, DTCs will not be erased. Therefore, be sure to erase the DTCs using the diagnostic tool.
  3. When replacing with a new automatic transmission.
    Hyundai Palisade. Repair procedures
    • The new automatic transmission is already filled with the specified amount of ATF. For this reason, it is not necessary to add or check the ATF, but the remaining ATF inside the ATF cooler must be removed.
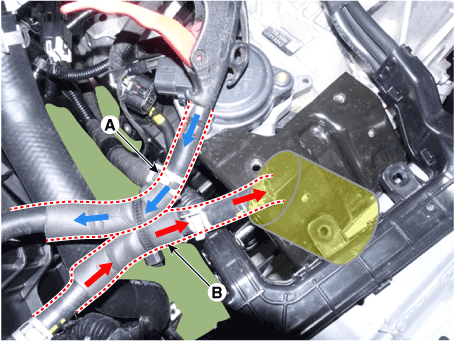
    1. Connect the air blow gun to the ATF cooler hose (A).
    2. Place a container under the ATF cooler hose (B).
    3. Remove the remaining ATF by blowing air through the ATF cooler hose.
    4. Connect the ATF cooler hoses (A) and (B).
      Hyundai Palisade. Repair procedures
    5. Erase the Diagnostic Trouble Codes (DTCs) using the diagnostic tool.
      Hyundai Palisade. Repair procedures
      • Even if the battery negative terminal is disconnected, DTCs will not be erased. Therefore, be sure to erase the DTCs using the diagnostic tool.
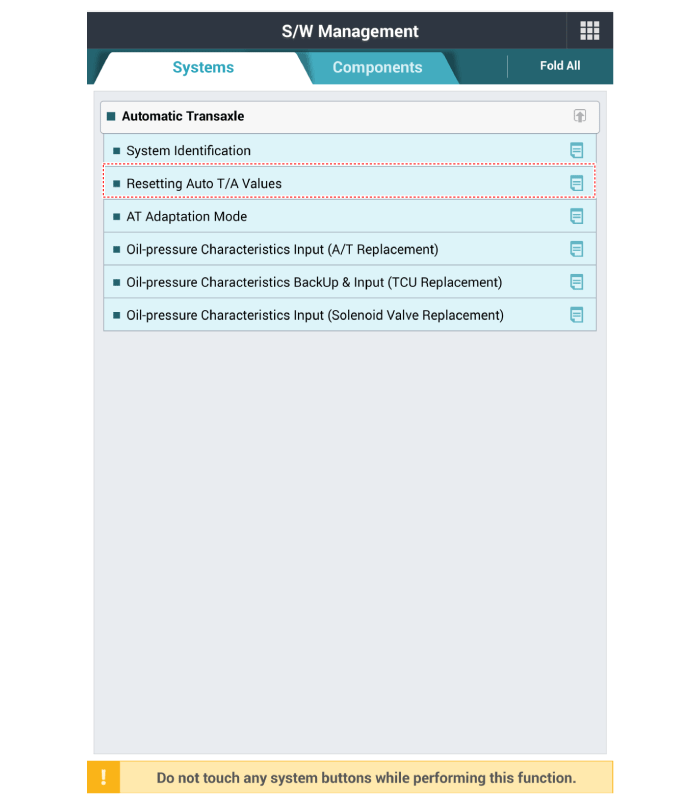
    6. Reset the automatic transmission adaptive values using the diagnostic tool.
      Hyundai Palisade. Repair procedures
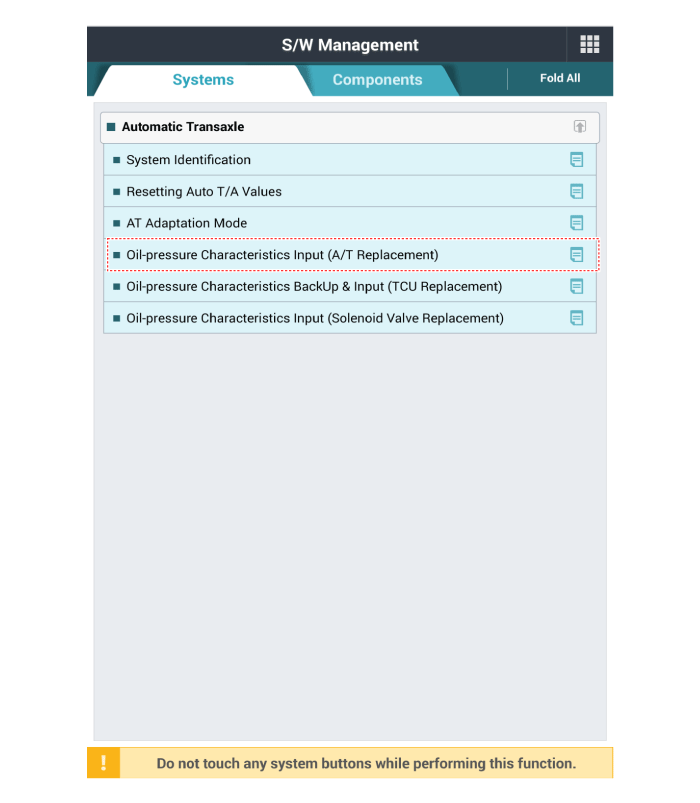
    7. Perform the oil pressure characteristics input procedure.
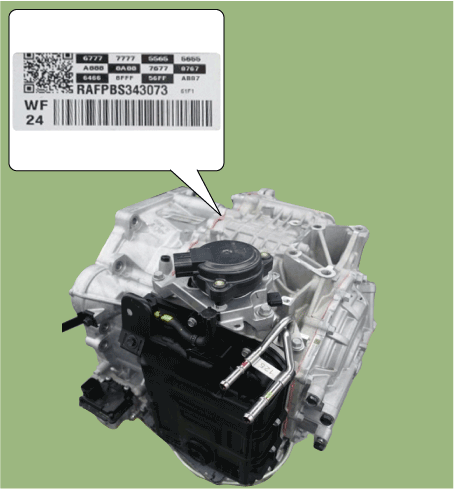
      • Location of Oil Pressure Characteristics (Barcode)
        Hyundai Palisade. Repair procedures
      • Input Oil Pressure Specifications (Transmission Replacement)
        Hyundai Palisade. Repair procedures
    8. Perform the procedure to store the TCM adaptive values. (Refer to "Automatic Transmission Control System - Repair Procedures")

Test yourself

A quick Hyundai Palisade quiz: every answer comes with an explanation and a link to the manual page.