Restraint
Driver Airbag and Clock Spring
In this manual: Restraint
22steps
~132min
5/5difficulty
Done 0 of 22
Components and Component Location
COMPONENTS

| 1. Clock Spring 2. Driver Airbag (DAB) |
3. Steering Wheel |
Description and Operation
Description
- DRIVER AIRBAG (DAB): The DAB is installed in the steering wheel and electrically connected to the SRSCM and clock spring. It deploys in the event of a frontal impact to protect the driver.
- CLOCK SPRING: The clock spring transmits the deployment signal generated by the sensors installed on the front and left/right sides of the vehicle to the inflator of the driver airbag module through an internal cable. It also transmits the horn switch and horn signal to the steering wheel and the corresponding systems through an internal cable.
Repair Procedures
DEPOSIT
- Disconnect the negative battery cable and wait at least three minutes before starting work.
- Remove the driver airbag module using a flat-tip tool (Ø 5 mm) inserted into the guide hole and press the locking tab.

- Disconnect the airbag connector (A) and horn connector (B).

- Remove the steering column and steering wheel trim (A). (Refer to Steering System Group - Column and Shaft)
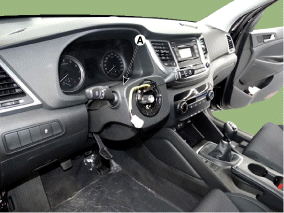
- Disconnect the clock spring connector (A) and horn connector (B), then remove the clock spring.

Inspection
Driver Airbag (DAB)
If the following inspection reveals any inappropriate parts, replace the airbag module.- Check the airbag cover for dents, scratches, cracks, or deformation.
- Check the airbag module for dents, cracks, or deformation.
- Check the hooks and connectors for damage, check that the terminals are not deformed, and check that the spiral cable is not bent.
- Check the airbag inflator for dents, cracks, or deformation.

- Install the airbag module on the steering wheel, making sure that they are correctly aligned and that the module fits the steering wheel.
- If any abnormality is found after the following inspections, replace the clock spring.
- Check the connectors and protective tube for damage, and check whether the terminals are deformed.
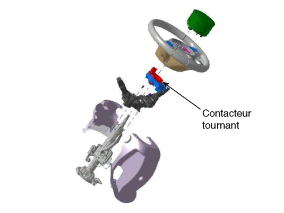

REMEDY
- Position the front wheels in a straight-ahead position.
- Turn the ignition switch to the OFF position.
- Disconnect the negative battery cable from the battery and wait at least three minutes before starting work.
- Connect the clock spring harness connector and the horn connector to the clock spring.
- The factory setting of the clock spring is the neutral position.
- If the white cable is not visible in the neutral check window at the 10 o'clock position, turn the clock spring to the neutral position.
- If the white cable is not visible in the neutral check window at the 10 o'clock position, manually adjust the setting to the neutral position.
Neutral Check Window: Normal Neutral Check Window: Malfunction
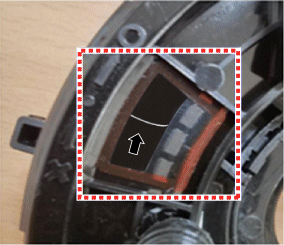
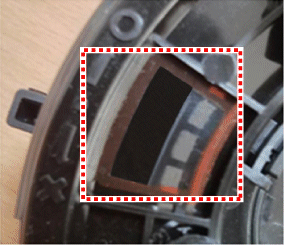
White cable is visible in the neutral check window at the 10 o'clock position White cable is not visible in the neutral check window at the 10 o'clock position - Manual neutral adjustment procedure for the clock spring.
- Engage the automatic lock at the "6 o'clock" position and turn clockwise 3 turns.
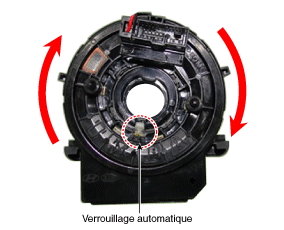
- Engage the automatic lock at the "6 o'clock" position and turn counterclockwise 3 turns.
- If the white cable is not visible in the 10 o'clock neutral position of the control window, the spring is installed in neutral position.
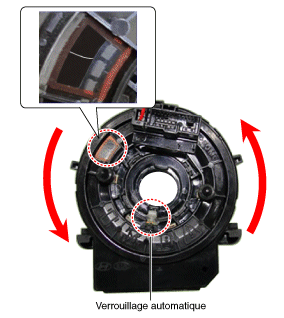
- Engage the automatic lock at the "6 o'clock" position and turn clockwise 3 turns.
- Install the steering column shroud and the steering wheel. (Refer to Steering System - "Column and Shaft")
- Connect the driver airbag (DAB) module connector and the horn connector, then install the driver airbag (DAB) module on the steering wheel.
- Connect the battery negative cable.
- After installing the airbag, check that it operates correctly:
- Turn the ignition switch to ON; the SRS warning lamp should illuminate for approximately six seconds and then go off.
- Check that the horn button operates.
Test yourself
A quick Hyundai Tucson quiz: every answer comes with an explanation and a link to the manual page.
Was this page helpful?