Air Switching Valve
Air Switching Valve Operation Test
Refer to the Air Suction System Damage Inspection in the Periodic Maintenance chapter.
Air Switching Valve Unit Test
- Remove the air switching valve (see Air Switching Valve Removal in the Engine Top End chapter).
- Set the hand tester [A] to the × 1 Ω range and connect it to the air switching valve terminals as shown in the figure.
Special Tool - Hand Tester: 57001-1394 Air Switching Valve Resistance Standard: 20  24 Ω at 20В°C (68В°F)
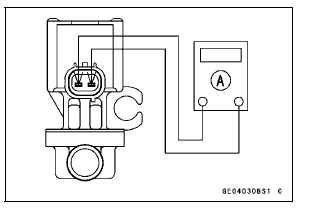
If the resistance reading is out of the specified value, replace it with a new one.
- Connect the 12 V battery [A] to the air switching valve terminals as shown in the figure.
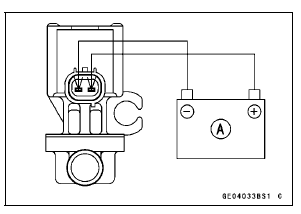
- Blow the air to the intake air duct [A], and make sure does not flow the blown air from the outlet air ducts [B].
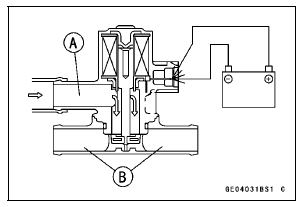
- Disconnect the 12 V battery.
- Blow the air to the intake air duct [A] again, and make sure flow the blown air from the outlet air ducts [B].
If the air switching valve dose not operate as described, replace it with a new one.
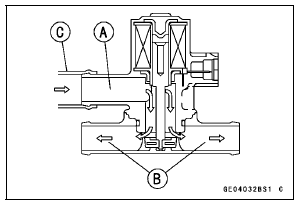
NOTE
To check air flow through the air switching valve, just blow through the air switching valve hose (intake side) [C].
Air Switching Valve Circuit
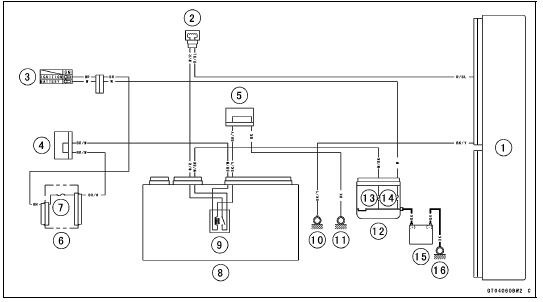
1. ECU
2. Air Switching Valve
3. Ignition Switch
4. Joint Connector F
5. Joint Connector A
6. Fuse Box 1
7. Ignition Fuse 15 A
8. Relay Box
9. ECU Main Relay
10. Frame Ground 1
11. Frame Ground 3
12. Starter Relay
13. ECU Fuse 15 A
14. Main Fuse 30 A
15. Battery
16. Engine Ground
Test yourself
A quick Kawasaki Ninja ZX-10R quiz: every answer comes with an explanation and a link to the manual page.