Brake System
Parking Brake Assembly Repair Procedures
In this manual: Brake System
42steps
~252min
4/5difficulty
Done 0 of 42
Removal
Parking Brake Pedal- Remove the main cover panel. (Refer to Body group)
- Remove the hood cross member. (Refer to Body group - Crash Pad)
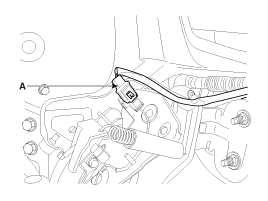
- Disconnect the parking brake switch connector (A).
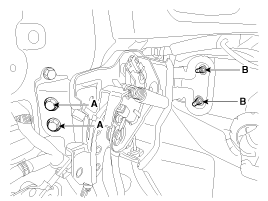
- Remove the parking brake pedal mounting bolts (A) and nut (B).
- Remove the parking brake cable mounting bolts.
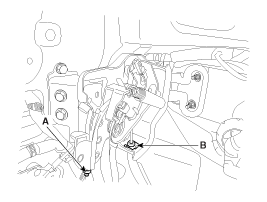
- Remove the parking brake cable adjusting nut (A) and retainer clip (B), then remove the parking brake pedal.
- Remove the floor console. (Refer to Body group - Console)
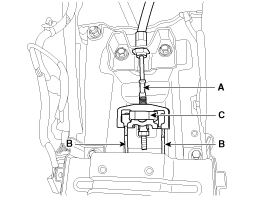
- Remove the parking brake cable (A, B) after removing the cable holder (C).
- Loosen the clamp and cable mounting bolts and remove the front parking brake cable.
- Raise the vehicle and make sure it is securely supported.
- Remove the rear tire and wheel.
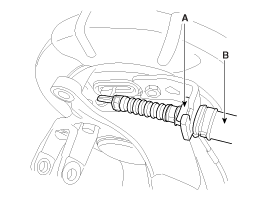
- Remove the parking brake cable (B) after removing the retaining clip (A).
- Loosen the parking brake cable bracket bolts and remove the rear parking brake cable.
- Raise the vehicle and make sure it is securely supported.
- Remove the rear tire and wheel.
- Remove the rear brake caliper and rear disc brake. (See Rear Disc Brake Removal)
- Remove the parking brake cable (B) after removing the retaining clip (A).
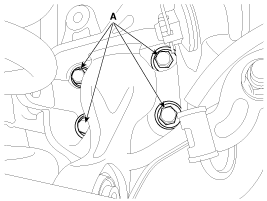
- Loosen the hub assembly mounting bolts (A) and remove the hub assembly and parking brake assembly.
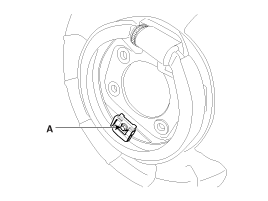
- Loosen the shoe hold-down clip mounting bolt (A) and remove the brake shoe.
Installation
Parking Brake Shoe- Install the brake shoe.
- Secure the brake shoe with the shoe hold-down clip, then install the bolt (A).
Tightening torque: 2.0 ~ 4.9 N·m
- Install the parking brake assembly and hub assembly.
- Install the parking brake cable (B), then install the retaining clip (A).
- Install the rear brake disc, then adjust the rear brake shoe clearance.
- Remove the plug from the disc.
- Turn the adjuster gear with a screwdriver until the drum stops moving, then back it off 5 notches.
- Install the brake caliper assembly. (Refer to "Rear Brake Installation")
- Install the tire and wheel after installing the cap on the disc.
- If the parking brake shoe or brake disc is replaced with a new one, perform the brake shoe break-in procedure.
- While operating the parking brake lever with 98 N (10 kgf, 22 lbf), drive the vehicle 500 m (0.31 mile) at a speed of 60 km/h.
- Repeat the above procedure more than three times.
- Must hold on a 20% uphill grade.
After adjusting the parking brake, check the following:
- There should be no problems when depressing the parking brake pedal with a force of 980 N (100 kgf, 154 lbf).
- Make sure all components operate smoothly.
- The parking brake warning lamp should illuminate when the parking brake pedal is depressed and go off when the pedal is released.
- Install the parking brake cable.
- Install the floor console. (Refer to Body group - Console)
- Install the retaining clip (B) and the cable adjusting nut (A) after securing the parking brake cable.
- Install the parking brake pedal, then install the parking brake pedal mounting bolts (A) and nuts (B). Tightening torque: Bolts (A): 8.8 ~ 13.7 N·m Nuts (B): 9.8 ~ 14.7 N·m
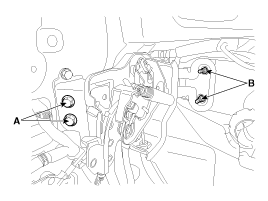
- Adjust the parking brake pedal travel by turning the adjusting nut (A).
- Depress the parking brake pedal fully more than 3 times to seat the parking brake cables.
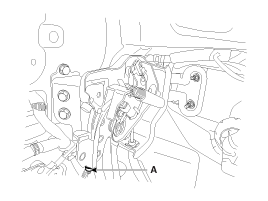
- Adjust the parking brake pedal travel adjusting nut (A) so that the parking brake pedal travel is 4 to 5 notches when the operating force is 196 N (20 kgf, 44 lbf).
- The parking brake adjustment must be performed after the rear shoe adjustment.
- After adjusting the parking brake, check the following.
a. There should be no clearance between the adjusting nut and the pin. b. Securely check that the brake does not slip.
- Depress the parking brake pedal fully more than 3 times to seat the parking brake cables.
- Reconnect the parking brake switch connector (A).
- Install the hood cross member. (Refer to Body - Crash Pad)
- Install the main pad cover. (Refer to Body group - Crash Pad)
Adjustment
Parking Brake Shoe Clearance Adjustment- Raise the vehicle and make sure it is securely supported.
- Remove the rear tire and wheel.
- Remove the cap (A) from the disc.
- Turn the adjuster gear with a screwdriver until the drum stops moving, then back it off 5 notches.
- Install the rear tire and wheel after installing the cap on the disc.
- Depress the parking brake pedal fully more than 3 times to seat the parking brake cables.
- Adjust the parking brake pedal travel adjusting nut (A) so that the parking brake pedal travel is 4 to 5 notches at an operating force of 196 N (20 kgf, 44 lbf).
- The parking brake adjustment must be performed after the rear shoe adjustment.
- After adjusting the parking brake, check the following.
a. There should be no clearance between the adjusting nut and the pin. b. Securely check that the brake does not slip.
Test yourself
A quick Kia Cadenza VG Owner's Manual quiz: every answer comes with an explanation and a link to the manual page.
Was this page helpful?