Heating, Ventilation, and Air Conditioning
Photo Sensor Repair Procedures
In this manual: Heating, Ventilation, and Air Conditioning
7steps
~42min
2/5difficulty
Done 0 of 7
Inspection
- Ignition switch ON
- Using a scan tool.
- Direct intense light onto the photo sensor using a lamp, and check the change in output voltage.
- The voltage will increase with more intense light and decrease with less intense light.
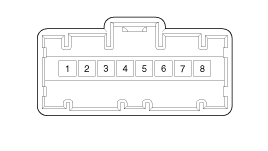
1. Automatic Light Signal
2. Auto Light GND
3. Photo Signal (RH)
4. LED Power (BAT)5. LED GND (to BCM)
6. Photo Signal
7. Photo Power (SW)
8. Auto Light Power (5 V)
Replacement
- Disconnect the negative (-) battery terminal.
- Using a flat-blade screwdriver (-), remove the photo sensor (A) from the center of the defrost nozzle.
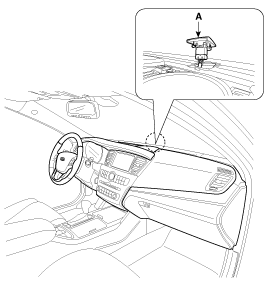
- Install in the reverse order of removal.
Test yourself
A quick Kia Cadenza VG Owner's Manual quiz: every answer comes with an explanation and a link to the manual page.
Was this page helpful?