Engine Mechanical System
CVVT and Camshaft Repair Procedures
In this manual: Engine Mechanical System
14steps
~89min
4/5difficulty
1special tools
Done 0 of 14
Removal
- Remove the cylinder head cover.
- Set the No. 1 cylinder to TDC/compression.
a. Turn the crankshaft pulley and align its groove with the "T" alignment mark on the lower timing chain cover. 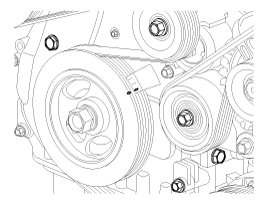
b. Make sure the mark (A) on the CVVT sprockets is in a straight line on the cylinder head surface as shown in the illustration. If not, turn the crankshaft one revolution (360°). 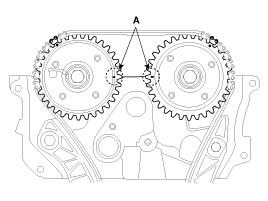
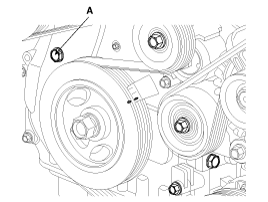
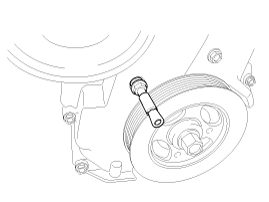
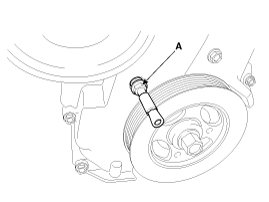
- Remove the bolt (A) from the service hole in the timing chain cover. It may be necessary to insert an M8 x 1.25 tap into the hole to clean the sealant from the threads.
Make sure no debris enters the engine through the open bolt hole.
- Pull and turn the loop (A) on SST 09240-2G000 to allow the spring-loaded shaft (B) to be pulled back and locked against the spring. Apply a small amount of light grease to the tool threads, then screw it into the hole in the timing cover until you feel it contact the tensioner. Then back the tool out approximately one turn.
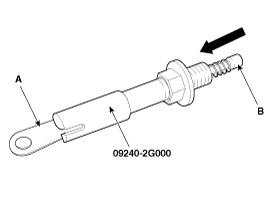
- Turn the loop to unlock the tool.
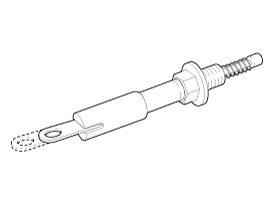
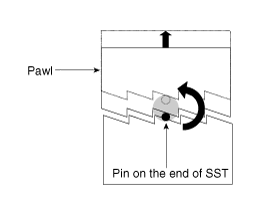
- Slowly turn the tool counterclockwise. Depending on the position of the pin on the tool, several clicks may be heard as the pin moves over the pawl and shaft. As you turn, you should feel the spring-loaded pawl rise. After the pawl is raised, tighten the lock nut (A) and lift the timing chain and cam sprocket onto the camshaft.
- Remove the camshaft.
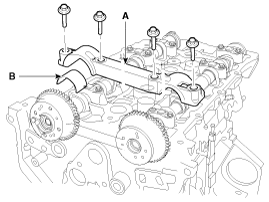
- Remove the camshaft front bearing cap (A) with the upper bearing (B).
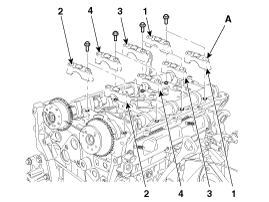
- Remove the camshaft bearing caps (A) in the sequence shown.
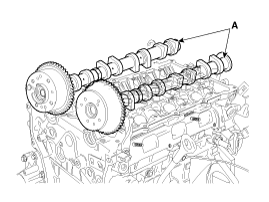
- Remove the camshafts (A).
- Remove the camshaft front bearing cap (A) with the upper bearing (B).
- Disconnect the intake CVVT assembly (A) and exhaust CVVT assembly (B) from the camshaft (C).
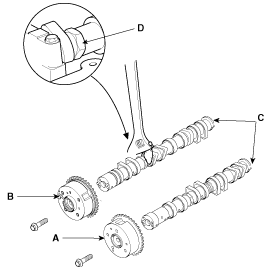
When removing the CVVT assembly bolt, do not allow the camshaft to rotate. Use a wrench on position D.
Installation
- Install the intake CVVT assembly (A), exhaust CVVT assembly (B), and camshaft (C).
Tightening Torque: 53.9 ~ 64 N·m
When installing the CVVT assembly bolt, hold the camshaft with a wrench on position D. - Install the camshafts.
Apply a thin coat of engine oil to the camshaft journals.- Install the exhaust camshaft lower bearing (A).
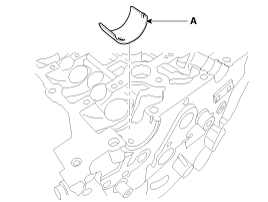
- Install the camshafts (A).
- Install the timing chain. Make sure the mark (A) on the CVVT sprockets is in a straight line on the cylinder head surface as shown in the illustration.
- Install the exhaust camshaft upper bearing (A) onto the camshaft front bearing cap.
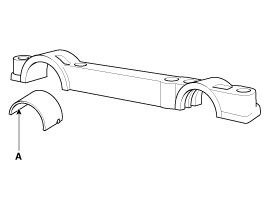
- Install the exhaust camshaft lower bearing (A).
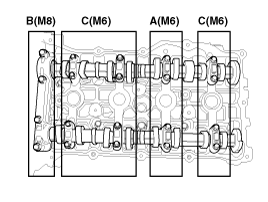
- Install the camshaft bearing caps (A) in their original positions. Tightening sequence: Group A > Group B > Group C. Tightening torque: Step 1 M6: 5.9 N·m M8: 14.7 N·m Step 2 M6: 10.8 - 12.7 N·m M8: 27.5 - 31 N·m
- Disconnect the SST (A) (09240-2G000).
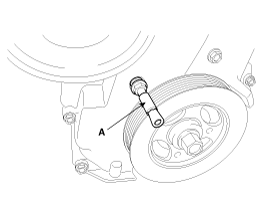
- Install the service hole bolt of the timing chain cover.
Tightening torque: 11.7 - 14.7 N·m
Do not reuse the bolt after assembly. - Install the cylinder head cover.
Test yourself
A quick Kia Optima Hybrid Owner's Manual quiz: every answer comes with an explanation and a link to the manual page.
Was this page helpful?