Emission Control System
Natural Vacuum Leak Detection (NVLD) Repair Procedures
In this manual: Emission Control System
15steps
~90min
4/5difficulty
Done 0 of 15
Removal
- Turn the ignition switch OFF and disconnect the negative (-) battery terminal.
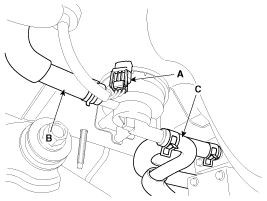
- Disconnect the NVLD connector (A).
- Disconnect the vent hoses (B, C).
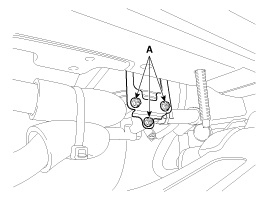
- Remove the NVLD by loosening the bolts (A).
Installation
- Install the component with the specified torque.
- Note that internal damage may occur if the component is dropped. If the component has been dropped, inspect it before installation.
- Install in the reverse order of removal.
NVLD mounting bolt: 2.3 ~ 3.3 N·m
Inspection
[Mechanical Inspection]- Turn the ignition off.
- Disconnect the NVLD connector.
- Remove the NVLD.
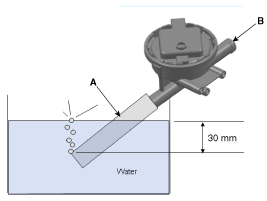
- Connect the hose (A) to the canister hose connection port as shown below.
- After submerging the hose (A) in water, apply more than 6 mbar (positive) pressure to the atmospheric pressure port (B).
- If the NVLD is normal, a large number of bubbles indicates a large leak.
An allowable internal leak of 0.35 g/h at 3 mbar will appear as one bubble every second (approximately).
- Connect the power supply line and the ground line to the NVLD terminals as shown below.
- Measure the current between NVLD terminal 1 and the battery (+) terminal when the NVLD switch is open.
- Measure the current between NVLD terminal 1 and the battery (+) terminal when the NVLD switch is closed.
- Measure the current between NVLD terminal 2 and the battery (+) terminal when the NVLD switch is open.
- Make sure the current is within specification.
The NVLD switch is normally open. When more than 6 mbar (positive) pressure is applied to the canister port, the switch closes.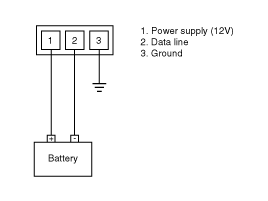
Test yourself
A quick Kia Optima Hybrid Owner's Manual quiz: every answer comes with an explanation and a link to the manual page.
Was this page helpful?