Automatic transmission
Gear selector controls
In this manual: Automatic transmission
7steps
~42min
2/5difficulty
Done 0 of 7
CONTROL UNIT
REMOVAL AND REFITTING
- Remove the battery.
- Drain the gearbox oil (see the relevant operation).
- Remove the oil sump (1) (Fig. 6).
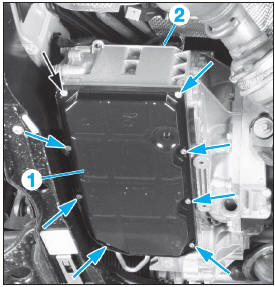
Fig. 6
- Disconnect the electrical connector (2).
- Remove the screws (3) and (4) (Fig.7).
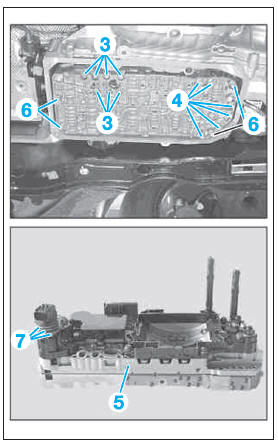
Fig. 7
- Hold the control unit (5) in place, then remove the screws (6).
- Remove the control unit (5).
When refitting, observe the following points:
- check that the seals (7) are not damaged. Replace them if necessary,
- replace the screws (3),
- fill and check the gearbox oil level,
- observe the specified tightening torques,
- read the fault memory and clear it if necessary.
GEAR SELECTOR HOUSING
REMOVAL
- Set the selector to position 'N'.
- Apply the parking brake.
- Switch off the ignition.
- Turn the ring (1) anticlockwise, then remove the selector knob (2) (Fig.8).
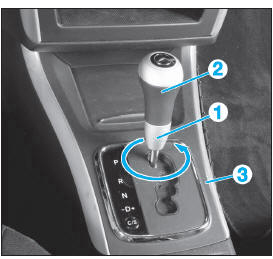 <.
Fig. 8
- Remove:
- the trim (3),
- Disconnect (Fig.9):
- the connectors (4) and (5),
- the steering column lock control cable (6).
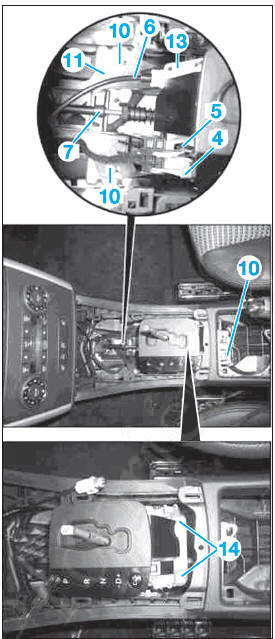
Fig. 9
- Disconnect the selector cable (7) (Fig.10):
- move the selector lever to position 'D',
- push the guide sleeve (8) against the spring (9),
- turn the sleeve (8) clockwise until it engages,
- move the selector lever from position 'D' to position 'R', guiding the selector cable (7) out of the clamping jaws.
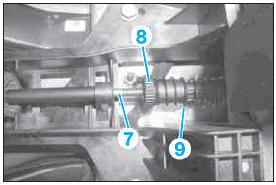
Fig. 10
- Unclip the cup holder from the floor console.
- Remove the screws (10), then the bearing bracket (11) (Fig.9).
- Unclip the storage compartment at the rear of the floor console.
- Remove the screws (12) (Fig.11).
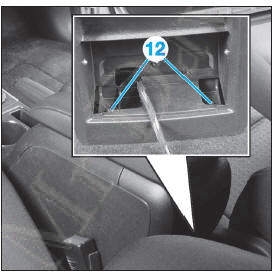
Fig. 11
- Lift the centre console from the rear and push the selector housing (13) forward together with the bearing bracket (11) (Fig.9).
 Lift the centre console only until it unclips from the selector housing.
- Remove the screws (14) and take out the selector housing (13).
When refitting, observe the following points:
- check the operation of the gear selector controls and adjust the selector cable if necessary,
- read the fault memory and clear it if necessary.
MANUAL RELEASE OF THE PARKING LOCK
- Apply the parking brake.
- Unclip the cup holder from the floor console.
- Press the release bolt (arrow) and simultaneously disengage the selector lever from position 'P' (Fig.12).
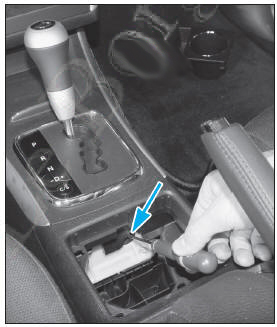
Fig. 12
SELECTOR CABLE
REMOVAL
- Apply the parking brake.
- Set the selector to position 'N'.
- Switch off the ignition.
- Remove:
- the front seats.
- the floor console (see the relevant operation in the 'BODYWORK' chapter).
- the left and right front floor coverings.
- If the selector cable is to be reused, unhook it from the selector housing (Fig.13):
- move the selector lever to position 'D',
- push the guide sleeve (1) against the spring (2),
- turn the clamping sleeve (1) clockwise until it engages,
- move the selector lever from position 'D' to position 'R', guiding the selector cable out of the clamping jaws.
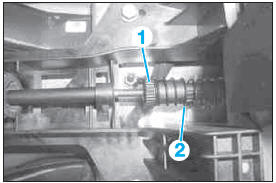
Fig. 13
- If the selector cable is to be replaced, disengage the ball joint (1) from the selector housing (2) (Fig.14).
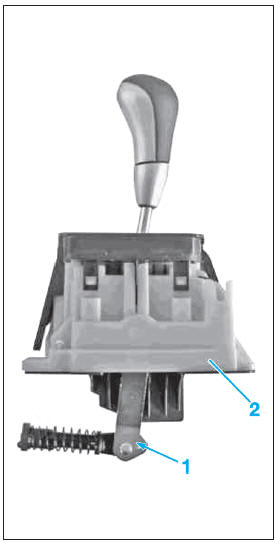
Fig. 14
- Disengage the selector cable (3) from the bearing bracket (4) of the selector housing (Fig.15).
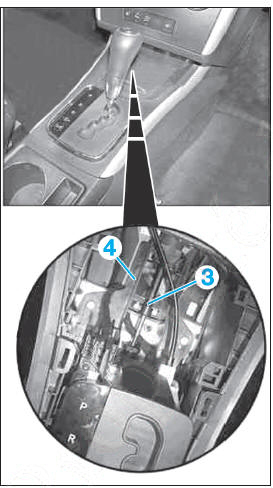 <.
Fig. 15
- Remove the air filter housing.
- Drive the sealing sleeve (5) out of the bulkhead (Fig.16).
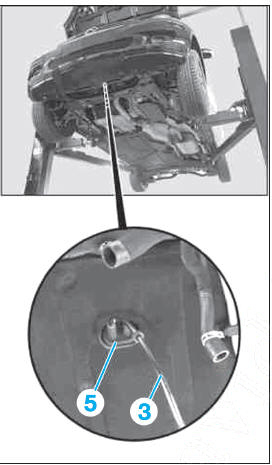
Fig. 16
 Carefully unclip the sealing boot (5). If it is damaged, the selector cable (3) must be replaced.
- Unhook the selector cable (3) from the gearbox lever (Fig.17):
- turn the lock (6) of the ball joint (7) of the selector cable (3) clockwise,
- remove the ball joint (7) from the selector lever (8).
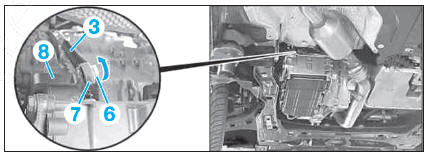
Fig. 17
- Pull the selector cable out through the bulkhead.
INSTALLATION
- To refit, reverse the removal procedure, observing the following points:
- the mark on the sleeve (5) must face upwards. It must not be twisted or pinched during installation,
- if the ball joint (1) (Fig.14) was disengaged, apply a thin coat of grease to the joint,
- apply a thin coat of grease to the joint (7),
- adjust the selector cable (see the relevant operation).
ADJUSTMENT
 The selector cable is only adjusted by unclipping and reclipping it on the selector housing.
- Apply the parking brake.
- Set the selector to position 'N'.
- Switch off the ignition.
- Unclip:
- the trim (1) (Fig.18),
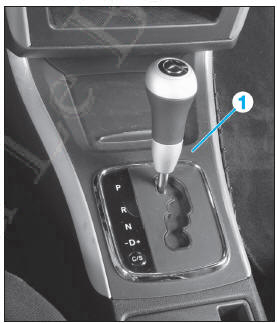
Fig. 18
- Disconnect the selector cable (2) (Fig.19):
- move the selector lever to position 'D',
- push the guide sleeve (3) against the spring (4),
- turn the sleeve (3) clockwise until it engages,
- move the selector lever from position 'D' to position 'R', guiding the selector cable (2) out of the clamping jaws.
- Reconnect the selector cable (2) by reversing the removal sequence.
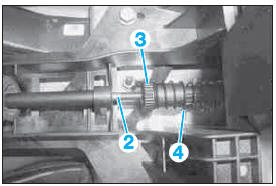
Fig. 19
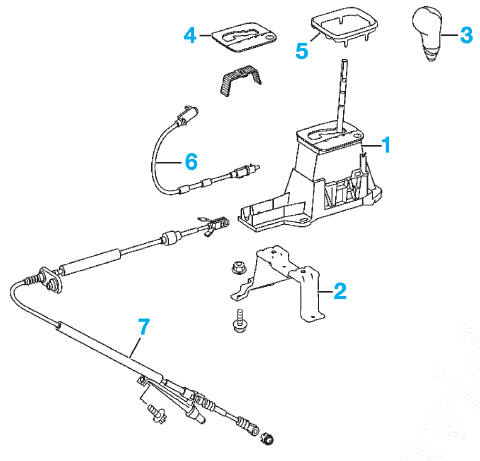
Gear selector controls
- Gear selector housing
- Holder
- Selector knob
- Selector gate
- Trim
- Steering column lock control cable
- Selector cable.
Test yourself
A quick Mercedes-Benz B-Class quiz: every answer comes with an explanation and a link to the manual page.
Was this page helpful?