Heating - air conditioning
Removal and installation of the air flap actuators
In this manual: Heating - air conditioning
~4min read
AIR FLAP ACTUATORS
 If an actuator is replaced, it must be calibrated using a diagnostic tool.
REMOVAL AND INSTALLATION OF THE DEFROST FLAP ACTUATOR (Thermotronic)
- Remove the glove box (see chapter 'BODYWORK').
- Set aside the sound insulation (1) located under the dashboard, on the right side (Fig.34).
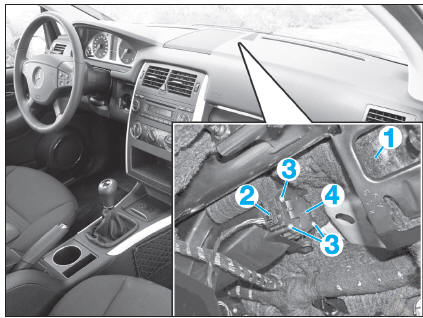
Fig. 34
- Disconnect the connector (2).
- Remove the screws (3).
- Remove the defrost flap actuator (4).
To refit, reverse the removal procedure, then carry out a function test.
REMOVAL AND INSTALLATION OF THE FLOOR FLAP ACTUATOR (Thermotronic)
- Under the dashboard, on the right side:
- remove the trim panel,
- set aside the sound insulation.
- Remove the hose (1) from the heater housing (2) (Fig.35).
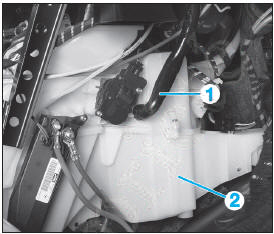
Fig. 35
- Disconnect the connector (3) (Fig.36).
- Remove the bolts (4).
- Remove the floor flap actuator (5).
To refit, reverse the removal procedure, then carry out a function test.
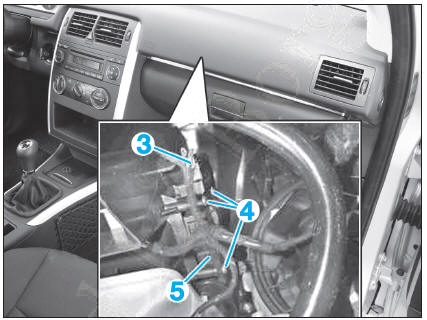
Fig. 36
REMOVAL AND INSTALLATION OF THE RIGHT AIR MIX FLAP ACTUATOR (Thermotronic)
OR AIR MIX FLAP (Thermatic)
- Under the dashboard, on the right side:
- remove the trim panel,
- set aside the sound insulation.
- Disconnect the connector (1) (Fig.37).
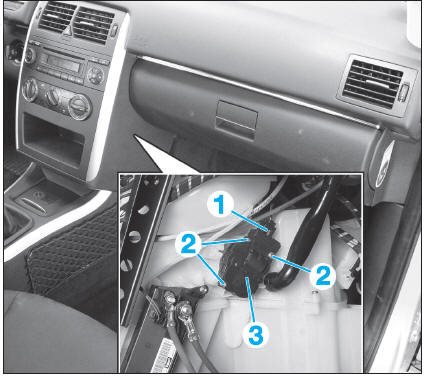
- Remove the screws (2).
- Remove the right air mix flap actuator (3).
To refit, reverse the removal procedure, then carry out a function test.
REMOVAL AND INSTALLATION OF THE LEFT AIR MIX FLAP ACTUATOR (Thermotronic)
- Under the dashboard, on the left side:
- remove the trim panel,
- set aside the sound insulation.
- Disconnect the connector (1) (Fig.38).
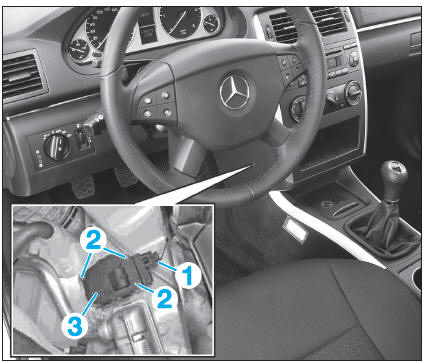
Fig. 38
- Remove the screws (2).
- Remove the left air mix flap actuator (3).
To refit, reverse the removal procedure, then carry out a function test.
REMOVAL AND INSTALLATION OF THE CENTER NOZZLE FLAP ACTUATOR (Thermotronic)
- Unclip the trim (1) of the center console at the arrows, starting from the bottom (Fig.39).
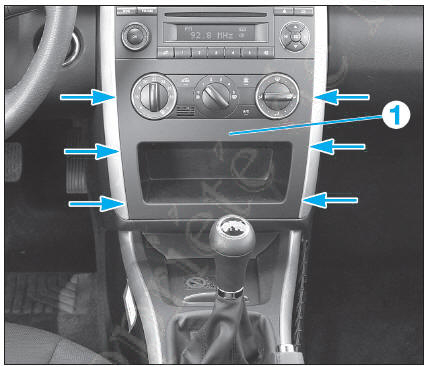
Fig. 39
- Depending on equipment (Parktronic system, heated seats, etc.), disconnect the connectors.
- Close the upper air outlet using the adjustment wheel (2) (Fig.40)
 The upper air outlet must be closed, otherwise the air guide or the center air vent may be damaged when removing the center air vent.
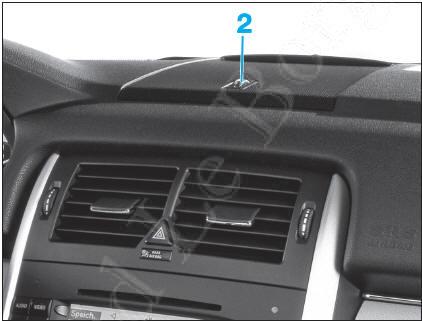
Fig. 40
- Using hooks, unlock the two fasteners of the center air vent (3) and remove it toward the rear (Fig.41).
- Disconnect the connector of the hazard warning switch.
- Remove the screws (4), operate the locks (5) and remove the radio (6) toward the rear (Fig.42).
- Disconnect the radio connectors.
- On vehicles with semi-automatic climate control (Thermatic), set the air distribution rotary knob to the 'general ventilation' position.
The levers are therefore placed in a position that makes it easier to disconnect the cables.- Operate the locks (7) and release the control panel (8) toward the front, rotate it, then remove it from the bottom.
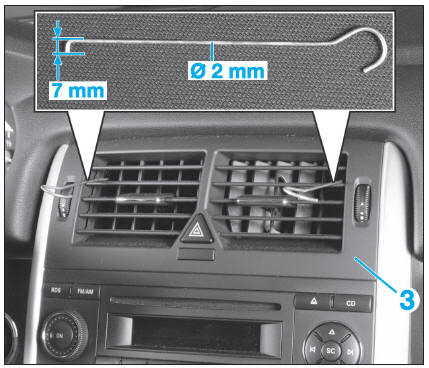
Fig. 41
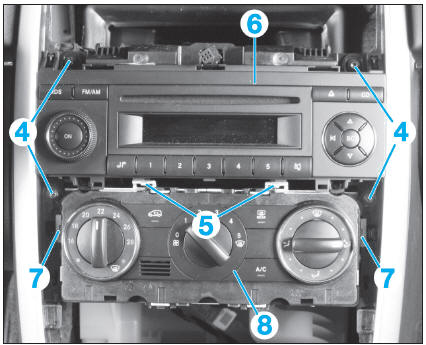
Fig. 42
It is not necessary to disconnect the connectors of the climate control panel.- Fold back the sound insulation (9), then remove the screw (10) from the bracket (11) (Fig.43).
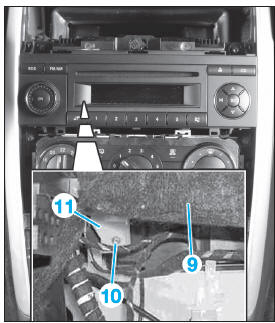
Fig. 43
- Remove the bracket (3) and the center nozzle flap actuator (4), and lower them until the connector (5) is accessible (Fig.44).
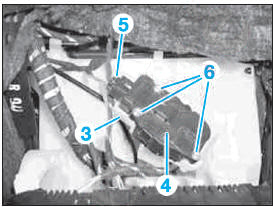
Fig. 44
- Disconnect the connector (5).
- Remove the screws (6) if the center nozzle flap actuator (4) needs to be replaced.
To refit, reverse the removal procedure, then carry out a function test.
REMOVAL AND INSTALLATION OF FRESH/RECIRCULATED AIR FLAP ACTUATOR
- Under the dashboard, on the left side, remove the trim panel.
- Unscrew the screws (1) on the bracket (2) (Fig.45).
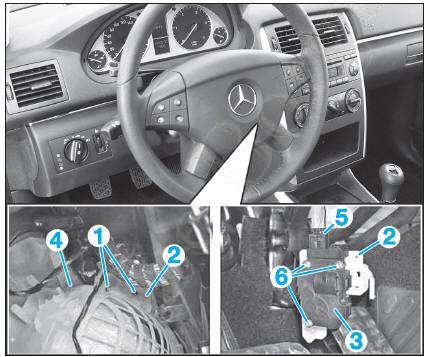
Fig. 45
- Remove the bracket (2) and the fresh/recirculated air flap actuator (3) from the heater housing (4) until the connector (5) is accessible.
- Disconnect the connector (5).
- Remove the screws (6) if the actuator needs to be replaced.
To refit, reverse the removal procedure, then carry out a function test.
Test yourself
A quick Mercedes-Benz B-Class quiz: every answer comes with an explanation and a link to the manual page.
Was this page helpful?