Heating - air conditioning
Removal and refitting of the expansion valve / heater-air conditioning unit
In this manual: Heating - air conditioning
~3min read
EXPANSION VALVE
REMOVAL AND REFITTING
 Be sure to promptly cap all air conditioning fittings after opening the air conditioning circuit to prevent moisture and contaminants from entering the circuit.
- Drain the refrigerant circuit (see relevant operation).
- Remove the bolt (1) (Fig.15).
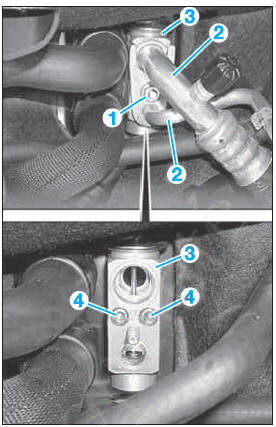
Fig. 15
- Disconnect the pipes (2) from the expansion valve (3).
- Remove the bolts (4).
- Remove the expansion valve (3).
When refitting, observe the following points:
- tighten the bolts (4) in successive passes, lubricating them with compressor oil,
- replace all pipe seals, lubricating them with compressor oil,
- recharge the refrigerant circuit,
- check for refrigerant leaks and correct operation of the air conditioning system.
HEATER-AIR CONDITIONING UNIT
 Removing the heater-air conditioning unit requires beforehand:
- draining the air conditioning circuit,
- draining the cooling circuit,
- removing the dashboard (see chapter 'BODYWORK').
 Be sure to promptly cap all air conditioning fittings after opening the air conditioning circuit to prevent moisture and contaminants from entering the circuit.
REMOVAL AND REFITTING
In the engine compartment
- Disconnect the battery.
- Drain the refrigerant circuit (see relevant operation).
- Drain the coolant (see chapter 'ENGINE').
- Remove the cowl grille.
- Lift the cabin filter housing (1) and remove it from the heater-air conditioning unit (Fig.16).
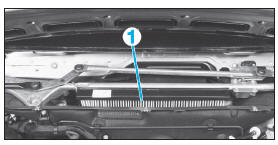
Fig. 16
- Disconnect the wiring harness at the heater-air conditioning unit.
- Remove the bolt (2) (Fig.17).
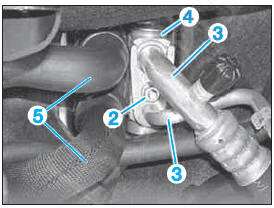
Fig. 17
- Disconnect the pipes (3) from the expansion valve (4).
- Remove the pipes (5).
In the passenger compartment
- Remove the dashboard and its cross member (see chapter 'BODYWORK').
- Remove the sound insulation between the heater unit and the bulkhead.
- Unclip the wiring harness on each side of the heater unit.
- Remove the accelerator pedal (2 nuts) after disconnecting the pedal sensor connector.
- On vehicles with Thermotronic air conditioning, remove the left mix air flap actuator (see chapter 'ENGINE').
- On each side of the heater unit, remove the air duct (6) (Fig.18).
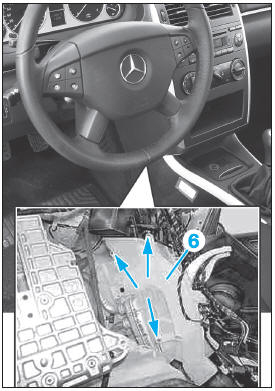
Fig. 18
- On vehicles with Thermatic air conditioning, pull the defrost flap control cable and the floor flap control cable out of the right air duct mounting tab (6).
- Disconnect the various connectors attached to the heater unit.
- Remove the bolt (arrow) to remove the air distributor (7) (Fig.19).
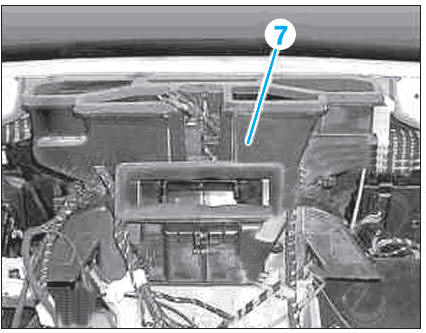
Fig. 19
- On vehicles with automatic transmission, unclip the selector lock control cable at the heater unit.
- Remove the nuts (arrows) on the left side of the heater unit (Fig.20).
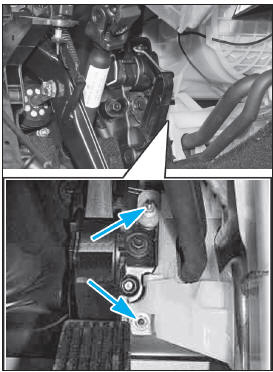
Fig. 20
- Remove the nut (arrow) on the right side of the heater unit (Fig.21).
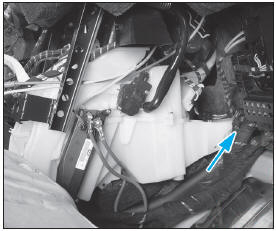
Fig. 21
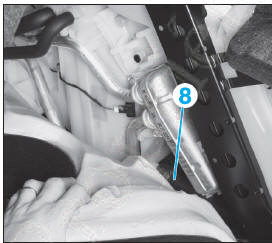
Fig. 22
- Detach the condensate drain hose (8) from the heater unit (Fig.22).
- Lift the rear of the heater unit to free it from the air ducts (9) for the rear passengers (Fig.23).
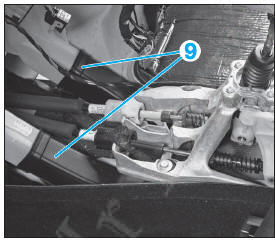
Fig. 23
- Free the heater unit (10) from the mounting (11) at the bulkhead (12) (Fig.24).
- With the help of a second person, remove the heater unit (10) from the cabin.
 Make sure no harness, hose or flexible pipe obstructs the removal of the heater unit.
To refit, proceed in the reverse order, observing the following instructions:
- make sure the wiring harnesses are correctly routed when refitting the dashboard,
- replace the removed seals,
- replace the desiccant cartridge,
- refill the cooling circuit, bleed it and check the coolant level,
- evacuate the air conditioner and recharge the circuit,
- check the operation of the air conditioning.
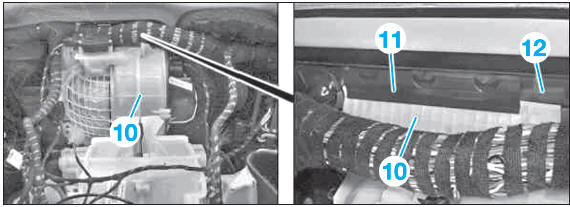
Fig. 24
Test yourself
A quick Mercedes-Benz B-Class quiz: every answer comes with an explanation and a link to the manual page.
Was this page helpful?