Heating - air conditioning
Removing and refitting the desiccant cartridge / compressor / condenser
In this manual: Heating - air conditioning
~3min read
 Be sure to promptly cap all air conditioning fittings after opening the air conditioning circuit to prevent moisture and contaminants from entering the circuit.
 The desiccant cartridge must be replaced after any work on the refrigerant circuit. It must be installed no more than 20 minutes after its packaging is opened.
REMOVAL AND REFITTING
- Drain the refrigerant circuit (see relevant operation).
- Raise and support the front of the vehicle.
- Remove the front bumper (see chapter 'BODYWORK').
- Remove the bolt (1) (Fig.10).
- Disconnect the pipe (2).
- Remove:
- the bolt (3),
- the 2 bolts (4),
- the desiccant cartridge (5).
To refit, reverse the removal procedure, observing the following points:
- replace all pipe seals, lubricating them with compressor oil,
- recharge the circuit with refrigerant, observing the additional oil quantities after replacing components (see 'SPECIFICATIONS'),
- check for refrigerant leaks and correct operation of the air conditioning system.
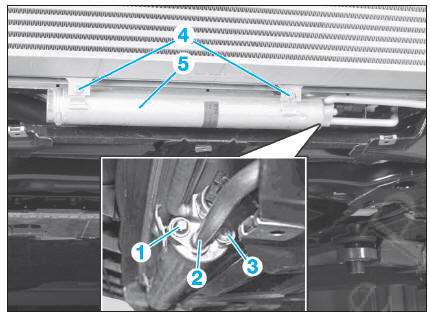
Fig. 10
AIR CONDITIONING COMPRESSOR
REMOVAL
Be sure to promptly cap all air conditioning fittings after opening the air conditioning circuit to prevent moisture and contaminants from entering the circuit.- Drain the refrigerant circuit (see relevant operation).
- Remove the engine undertray.
- Release the accessory drive belt (1) (Fig.11) and remove it from the compressor pulley (see chapter 'ENGINE').
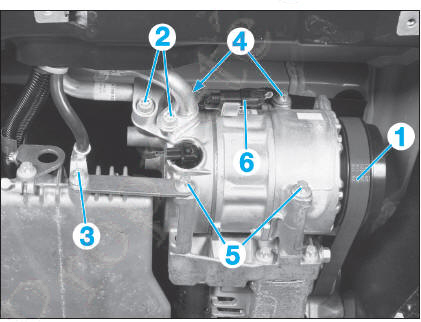
Fig. 11
- Remove:
- the bolts (2),
- the bolt (3),
- the bolts (4),
- the bolts (5).
- Pull the compressor out until the connector (6) is accessible; detach the connector from its bracket.
- Finish pulling out the compressor.
INSTALLATION
Refit in the reverse order of removal, observing the following points:
- replace all pipe seals, lubricating them with compressor oil,
- replace the desiccant cartridge,
- recharge the circuit with refrigerant, observing the additional oil quantities after replacing components (see 'SPECIFICATIONS'),
- observe the specified tightening torques,
- check for refrigerant leaks and correct operation of the air conditioning system.
CONDENSER
Be sure to promptly cap all air conditioning fittings after opening the air conditioning circuit to prevent moisture and contaminants from entering the circuit.REMOVAL AND REFITTING
- Remove the front bumper (see chapter 'BODYWORK').
- Remove the clips (arrows) (Fig.12).
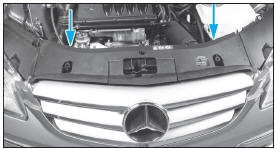
Fig. 12
- Remove the air guide.
- Remove the desiccant cartridge (see relevant operation).
- Disconnect the pressure switch connector (1) (Fig.13).
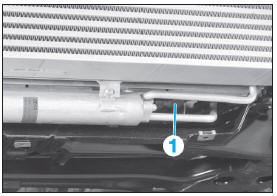
Fig. 13
- On vehicles with automatic transmission, remove the transmission oil cooler (2) (Fig.14). To do so:
- remove the 2 bolts (3),
- compress the clip (4) and remove the transmission oil cooler.
- Remove the screw (5).
- Unlock the condenser (6) from the engine coolant radiator by compressing the clip (7) and pushing the bracket (8) to the side.
- Remove the air-to-air intercooler (9).
- Remove the condenser (6) from the bottom.
When refitting, observe the following points:
- replace all pipe seals, lubricating them with compressor oil,
- recharge the refrigerant circuit,
- replace the desiccant cartridge,
- check for refrigerant leaks and correct operation of the air conditioning system.
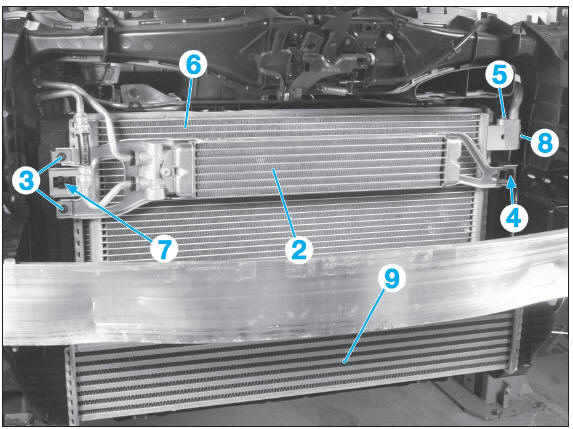
Fig. 14
Test yourself
A quick Mercedes-Benz B-Class quiz: every answer comes with an explanation and a link to the manual page.
Was this page helpful?