Rear Shock Absorber
Exploded View
WITHOUT DYNAMIC DIGITAL SUSPENSION AND ELECTRONIC AIR SUSPENSION

 |
Piston rod lock nut |  |
Shock absorber mounting bracket |  |
Dust cover |
 |
Bound bumper |  |
Shock absorber |  |
Front lower link |
 |
: Always replace after every disassembly. | ||||
 |
: N·m (kg-m, ft-lb) | ||||
WITH DYNAMIC DIGITAL SUSPENSION AND ELECTRONIC AIR SUSPENSION
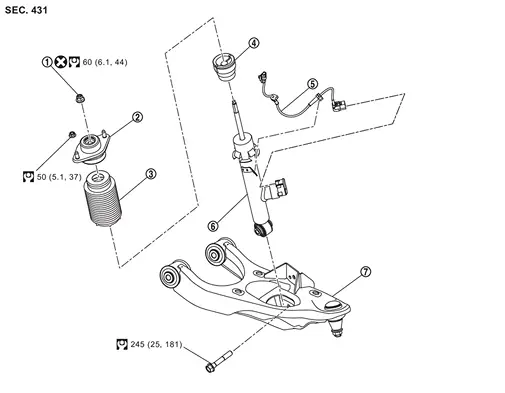
|
Piston rod lock nut | |
Shock absorber mounting bracket | |
Dust cover |
|
Bound bumper | |
Shock absorber harness | |
Shock absorber |
 |
Front lower link | ||||
|
: Always replace after every disassembly. | ||||
|
: N·m (kg-m, ft-lb) | ||||
Removal and Installation
REMOVAL
Without Dynamic Digital Suspension and Electronic Air Suspension
Remove tires. Refer to ROAD WHEEL TIRE : Removal & Installation.
Remove cylinder body. Hang cylinder body in a place where it will not interfere with work. Refer to Removal and Installation.
Loosen front lower link mounting nuts (frame side).
Loosen rear lower link mounting nuts (frame side).
Remove stabilizer clamp. Refer to Removal and Installation.
Remove shock absorber mounting bolt (lower side).
Set suitable jack under axle housing.
Remove shock absorber mounting nuts (upper side)
Lower suitable jack.
Lower axle housing, and remove shock absorber from front lower link.
Perform inspection after removal. Refer to Inspection.
With Dynamic Digital Suspension and Electronic Air Suspension
Start engine.
Turn auto height mode control switch to ON, shift the shift position to N and set to normal height.
Turn OFF the electronic air suspension function. Refer to Operation.
Stop engine.
Lift up the vehicle.
Remove rear tire. Refer to ROAD WHEEL TIRE : Removal & Installation.
Remove wheel sensor and harness from lower link. Refer to Removal and Installation.
Disconnect shock absorber harness connector.
Support the rear lower link with suitable jack (A) until most horizontal angle with vehicle on the ground.
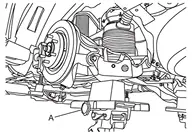
Loosen the air connector and perform air bleeding.
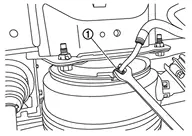
Remove air tube together with air connector from air spring .
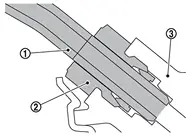
Remove cylinder body. Hang cylinder body in a place where it will not interfere with work. Refer to Removal and Installation.
Remove stabilizer clamp. Refer to Removal and Installation.
Loosen front lower link mounting nuts (frame side). Refer to Removal and Installation.
Loosen rear lower link mounting nuts (frame side). Refer to Removal and Installation.
Separate rear lower link from axle housing. Refer to Removal and Installation.
Remove shock absorber mounting bolt (lower side).
Set suitable jack under axle housing.
Remove shock absorber mounting nuts (upper side)
Lower suitable jack.
Lower axle housing, and remove shock absorber from front lower link.
Perform inspection after removal. Refer to Inspection.
INSTALLATION
Without Dynamic Digital Suspension and Electronic Air Suspension
Note the following, and install in the reverse order of removal.
Perform final tighting of shock absorber (lower side) by the following procedures.
Measure between wheel center and fender arch (A).
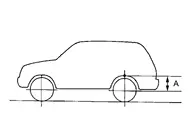
Set the wheel chocks on the front tires.
Jack up the rear of the vehicle and set the rigid rack.
Remove the rear tires.
Set suitable jacks (A) on the left and right axle housings
. (axle housing ball joint fastening part).
Jack up the left and right axle housings until the vehicle no longer floats off the rigid rack (A).
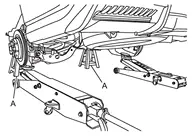
Measure between wheel center and fender arch (A).
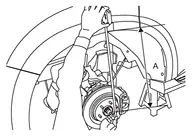
Tight the mounting bolt of shock absorber (lower side) to the specified torque. Refer to Exploded View.
Perform inspection after installation. Refer to Inspection.
After replacing the shock absorber, always follow the disposal procedure to discard the shock absorber. Refer to Disposal.
With Dynamic Digital Suspension and Electronic Air Suspension
Install shock absorber.
Install rear lower link to axle housing. Refer to Removal and Installation.
Tighten rear lower link mounting nuts (frame side). Refer to Removal and Installation.
Tighten front lower link mounting nuts (frame side). Refer to Removal and Installation.
Install stabilizer clamp. Refer to Removal and Installation.
Install cylinder body. Refer to Removal and Installation.
Install air tube and air connector together to air spring .
Start engine.
Use CONSULT and fill the inner pressure of air spring to 3.3 bar. Refer to Work Support.
Remove suitable jack from rear lower link.
Use CONSULT and fill the inner pressure of air spring to 3.3 bar. Refer to Work Support.
Install shock absorber harness connector.
Stop engine.
Install tire. Refer to ROAD WHEEL TIRE : Removal & Installation.
Lift down the vehicle.
Start engine.
Perform pressure measurements using CONSULT. Refer to Work Support.
Perform the height sensor calibration using CONSULT. Refer to Work Support.
Use CONSULT and vehicle to the normal height. Refer to Work Support.
Turn ON the electronic air suspension function. Refer to Operation.
Stop engine.
Perform final tighting of front lower link (frame side) by the following procedures.Measure between wheel center and fender arch (A).
.
Perform inspection after installation. Refer to Inspection.
After replacing the shock absorber, always follow the disposal procedure to discard the shock absorber. Refer to Disposal.
Disassembly and Assembly
DISASSEMBLY
When removing the shock absorber mounting bracket, use the rear shock absorber service kit [SST: KV401110S0 ( ― ) ] to hold the shock absorber rod. A: Soket 18 :[SST: KV40111000(NI-53363)] B: Rod lock handle :[SST: KV40111100(NI-53362)]
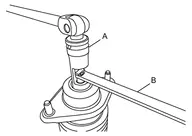
ASSEMBLY
When assembling dust cover, bound bumper, and shock absorber mounting bracket, follow the procedure below.
Install bound bumper
to dust cover .
Install dust cover
and bound bumper to shock absorber mounting bracket .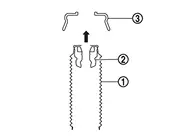
Install shock absorber to bound bumper, dust cover, and shock absorber mounting bracket.
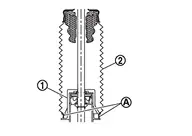
When installing the shock absorber mounting bracket, use the rear shock absorber service kit [SST: KV401110S0 ( ― ) ] to hold the shock absorber rod. A: Soket 18 :[SST: KV40111000(NI-53363)] B: Rod lock handle :[SST: KV40111100(NI-53362)]
Inspection
INSPECTION AFTER REMOVAL
Check the following items, and replace the parts if necessary.
Shock absorber assembly for deformation, cracks, damage.
Piston rod on shock absorber assembly for damage, uneven wear, and distortion.
Welded and sealed areas for oil leakage.
INSPECTION AFTER INSTALLATION
Without Dynamic Digital Suspension and Electronic Air Suspension
Check wheel alignment. Refer to Inspection.
With Dynamic Digital Suspension and Electronic Air Suspension
Make sure the electronic air suspension function is turn ON. Refer to Operation.
Confirm that no warning message is displayed on the information display. Refer to Air suspension warning.
Perform the self-diagnosis with CONSULT. Check if any DTC is detected. Refer to CONSULT Function.
Confirm to close the hood.
Always check for the air leakage with soapy water.
Check wheel alignment. Refer to Inspection.
Disposal
Set shock absorber horizontally with the piston rod fully extended.
Drill 2 – 3 mm (0.08 – 0.12 in) hole at the position (
 ) from top as shown in the figure to release gas gradually.

A : 20 – 30 mm (0.79 – 1.18 in) Position the drilled hole downward and drain oil by moving the piston rod several times.