Turbocharger
Exploded View
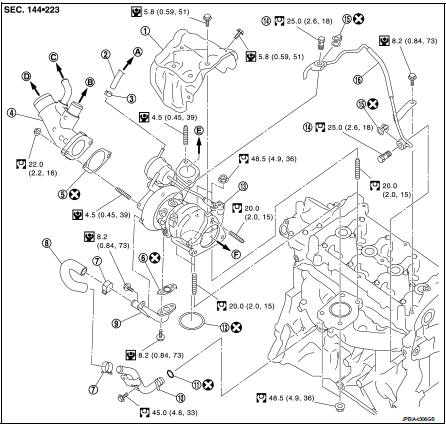
1. Heat insulator
2. Actuator hose
3. Clamp
4. Turbocharger inlet tube 5. Gasket
6. Gasket
7. Clamp
8. Oil outlet hose
9. Oil return pipe
10. Oil supply tube
11. O-ring
12. O-ring
13. Turbocharger
14. Eye bolt
15. Gasket
16. Oil supply tube
A. To EVAP canister purge volume control solenoid valve
B. To air inlet hose
C. To PCV hose
D. To air duct E. To air inlet tube assembly F. To catalyst convertor
 : N·m (kg-m, ft-lb)
 : N·m (kg-m, in-lb)
 : Always replace after every
disassembly.
Removal and Installation
REMOVAL
1. Drain engine coolant. Refer to CO-11, "Draining". 2. Remove engine cover. Refer to EM-25, "Exploded View". 3. Remove air cleaner cover assembly and air cleaner body assembly. Refer to EM-26, "Exploded View". 4. Remove air inlet tube assembly. Refer to EM-31, "Exploded View". 5. Remove cowl top extension. Refer to EXT-20, "Exploded View". 6. Disconnect heated oxygen sensor 2 harness connector. 7. Remove front tube. Refer to EX-5, "Exploded View".8. Remove catalyst convertor. Refer to EM-33, "2WD : Exploded View" (2WD models) or EM-34, "4WD : Exploded View" (4WD models).
9. Remove turbocharger assembly as follows:
a. Remove heat insulator. b. Remove oil supply tube.c. Remove mounting nuts of turbocharger.
CAUTION:Be careful not to deform each turbocharger piping when pulling out the assembly.
INSTALLATION
Install in the reverse order of removal.
NOTE:
Apply LOCTITE FRENETANCH or equivalent to the threads of the turbocharger oil inlet pipe union to the cylinder head
Inspection
Turbocharger
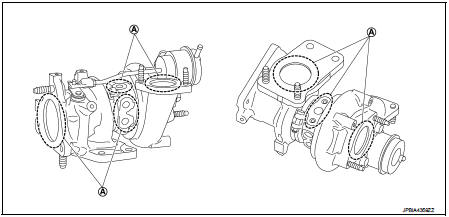
A. Check for leakage
CAUTION:When the compressor wheel, turbine wheel or rotor shaft is damaged, remove all the fragments and foreign matter left in the following passages in order to prevent a secondary failure:
Suction side : Between turbocharger and air cleaner Exhaust side : Between turbocharger and outlet duct
INSPECTION AFTER INSTALLATION
Start engine and raise engine speed to check no exhaust emission leaks.