Transaxle Assembly
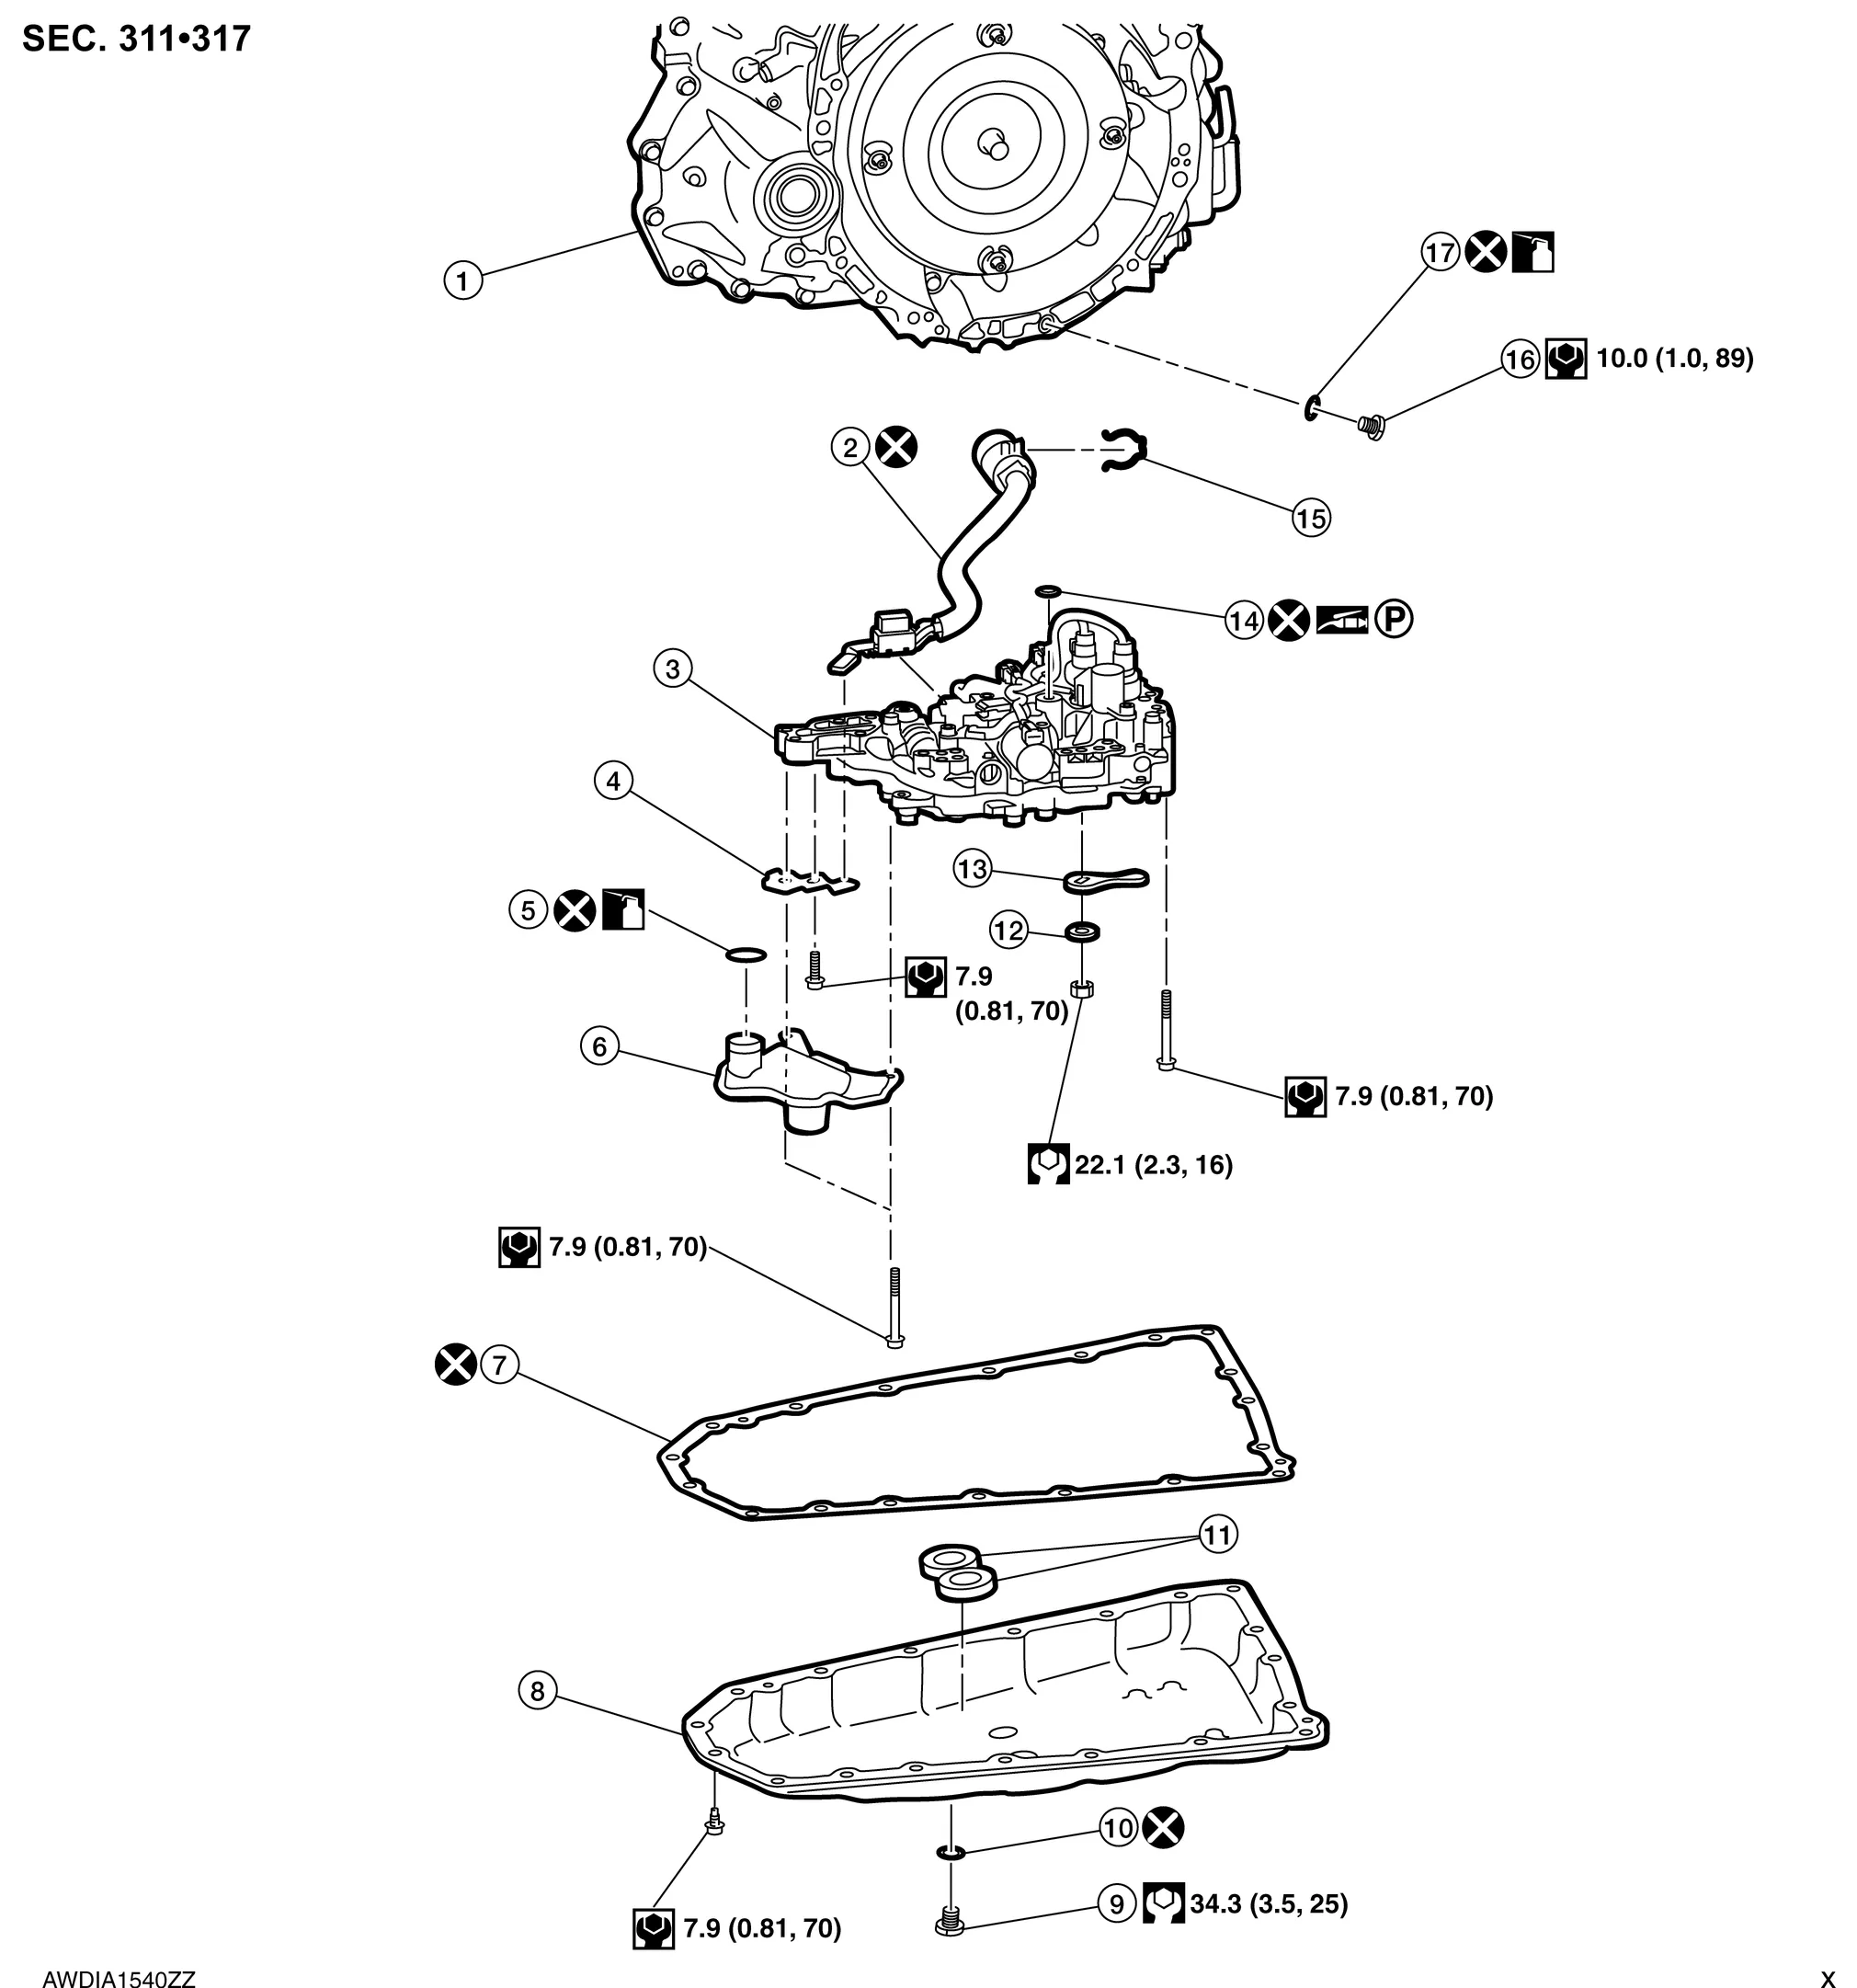
 |
Transaxle assembly |  |
Terminal cord assembly |  |
Control valve |
 |
Bracket |  |
O-ring |  |
Oil strainer assembly |
 |
Oil pan gasket |  |
Oil pan |  |
Drain plug |
 |
Drain plug gasket |  |
Magnet |  |
Spring washer |
 |
Manual plate |  |
Lip seal |  |
Snap ring |
 |
Overflow plug |  |
O-ring | ||
 |
: Always replace after every disassembly | ||||
 |
: N·m (kg-m, ft-lb) | ||||
 |
: N·m (kg-m, in-lb) | ||||
 |
: Apply CVT fluid | ||||
 |
: Apply petroleum jelly |
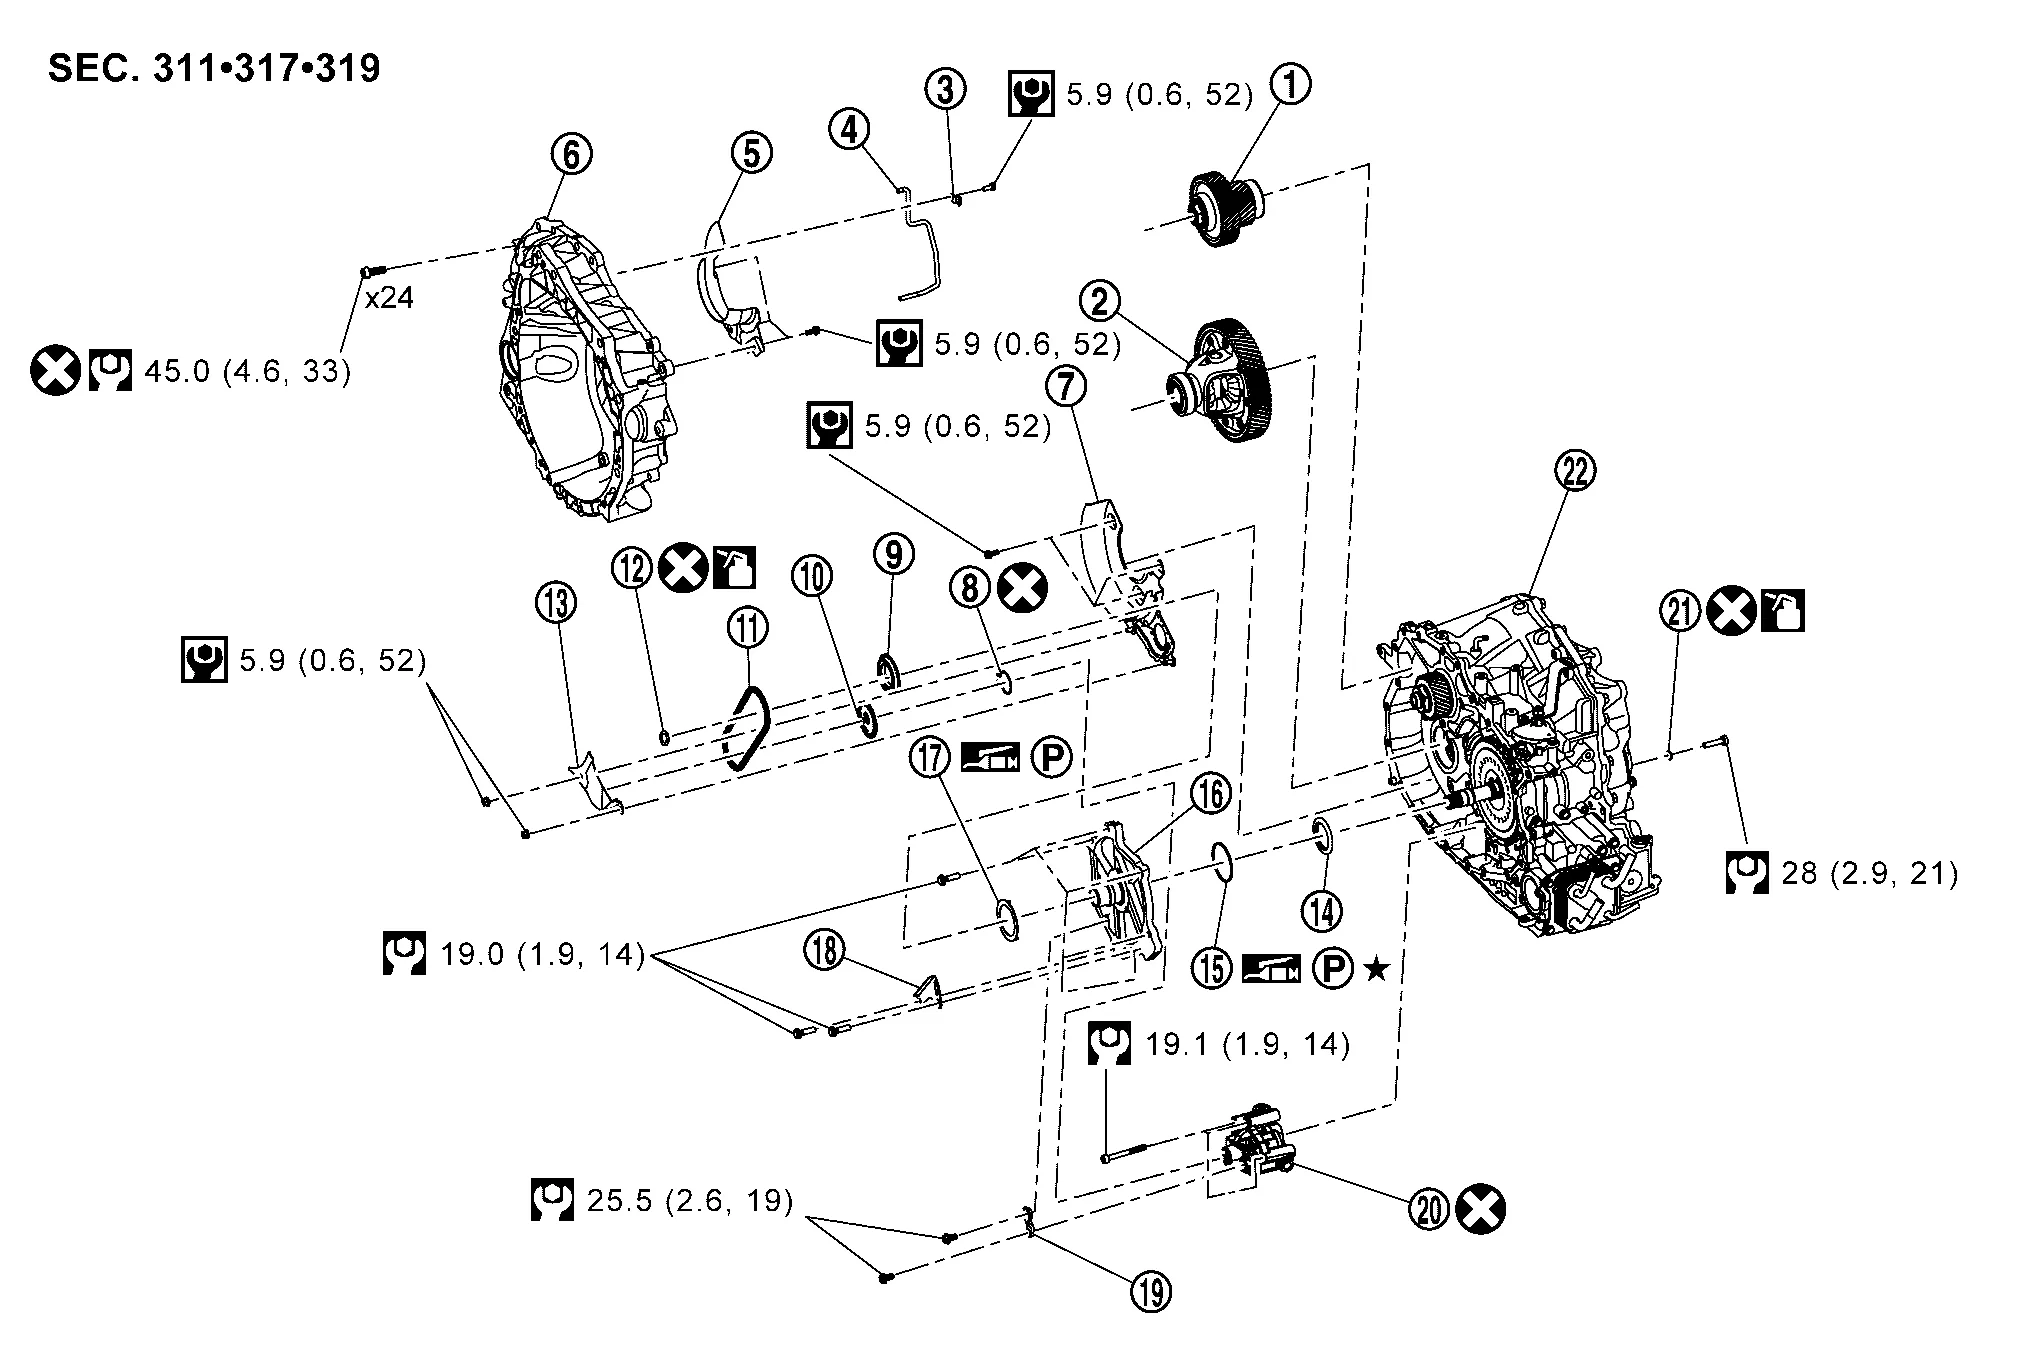
 |
Reduction gear assembly |  |
Differential assembly |  |
Clip |
|
Lubrication tube | |
Baffle plate | |
Converter housing |
|
Baffle plate | |
Snap ring | |
Drive sprocket |
|
Driven sprocket | |
Oil pump chain | |
O-ring |
|
Baffle plate (Chain cover) | |
Thrust bearing | |
Thrust bearing race |
|
Dummy cover | |
Thrust washer |  |
Chain guide |
 |
Bracket |  |
Oil pump |  |
O-ring |
 |
Transaxle case | ||||
|
: Always replace after every disassembly. | ||||
|
: N·m (kg-m, ft-lb) | ||||
|
: N·m (kg-m, in-lb) | ||||
|
: Apply CVT fluid | ||||
|
: Apply petroleum jelly | ||||
 |
: Apply Liquid Gasket (loctite 5460) or equivalent | ||||
 |
: Select with proper thickness | ||||
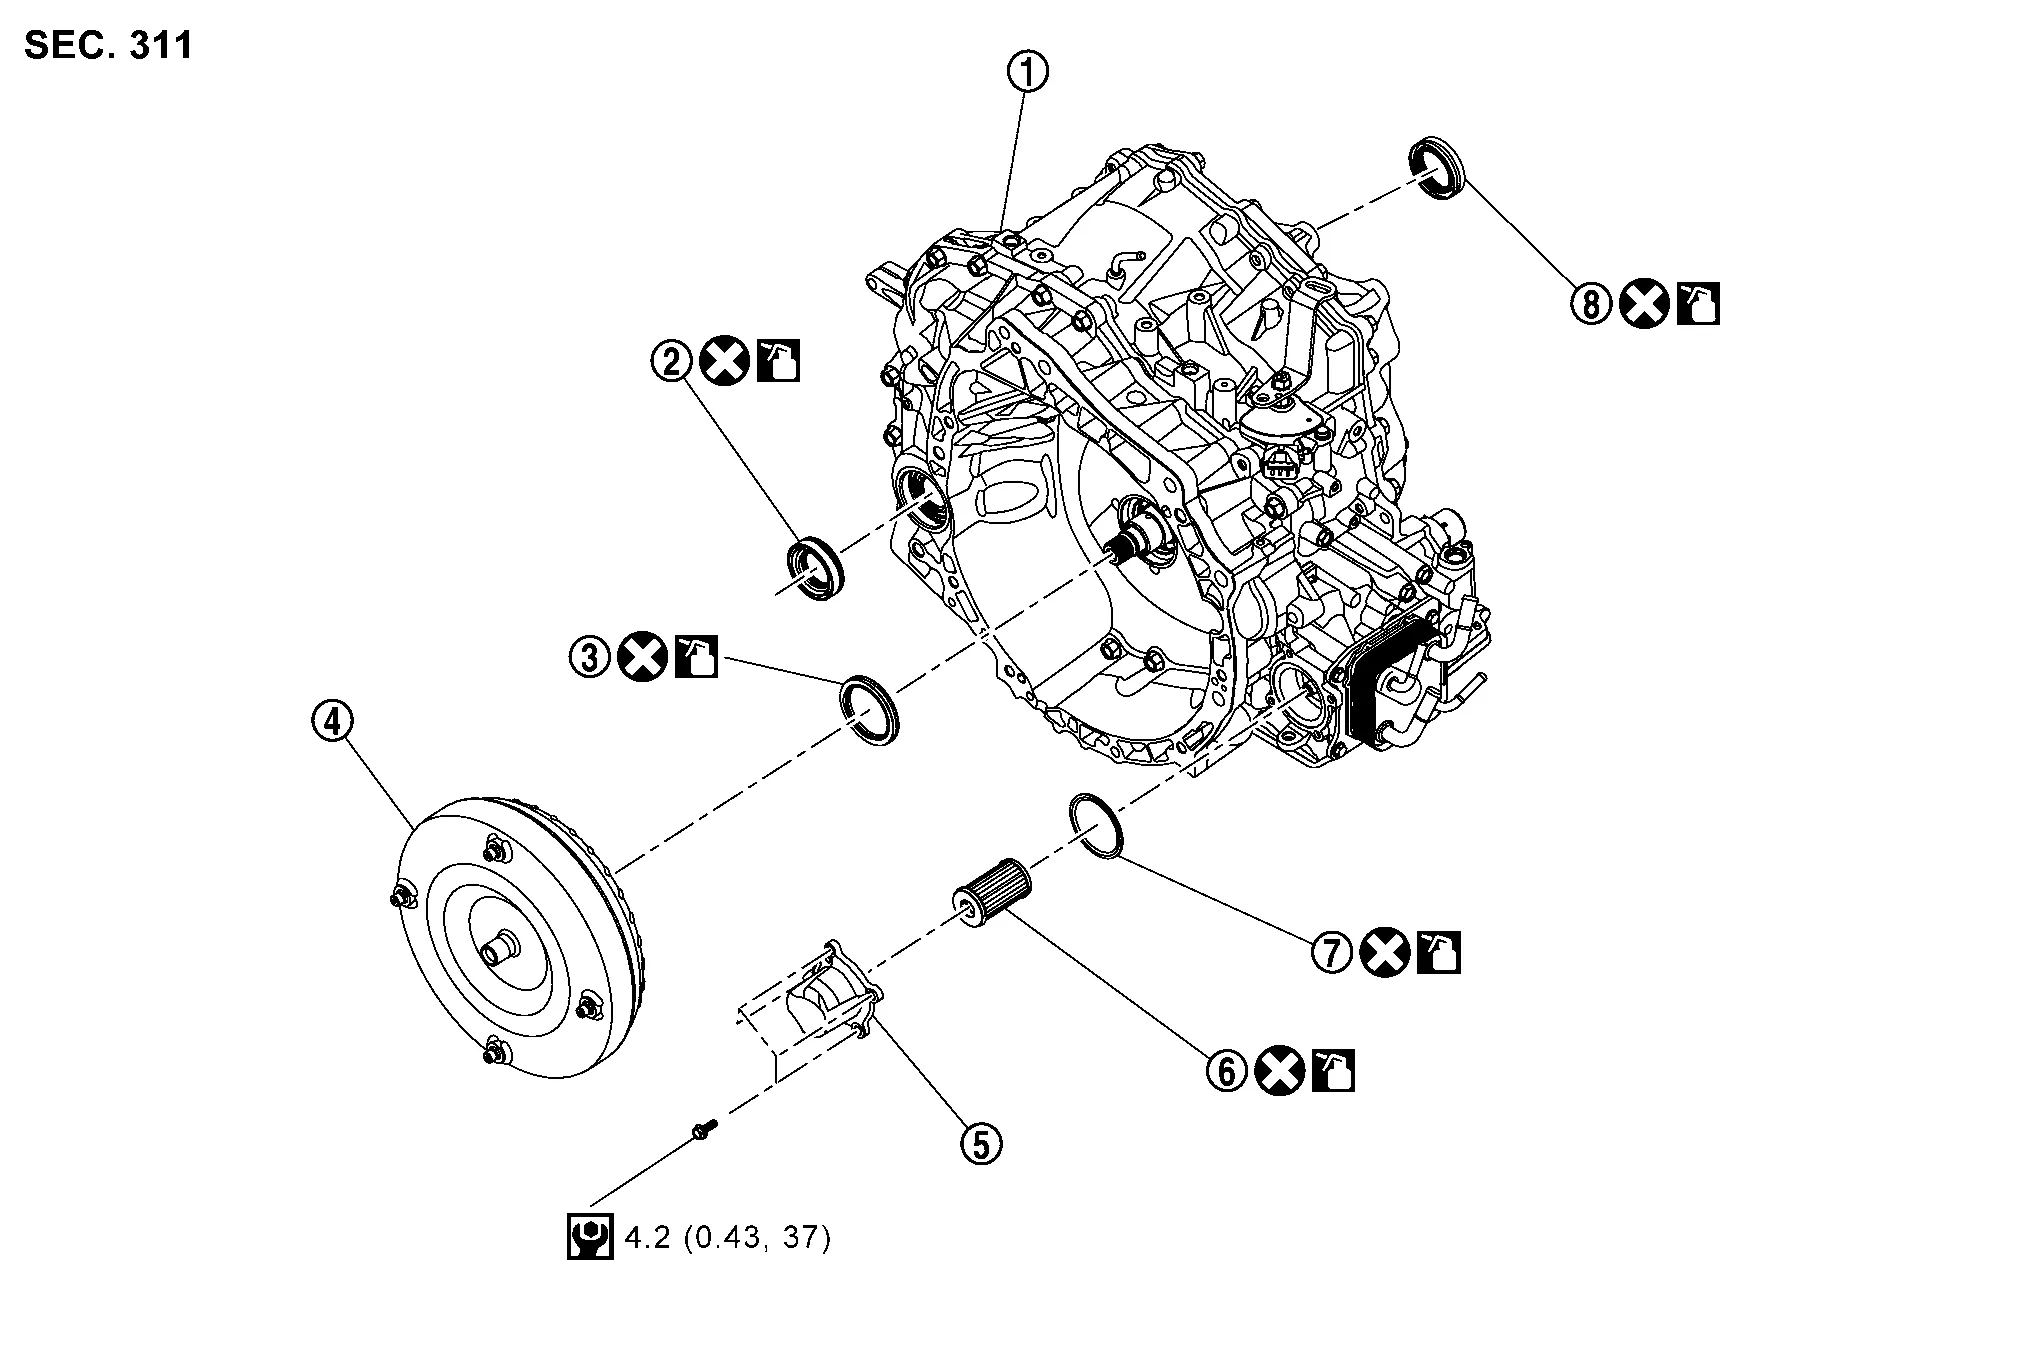
|
Transaxle assembly | |
Differential side oil seal | |
Converter housing oil seal |
|
Torque converter | |
Fluid filter cover | |
CVT fluid filter |
|
O-ring | |
Differential side oil seal | ||
|
: Always replace after every disassembly. | ||||
|
: N·m (kg-m, in-lb) | ||||
|
: Apply CVT fluid | ||||

|
Transaxle case | |
Thrust bearing | |
Pulley bearings |
|
Lubrication cap | |
Side cover | |
Primary speed sensor |
|
O-ring | |
O-ring | |
Shim |
|
O-ring | |
Sub-assembly | ||
|
: Always replace after every disassembly. | ||||
|
: N·m (kg-m, ft-lb) | ||||
|
: N·m (kg-m, in-lb) | ||||
|
: Apply CVT fluid | ||||
|
: Apply petroleum jelly | ||||
|
: Apply Liquid Gasket (loctite 5460) or equivalent | ||||
Check that the part number and serial number of the new control valve
are identical to those of the attached CD .
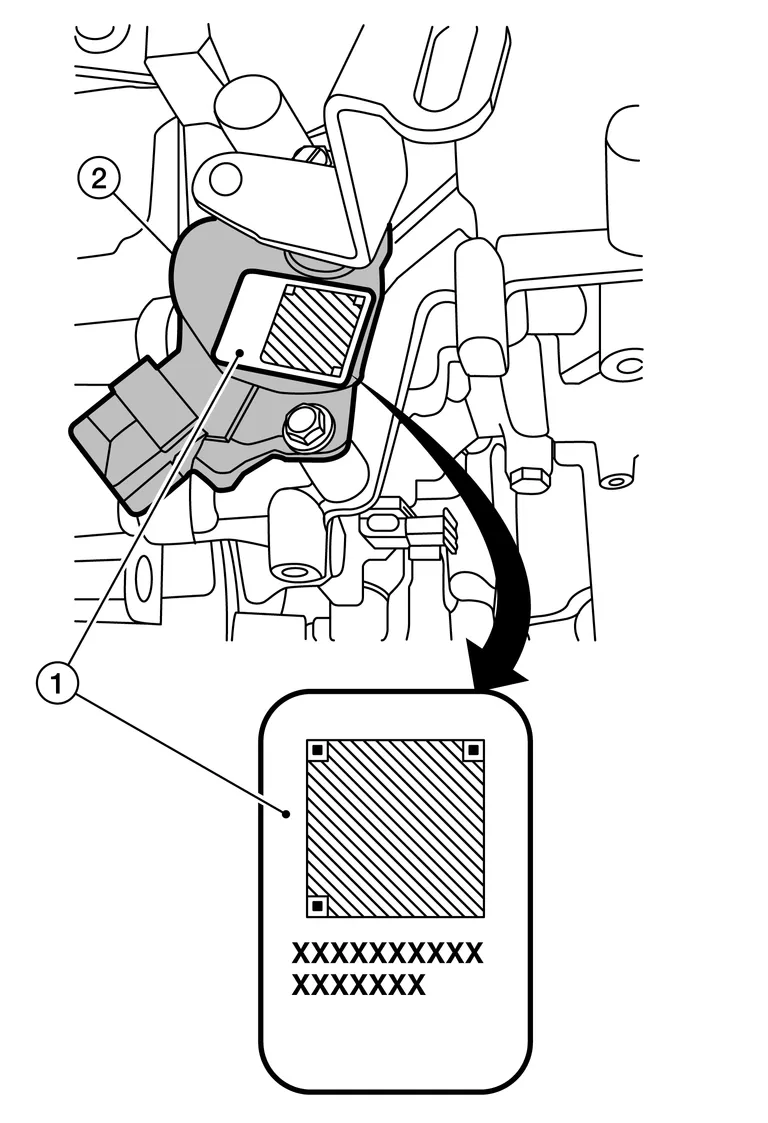
If old QR code sticker is affixed to transmission range switch, remove the QR code sticker and affix new QR code sticker included with new control valve.
Disconnect battery negative terminal.
Remove drain plug from oil pan and then drain the CVT fluid.
Remove drain plug gasket.
Remove the oil pan bolts, and then remove the oil pan and oil pan gasket.
Remove the magnets from the oil pan.
Remove the lock nut , spring washer , and manual plate from manual shaft  .
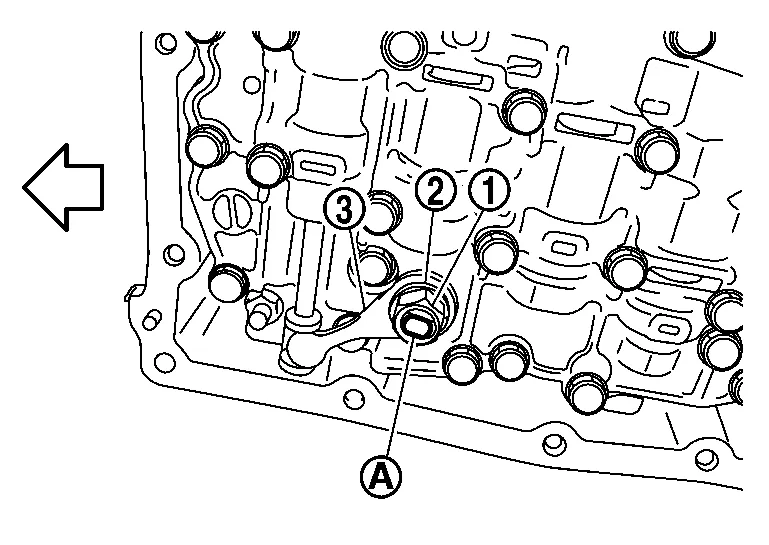
 |
: Front |
Remove the oil strainer assembly bolts and remove the oil strainer assembly.
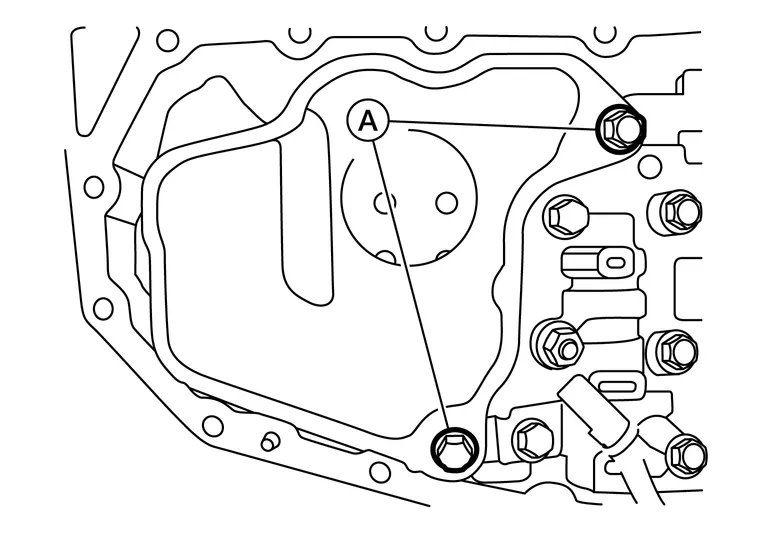
Remove CVT fluid temperature sensor bracket .
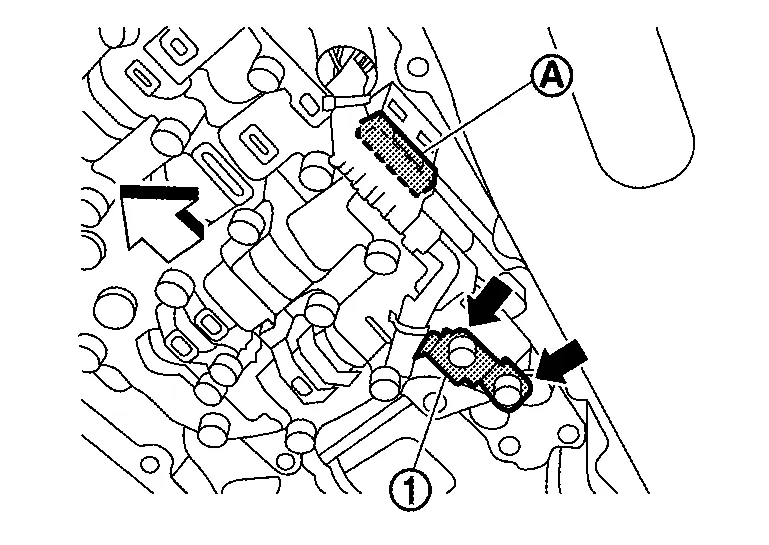
 |
: Bolt |
|
: Front |
Disconnect control valve harness connector .
Remove the control valve bolts and  , and then remove the control valve from the transaxle case.
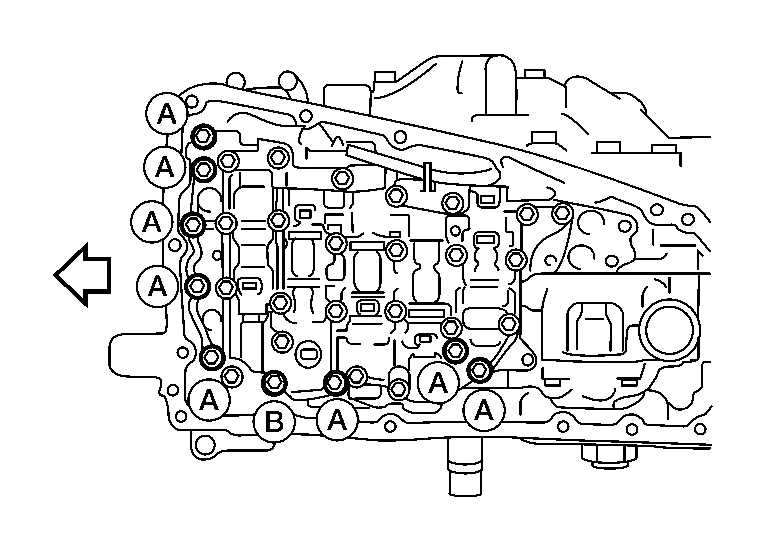
|
: Front |
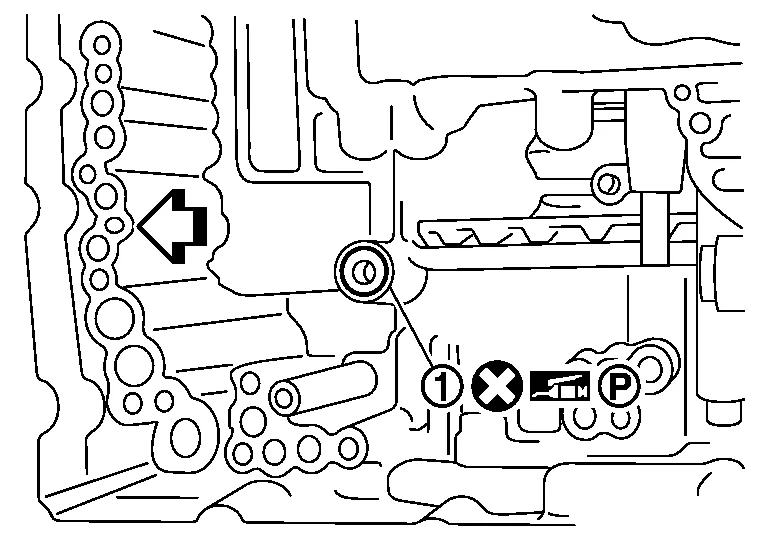
Remove the lip seal from the transaxle case.
|
: Front |
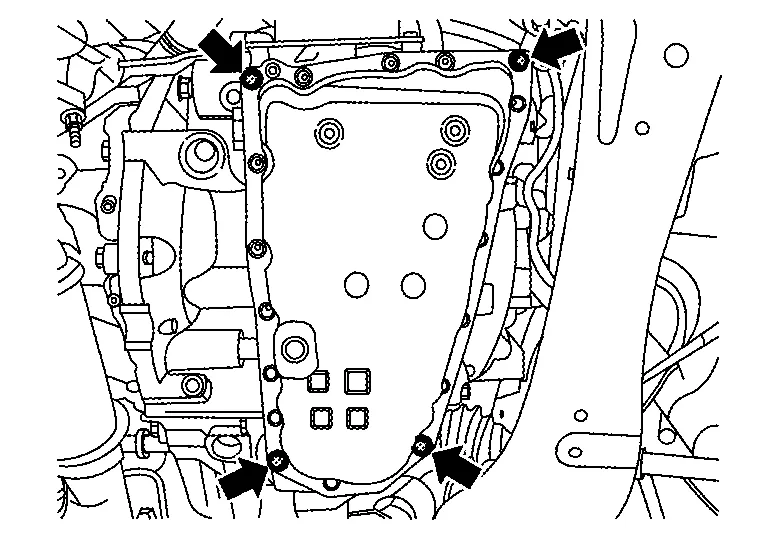
Temporarily install the oil pan gasket and oil pan with four oil pan bolts (  ) to corners of the oil pan, hand tight.
Remove the CVT from the Nissan Murano vehicle. Refer to Removal and Installation - FWD (FWD) or Removal and Installation - AWD (AWD).
Mount the CVT on a workbench with the oil pan side down.
Remove the torque converter .
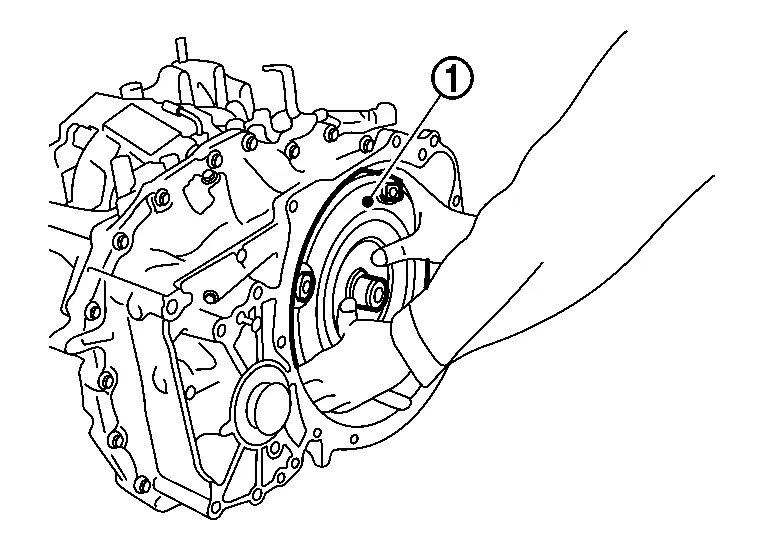
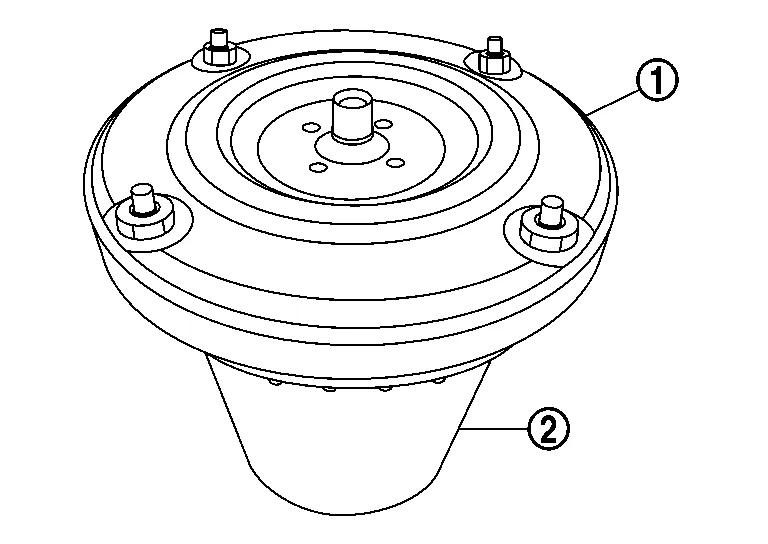
Drain the CVT fluid out of the torque converter .
|
: Drain pan |
Remove mounting bolt () and remove primary speed sensor from transaxle assembly.

Remove the converter housing fixing bolts.

|
: Front bolts |
|
: Back side bolts |
Separate and then remove the converter housing from the transaxle case. Use the slide hammer [SST: KV315J0610 (J-25721-A)] (A), slide hammer nut and bolt kit [SST: KV315J0630 (J-50255-UPD)] (B), and J-hook case separator [SST: KV315J0620 (J- 51923)] (C) at the cut out areas similar to the one shown in figure.
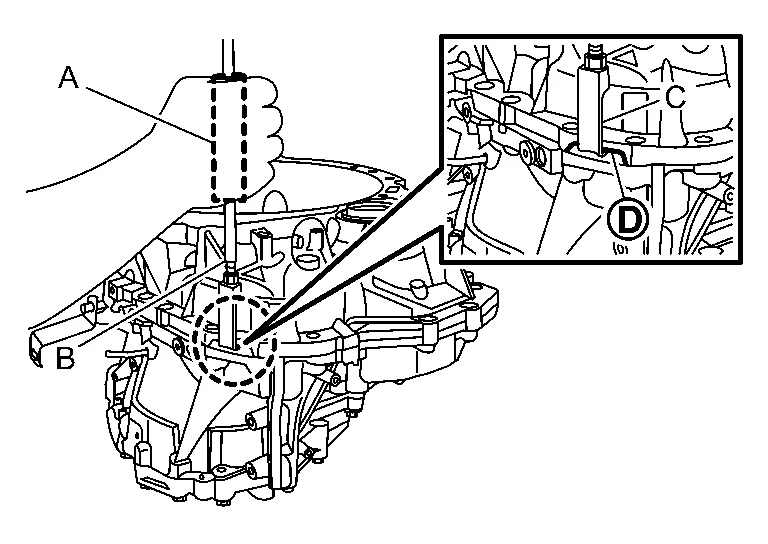
 |
: Cutout area (total 3 places) |
Check that retaining pin of manual shaft locates on the original position.

Remove the O-ring from the input shaft.
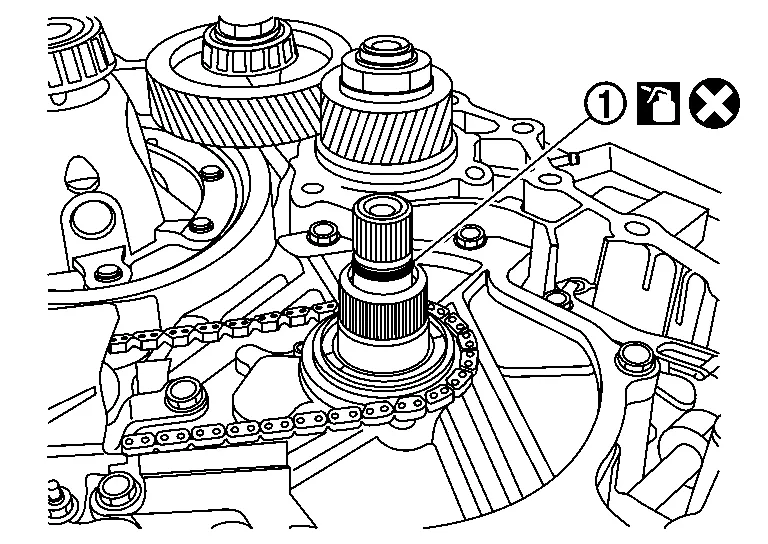
Carefully remove the reduction gear assembly and the differential assembly .

Remove the following oil seals using suitable tool:
Transaxle case differential side oil seal (drive shaft seal)

Torque converter seal
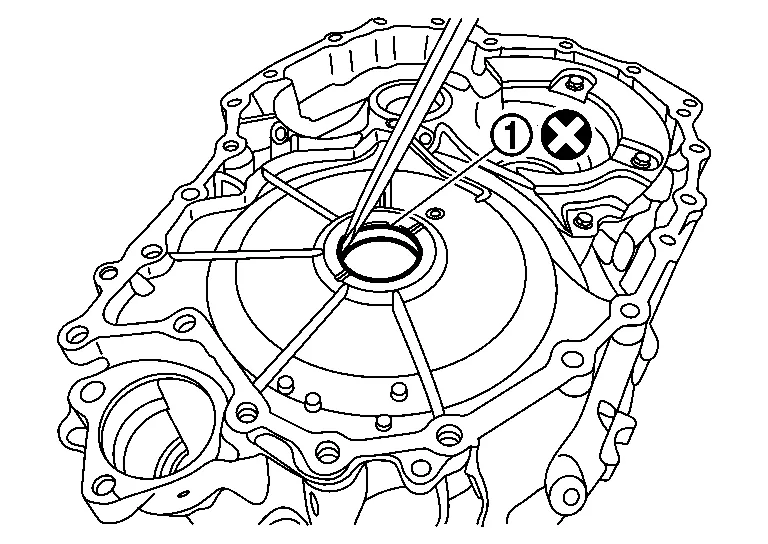
Converter housing differential side oil seal (drive shaft seal)
(FWD only)
Remove the baffle plate (chain cover) .

|
: Nut |
Remove the oil pump chain , driven sprocket and drive sprocket as one assembly in the following procedure.
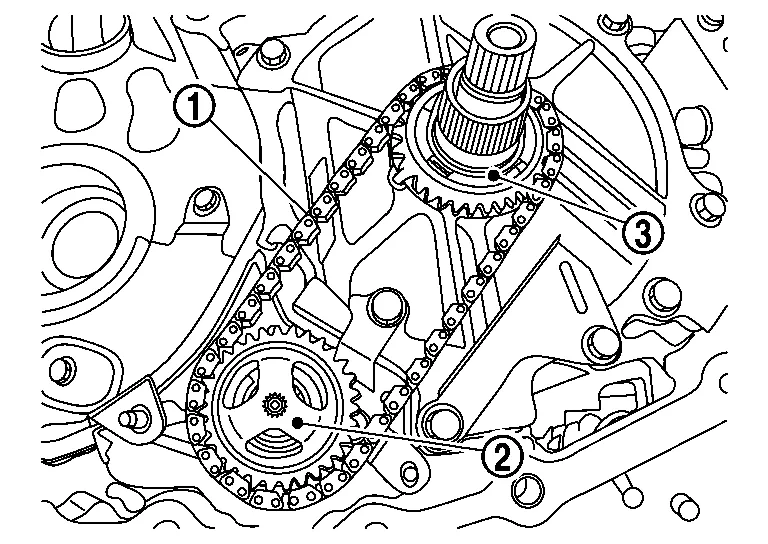
Spread the snap ring
using snap ring pliers.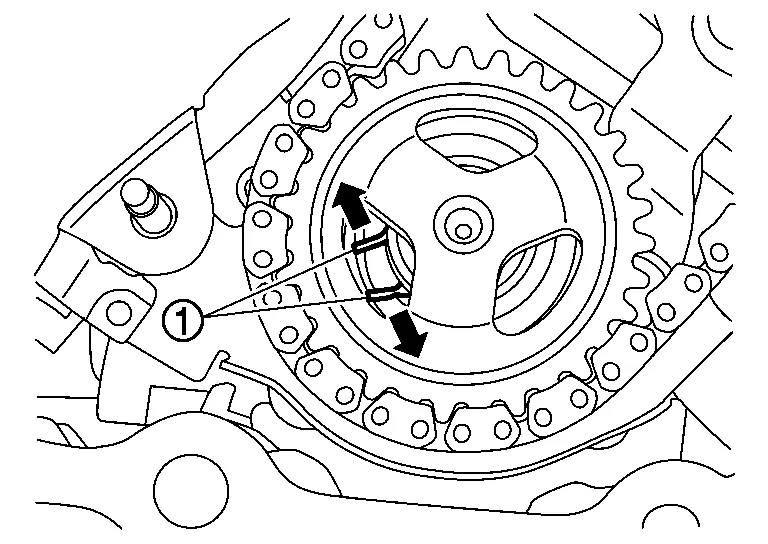
Lift the driven sprocket and the drive sprocket horizontally.
Remove the thrust washer .
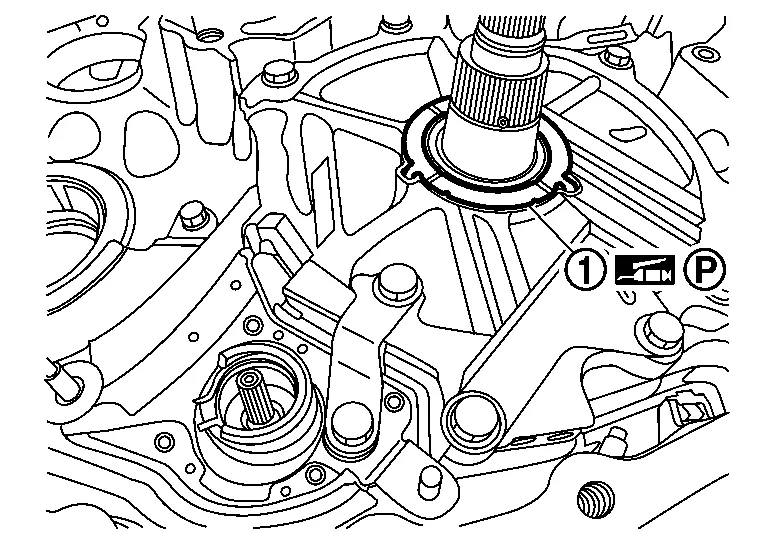
Remove the snap ring .
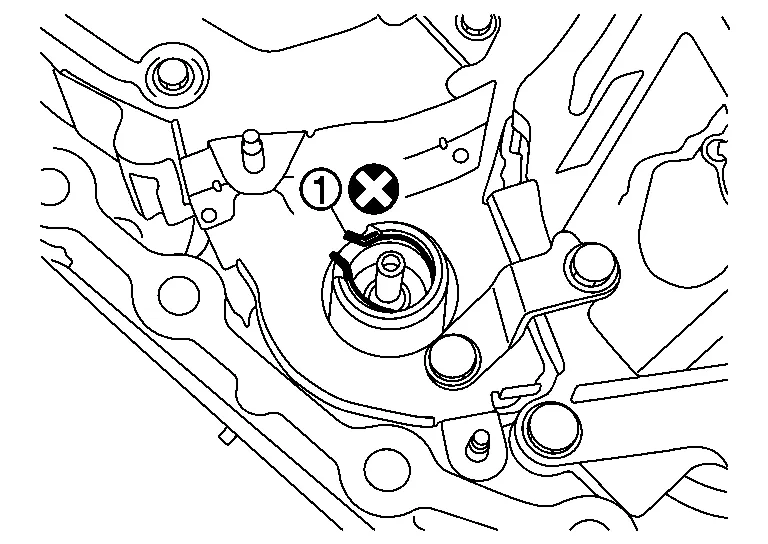
Remove the bracket .
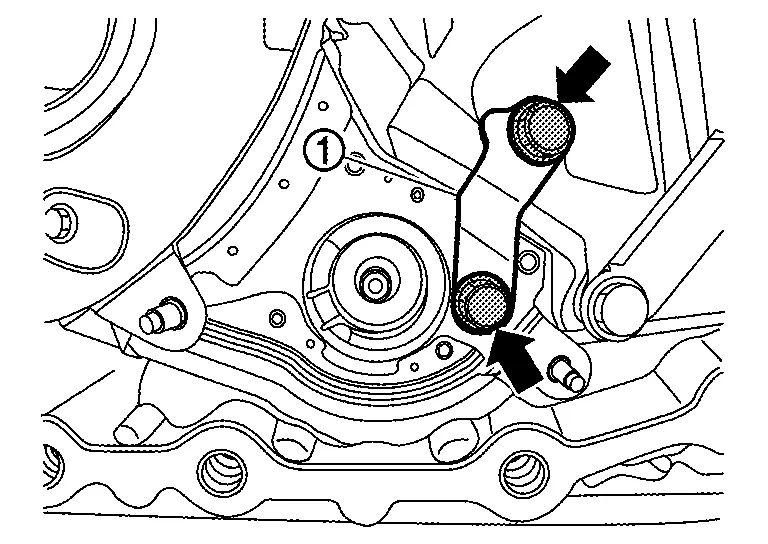
|
: Bolt |
Remove the baffle plate .
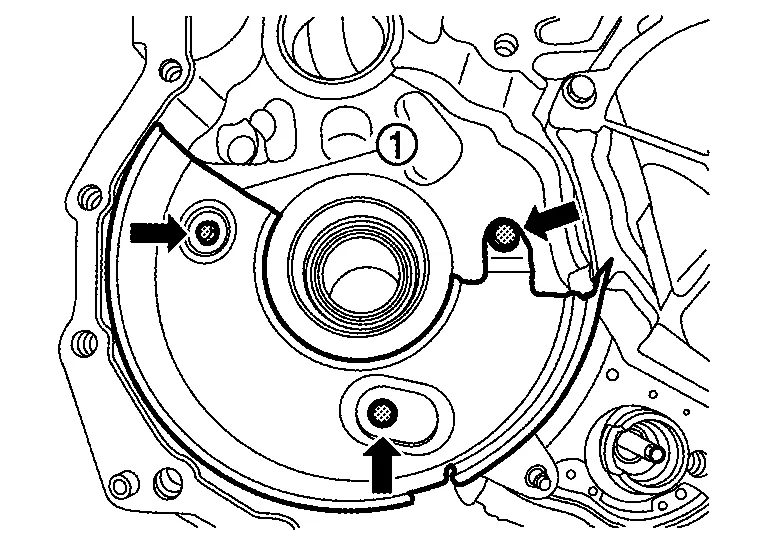
|
: Bolt |
Remove the chain guide .
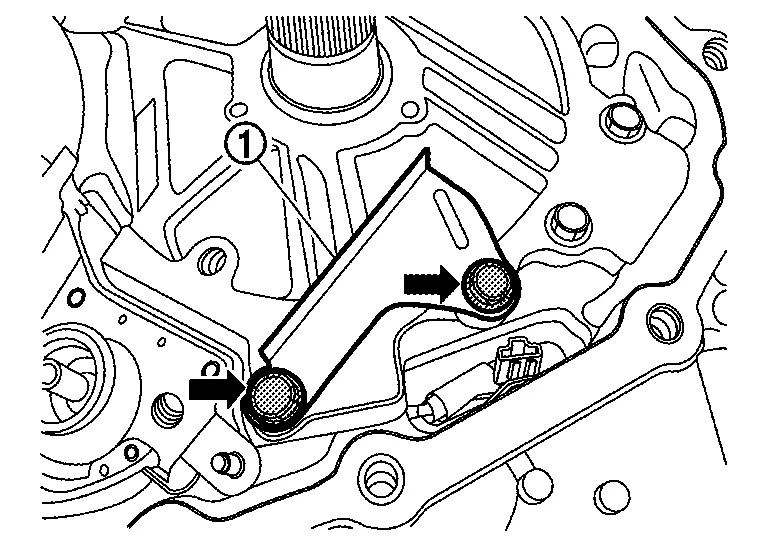
|
: Bolt |
Remove the dummy cover .

|
: Bolt |
Remove the thrust bearing clutch assembly. And wipe any metallic debris off of the face of the secondary speed sensor .
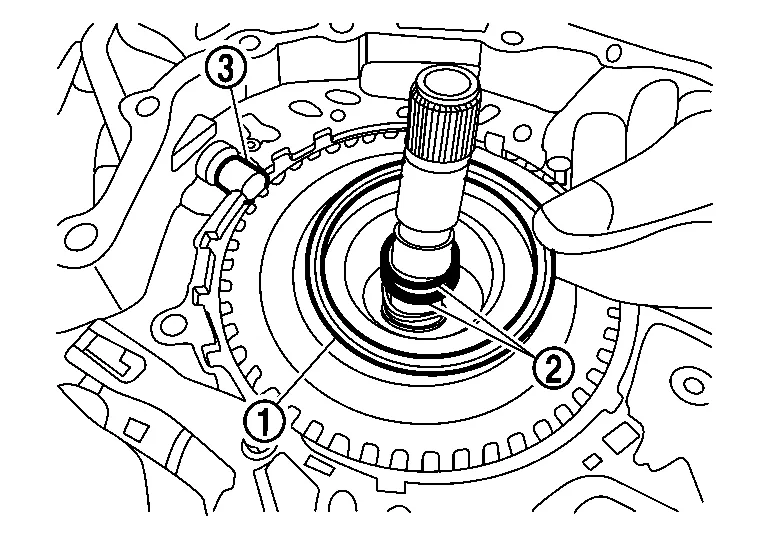
Remove the thrust bearing race from the dummy cover.
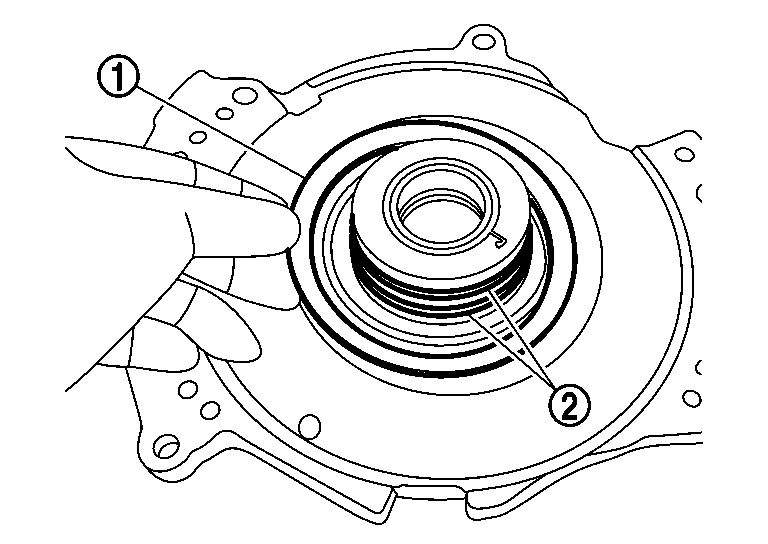
Remove the oil pump fixing bolts (4 pieces) and then remove the oil pump .
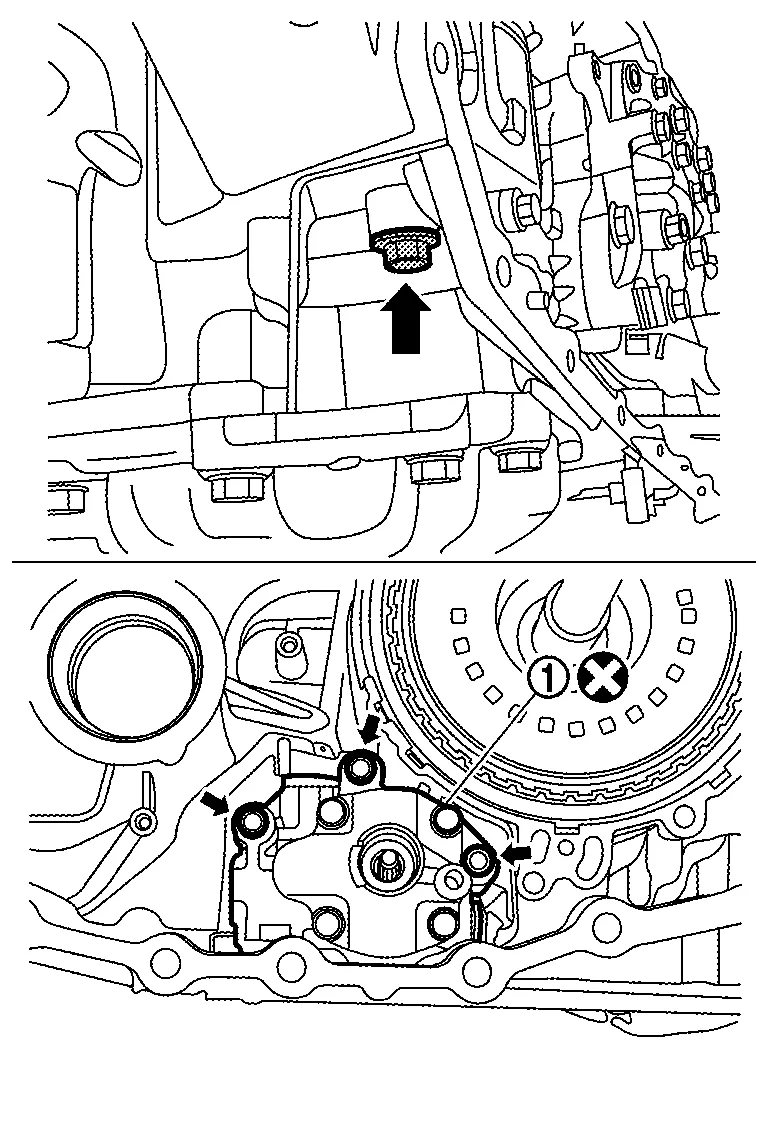
|
: Bolt |
Remove CVT fluid filter as follows:
Remove the bolts (
)and then remove the CVT fluid filter cover .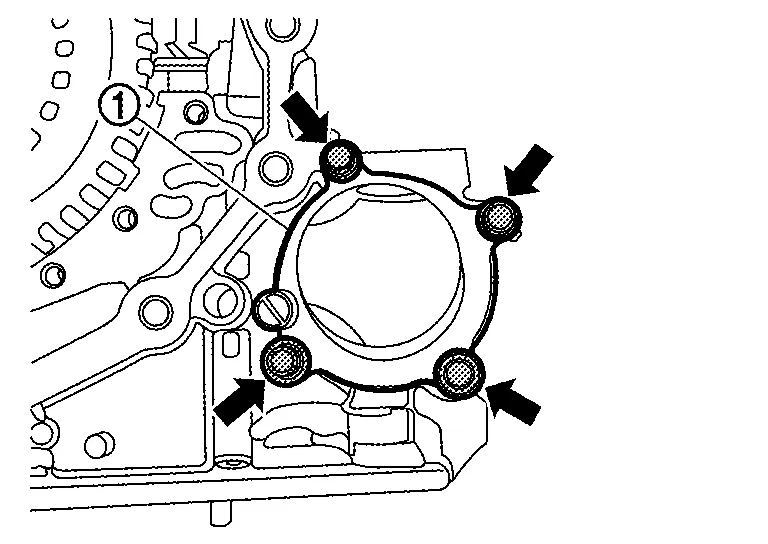
Remove the CVT fluid filter
with grommet seal and O-ring seal .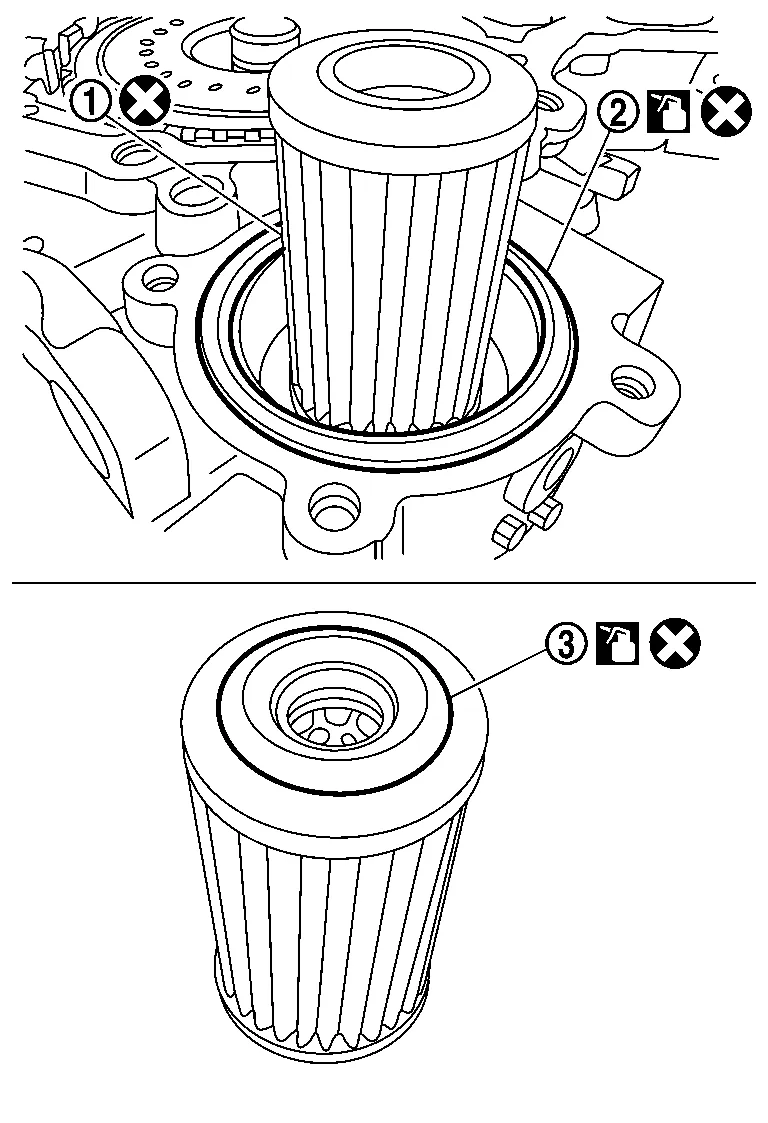
Thoroughly clean the mating surfaces of the transaxle case and torque converter housing.
Make sure rust and debris have been cleaned off of dowel pins and receiving holes .
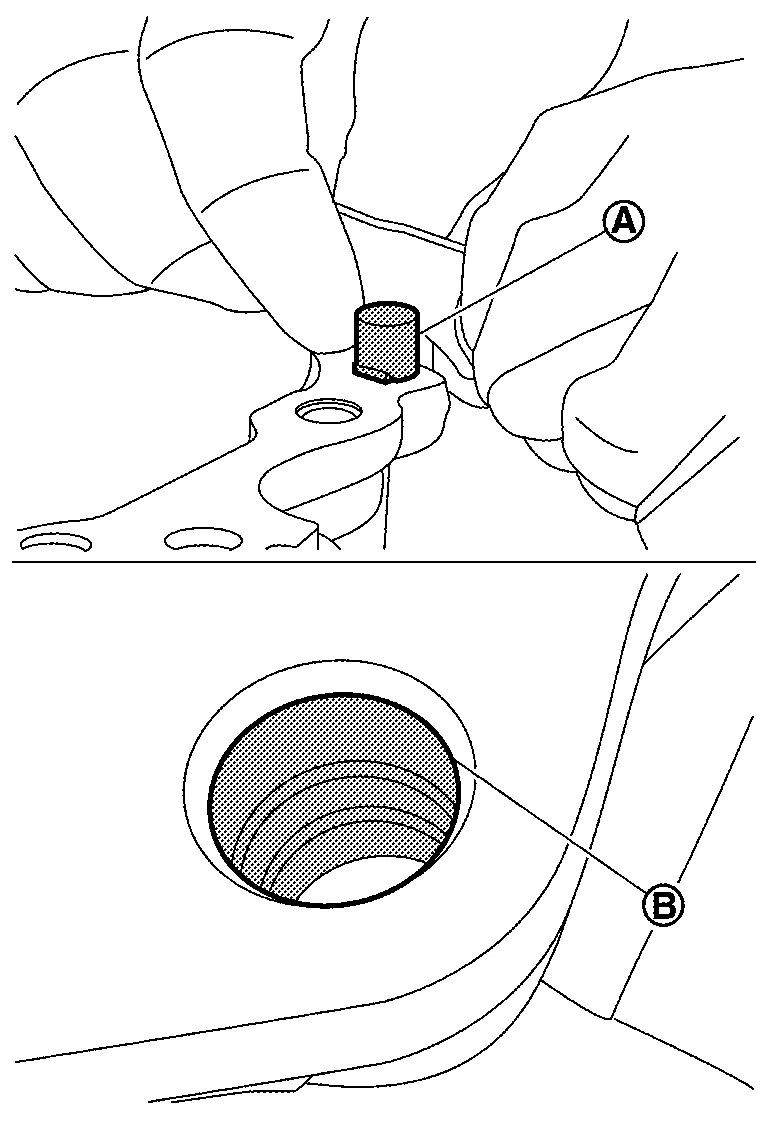
Clean the oil passages in the transaxle case, dummy cover, and CVT fluid filter area.
Clean the area where the CVT fluid filter fits
.Clean the fluid passages
to and from the filter.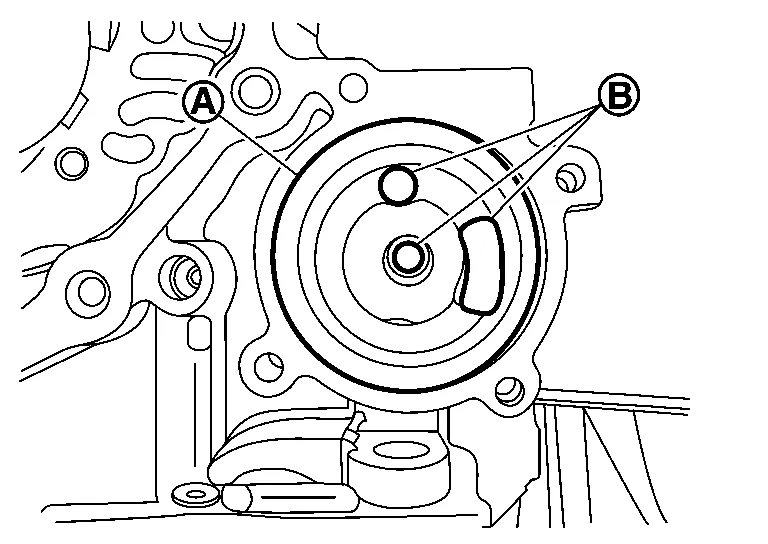
Spray parts cleaner in all fluid passages
of the transaxle case where shown in figure.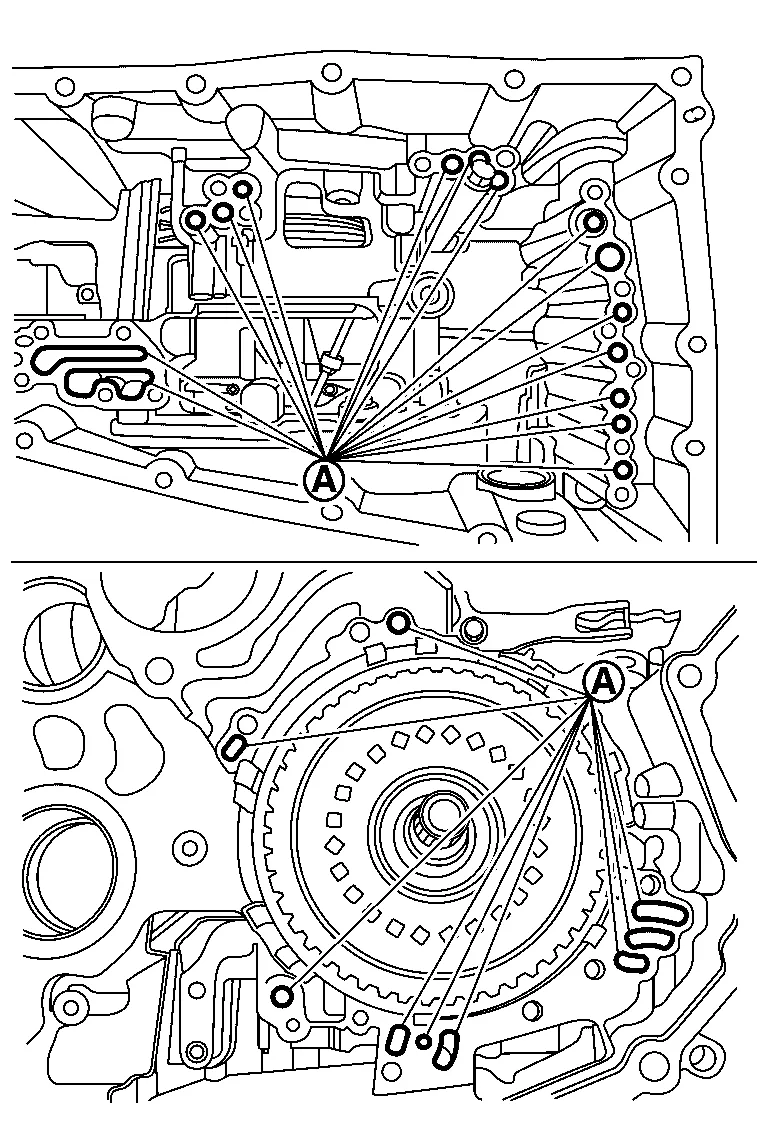
Apply compressed air in the same passage.
Temporarily install fluid filter cover.
Install the O-ring to the oil pump mounting bolts. (Only for the bolt installed from the outside of the transaxle case)

Install the oil pump on the transaxle case and tighten the mounting bolts to the specified torque. (One of the oil pump retaining bolts is installed from the outside of the transaxle case in the rear part of the oil pump.)
|
: Bolt |
Install the snap ring .
Temporarily install the dummy cover with 3 bolts ( ).
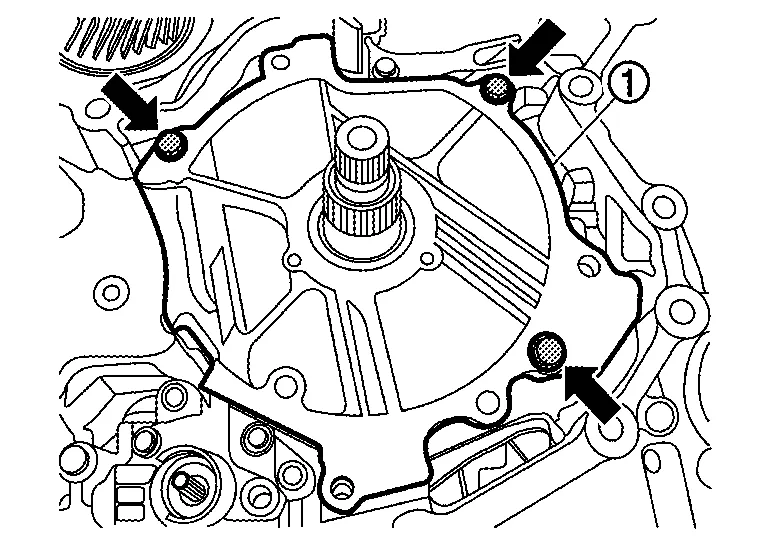
Temporarily install the converter housing onto the transaxle case with 3 bolts ( ).
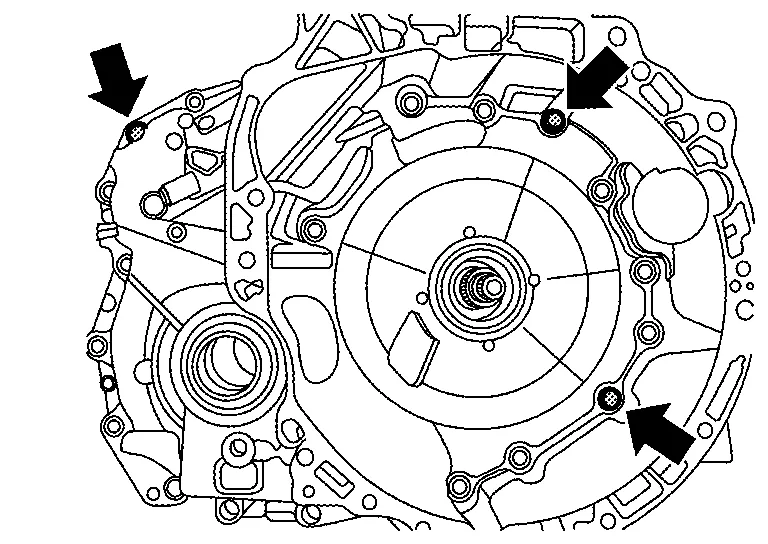
Reposition the CVT assembly on the work bench with the side cover side facing up.
Rotate the primary pulley by hand to check the pulley’s rotational characteristics.
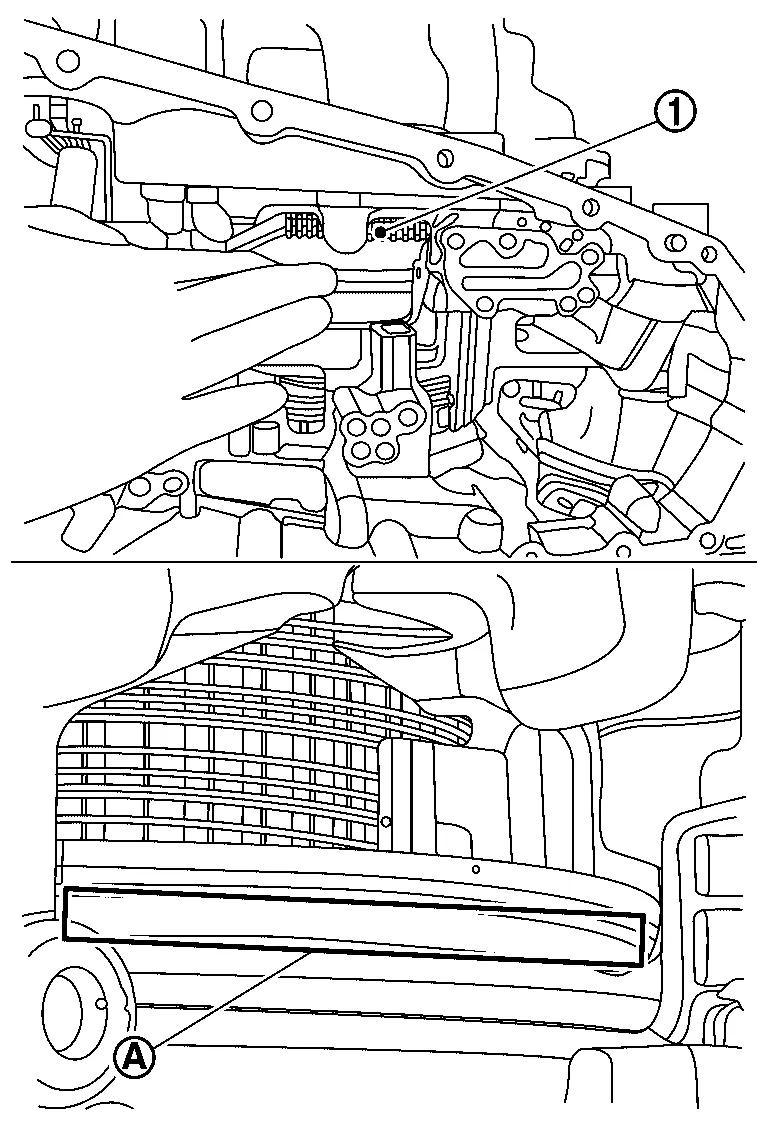
Remove the side cover fixing bolts.
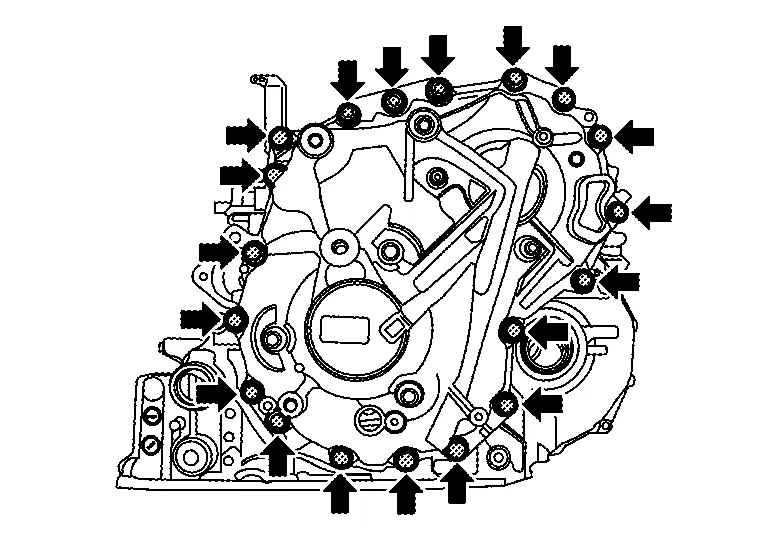
|
: Bolt |
Attach the CVT universal lifting fixture [SST: KV315J0100 (J–52082)] (B) with spacers (SST: J–52082–2) (A) to the side cover.
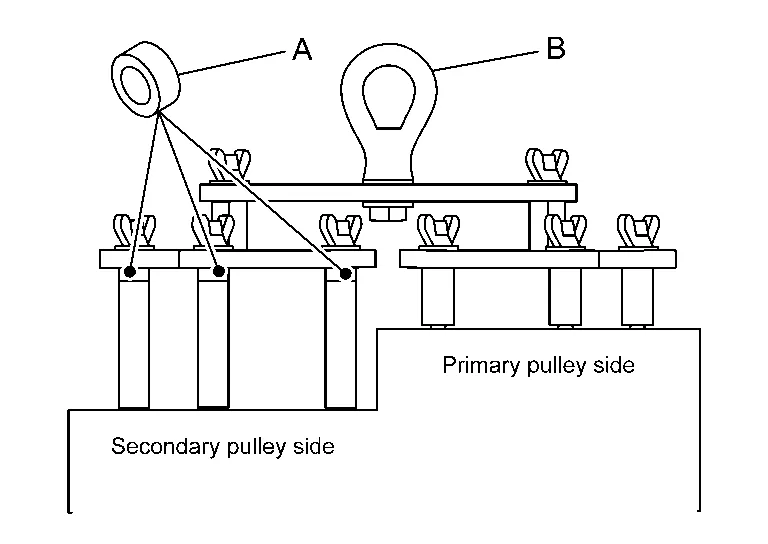
Remove the pulley bracket bolts (
) from side cover .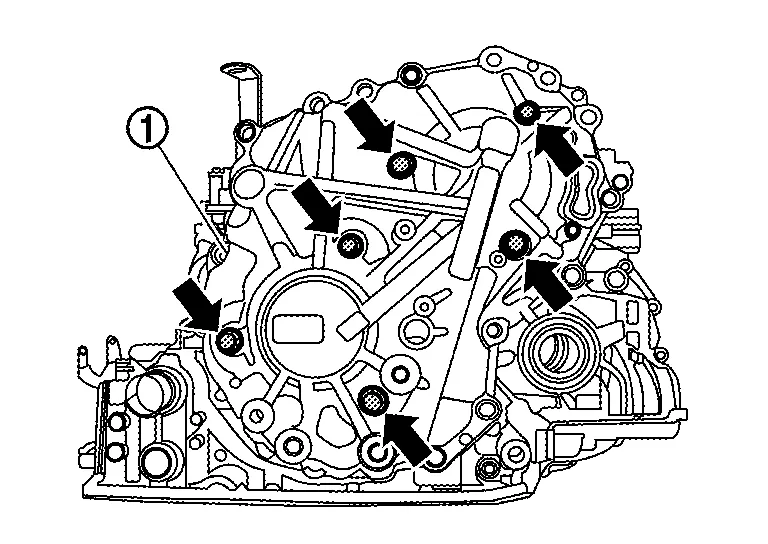
Install medium (A) and long (B) shafts of CVT universal lifting fixture [SST: KV315J0100 (J-52082)].

Install spacers (SST: J-52082-2) (A) and CVT universal lifting fixture [SST: KV315J0100 (J-52082)] (B) to shafts.
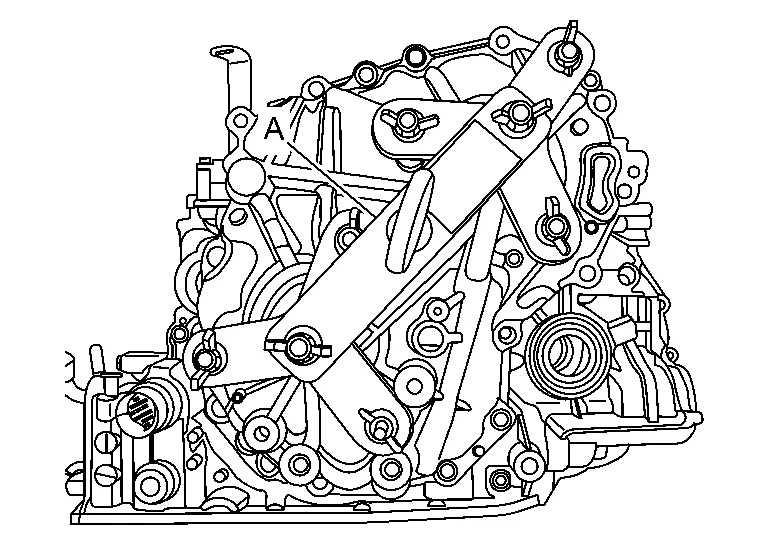
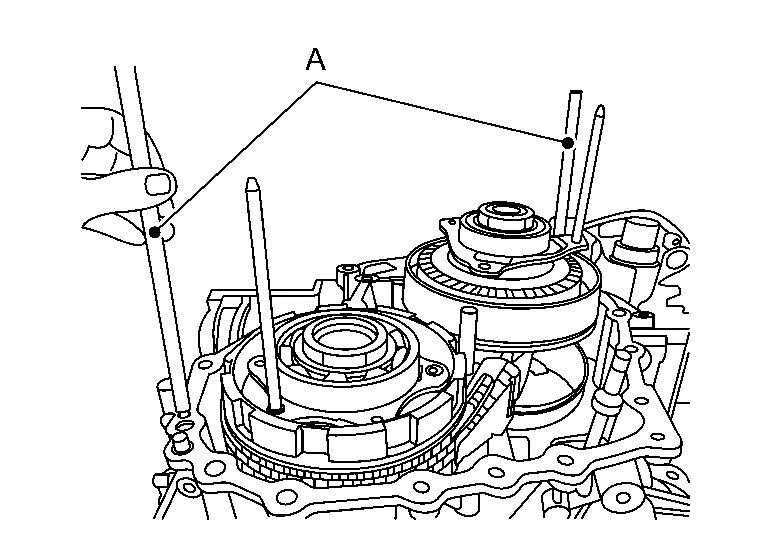
Attach the CVT assembly guide pins [SST: KV315J0200 (J-51959)] (A) as shown in figure.

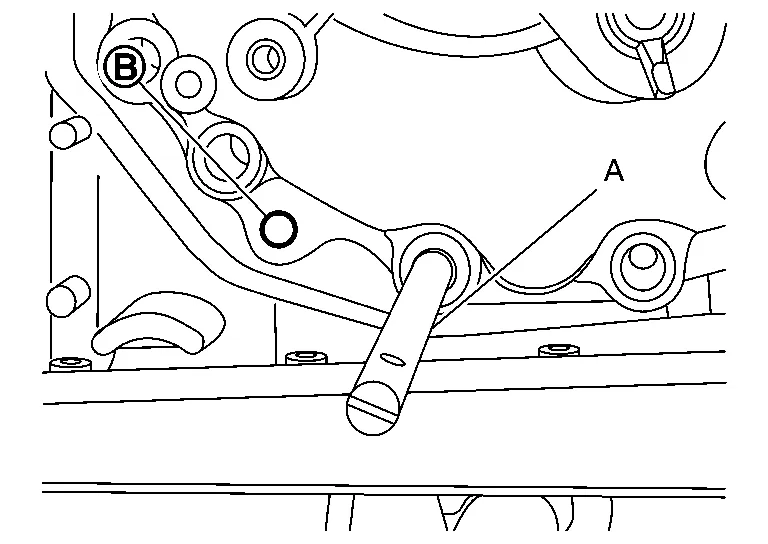
Lift up the CVT universal lifting fixture [SST: KV315J0100 (J-52082)] so that the CVT assembly weight is mostly supported by the CVT universal lifting fixture and just slightly raised off of the work surface.
Loosen the side cover with a slide hammer at the three points.
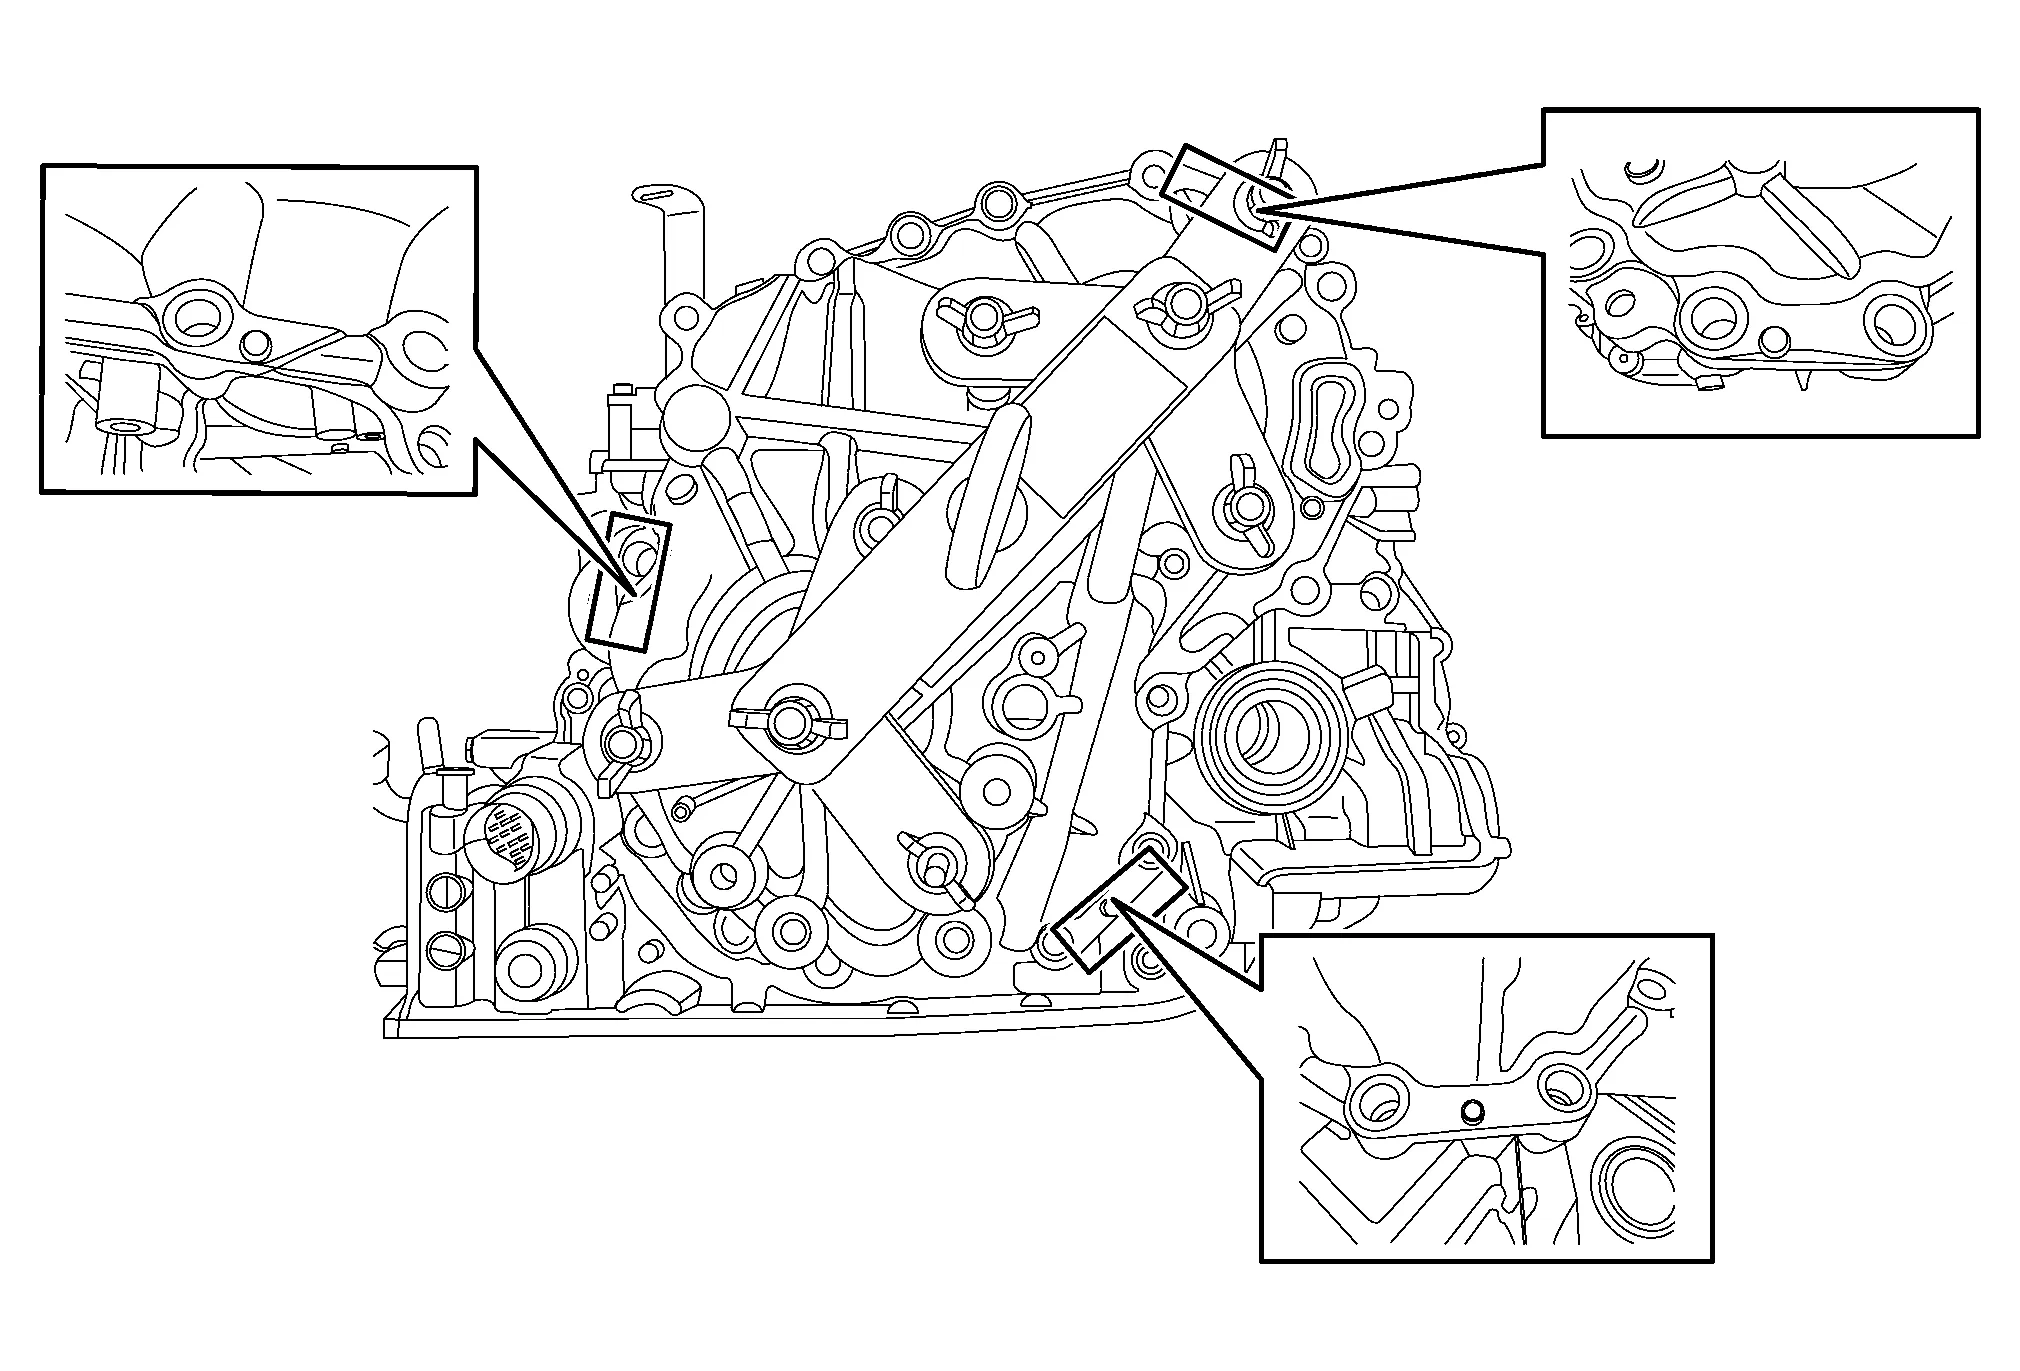
Lift up the CVT universal lifting fixture [SST: KV315J0100 (J-52082 )] to remove the sub-assembly from the transaxle case.
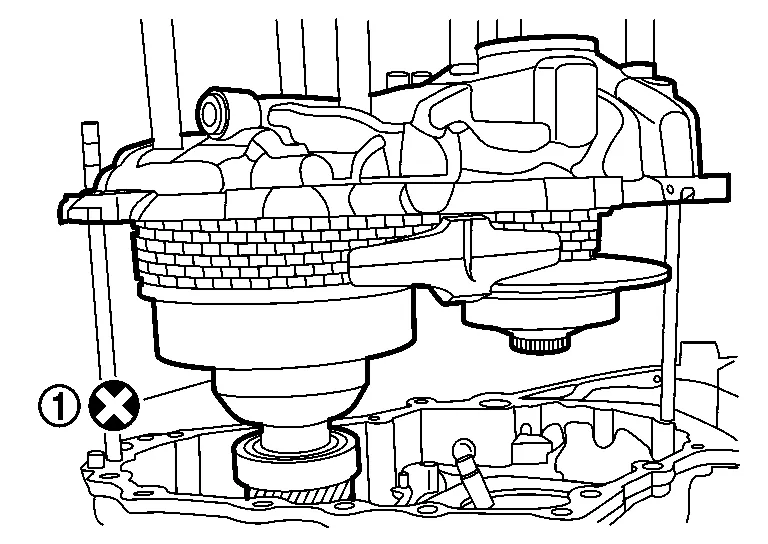
Remove the CVT universal lifting fixture from the sub-assembly.
Thoroughly clean the mating surfaces of the CVT case that the subassembly was just separated from.
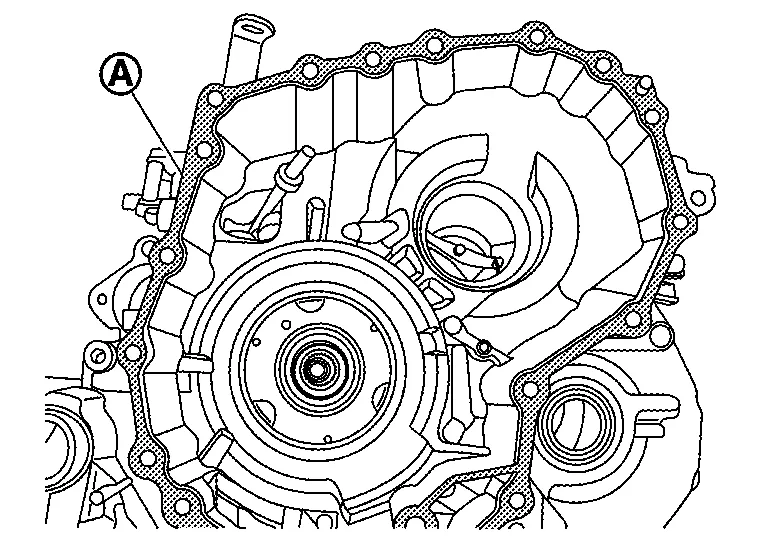
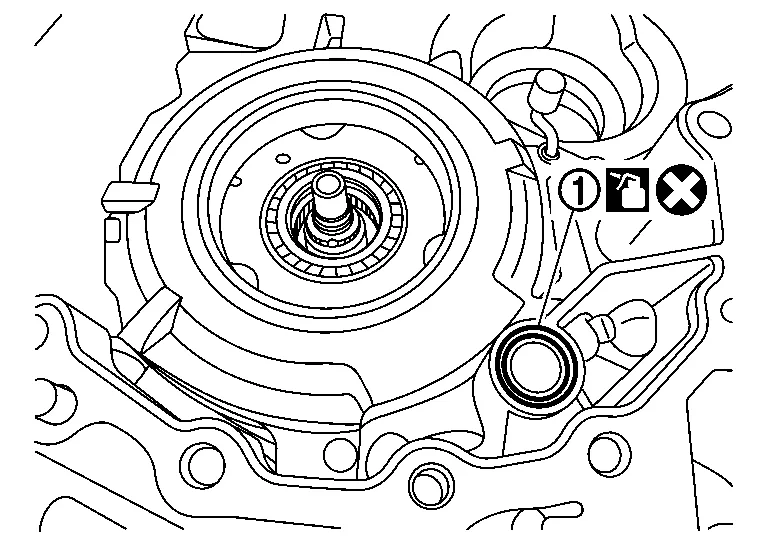
Replace the O-ring .
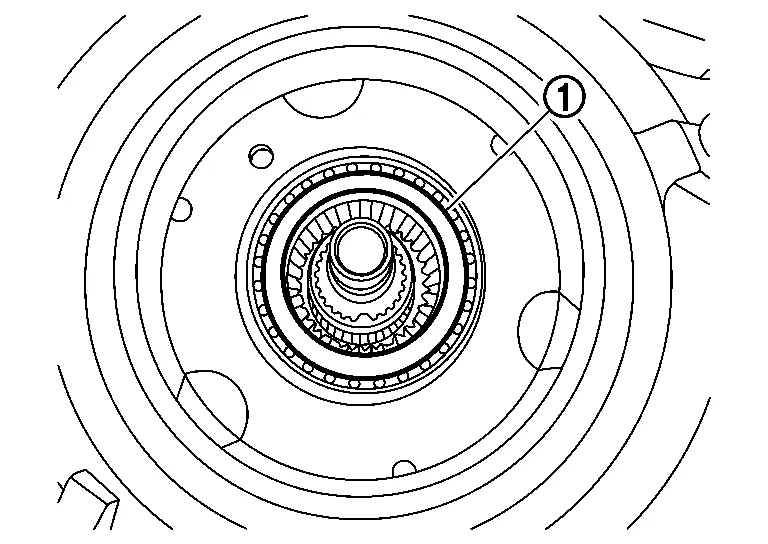
Remove the thrust bearing from the planetary carrier assembly.
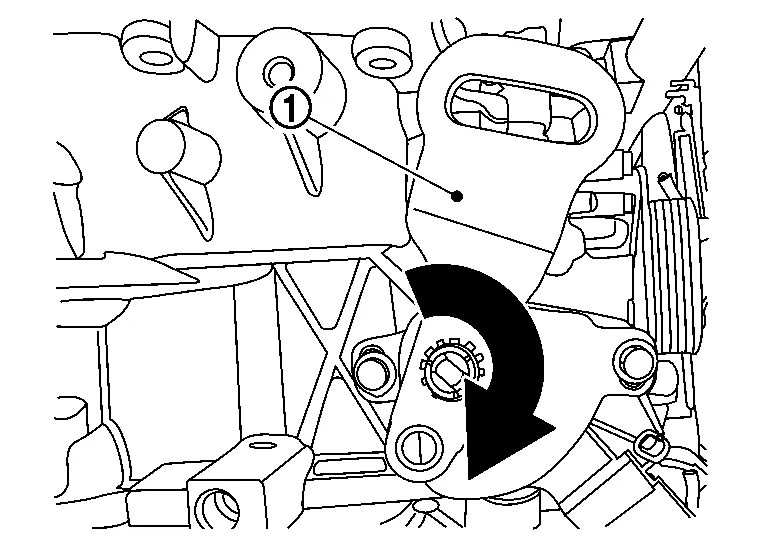
Rotate the shift select lever clockwise on the side of the CVT to adjust the parking rod to the lowest position.
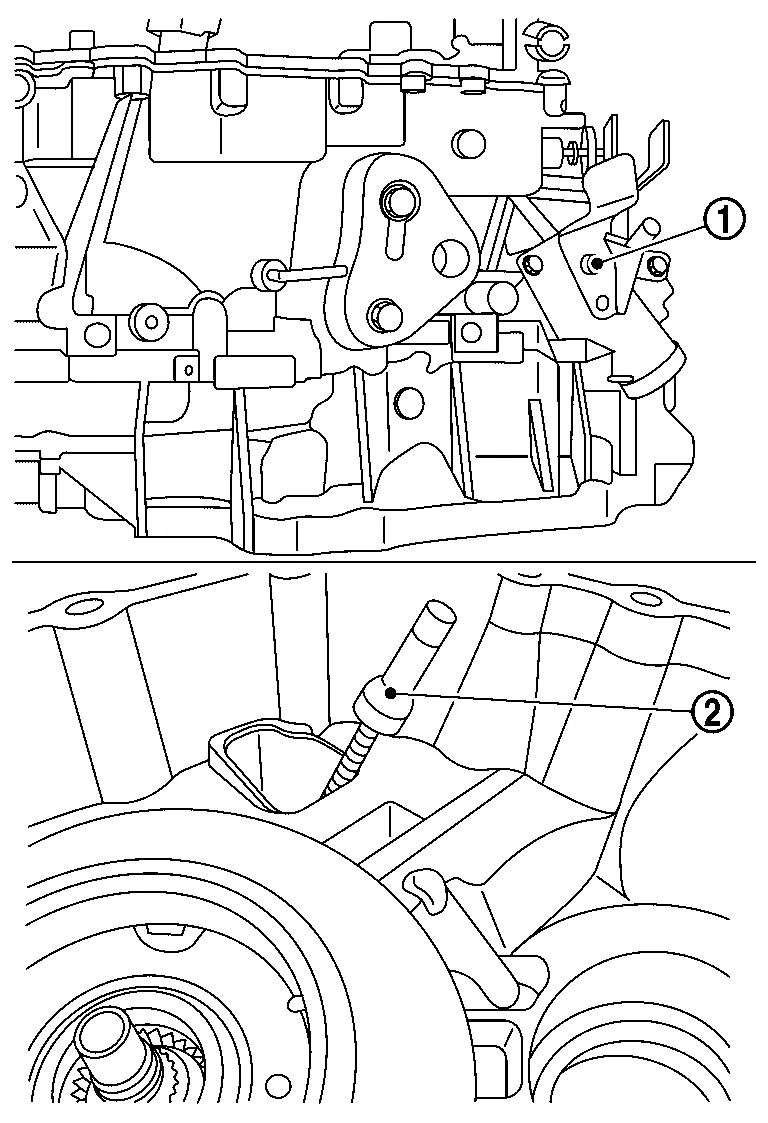
Remove the pulley bracket bolts ( ) from the side cover of the new sub-assembly.
Attach the appropriate CVT universal lifting fixture [SST: KV315J0100 (J-52082)] (A) to the new sub-assembly, and then lift up sub-assembly out of the shipping box.
Install the original thrust bearing on the primary pulley of the new sub-assembly.

Apply CVT fluid to the primary pulley bearing, secondary pulley gear teeth and the secondary bearing when installing the new sub-assembly.
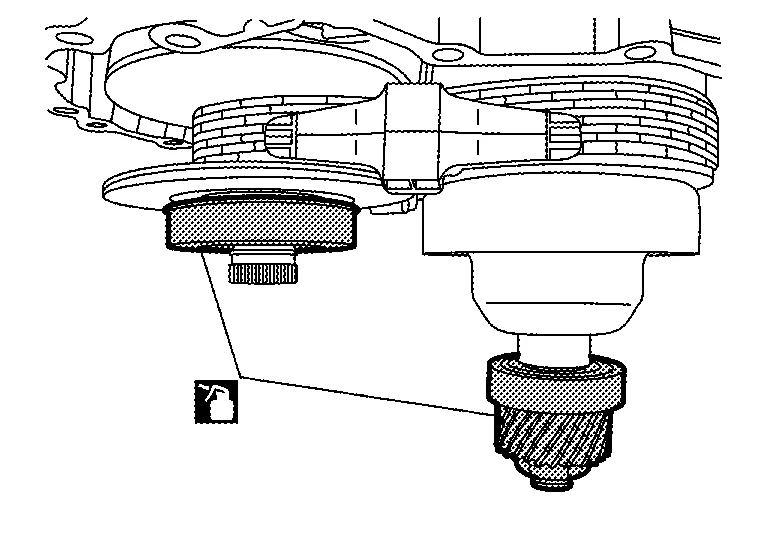
Attach the CVT assembly guide pins [SST: KV315J0200 (J-51959)] (A) to transaxle case when installing the new sub-assembly.
Install the the new sub-assembly to transaxle case.
Rotate the shift select lever to “N” range.
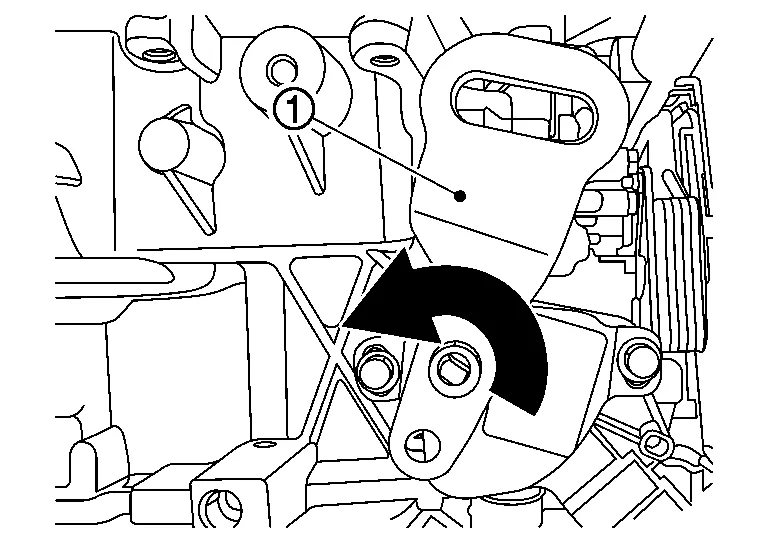
Remove the CVT universal lifting fixture from the side cover.
Remove the side cover as following procedure.
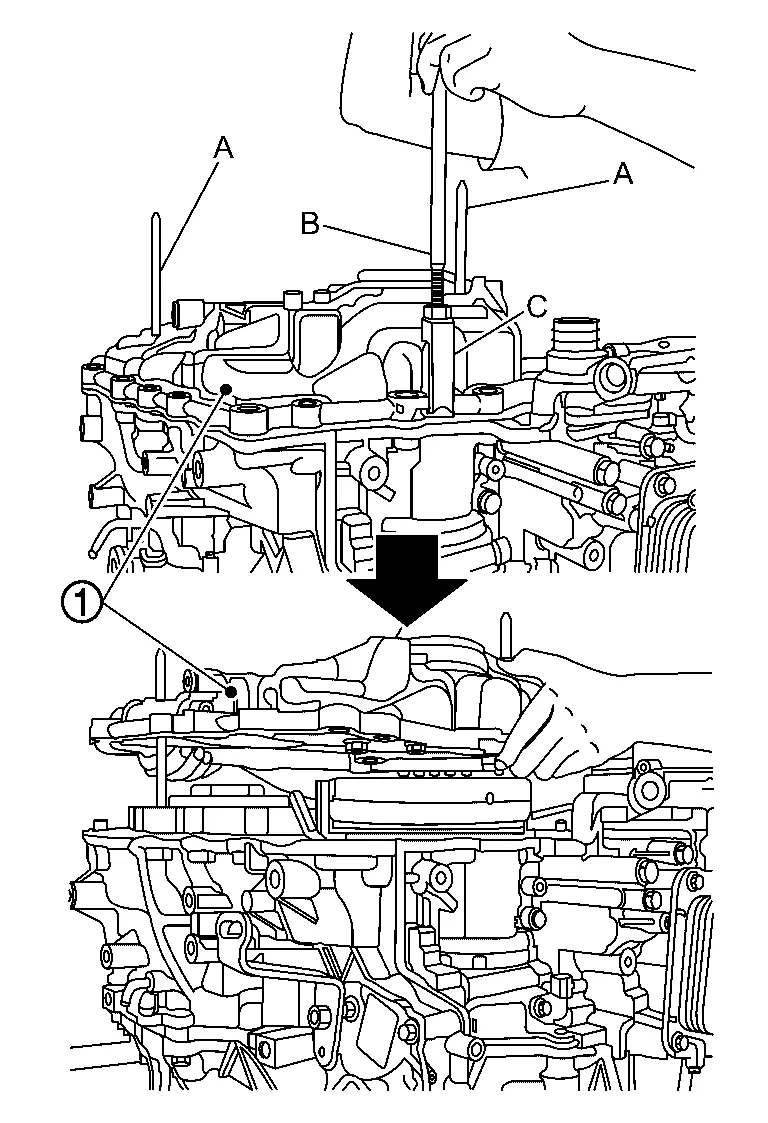
Attach the assembly guide pins, pulley bracket [SST: KV315J0300 (J-52272)] (A) to side cover.
Use slide hammer [SST: KV315J0610 (J-25721-A)] (B) with J-hook case separator [SST: KV315J0620 (J-51923)] (C) and evenly separate the side cover from the belt and pulley assembly.
Lift up the side cover by hand.
Install new lubrication caps onto the lubrication tubes.

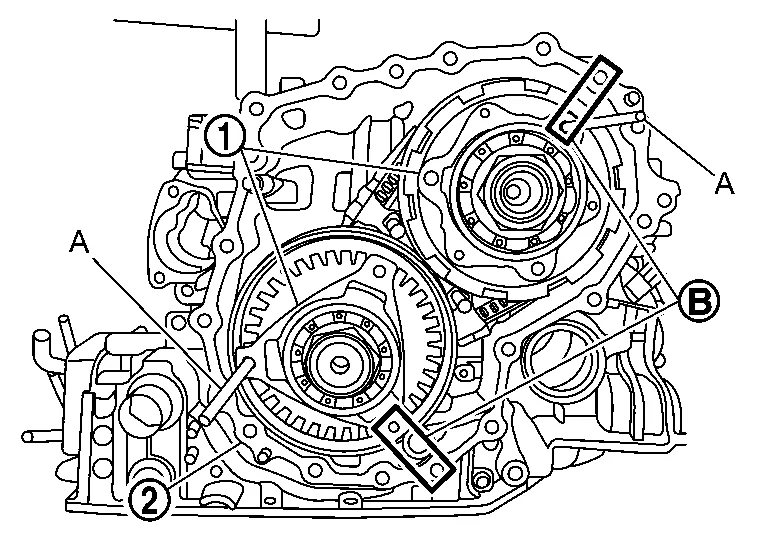
Rotate each pulley bracket to align with holes and assembly guide pins, pulley bracket [SST: KV31500300 (J-52272)] (A) in the transaxle case .
|
: Align holes |
Install a new O-ring .
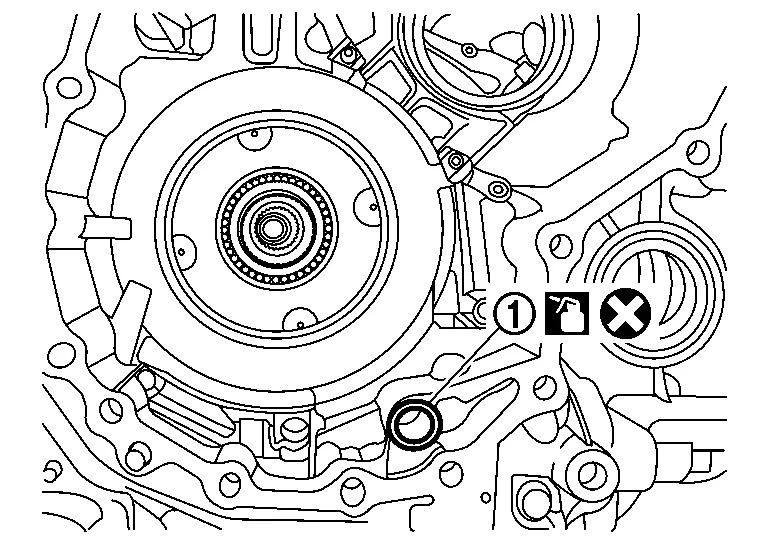
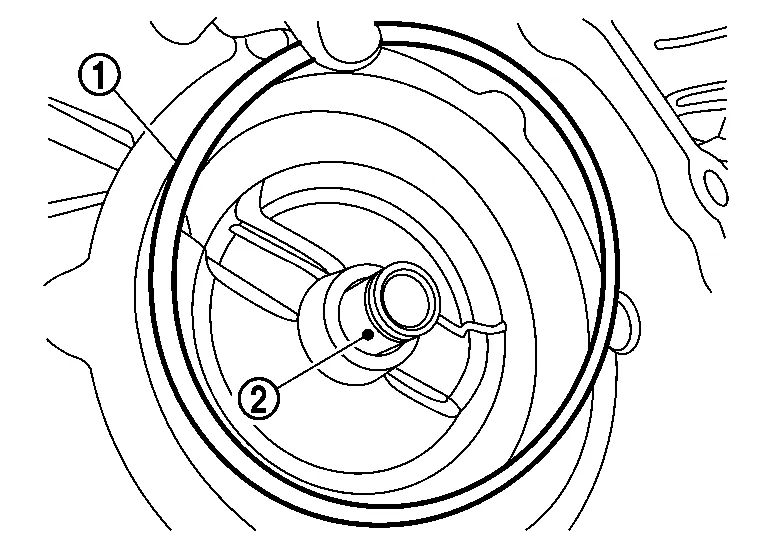
Check that the shim and the seal ring , on the underside of the side cover.
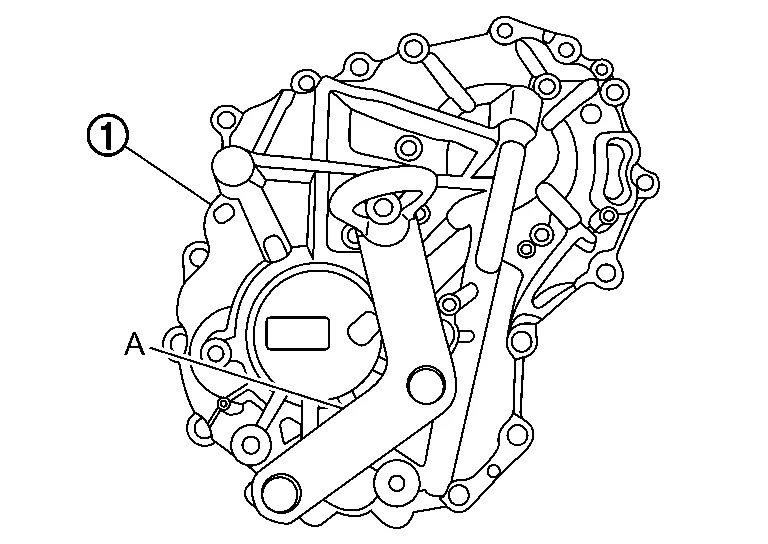
Attach the side cover alignment aid (SST: J-52275) (A) to side cover .
Lift up side cover and check that the underside case mating surface is clean.
Apply Loctite 5460 on the transaxle case installation surface of the sub-assembly.
Rotate the shift select lever clockwise to the “P” range to set the parking rod at the highest position.
Attach the CVT assembly guide pins [SST: KV315J0200 (J-51959)] (A).
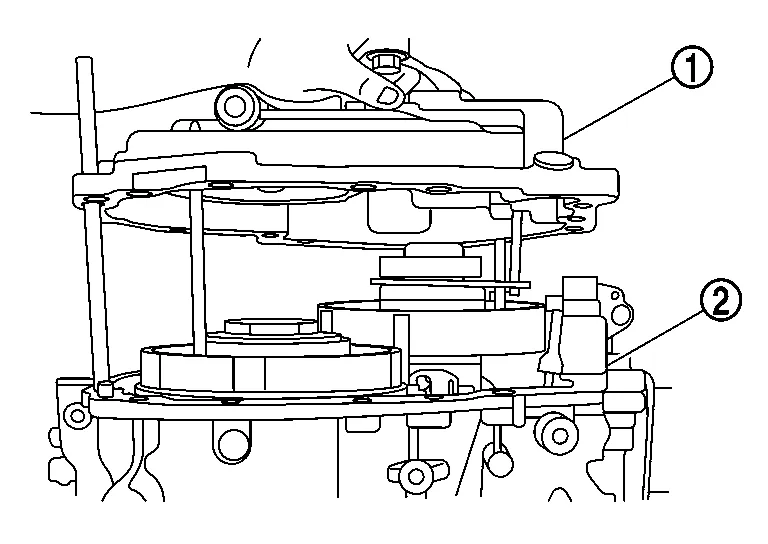
Install the side cover to the transaxle case .
By hand, press down on the side cover over each of the pulley bearings to level and seat the side cover.

| A | : Side cover alignment aid (SST: J-52275) |
|
: Pressure area |
Rotate the shift select lever to the “N” position.
Remove the side cover alignment aid (SST: J-52275).
Continue to lower the side cover fixed transaxle case.
Remove the CVT assembly guide pins [SST: KV315J0200 (J-51959)].
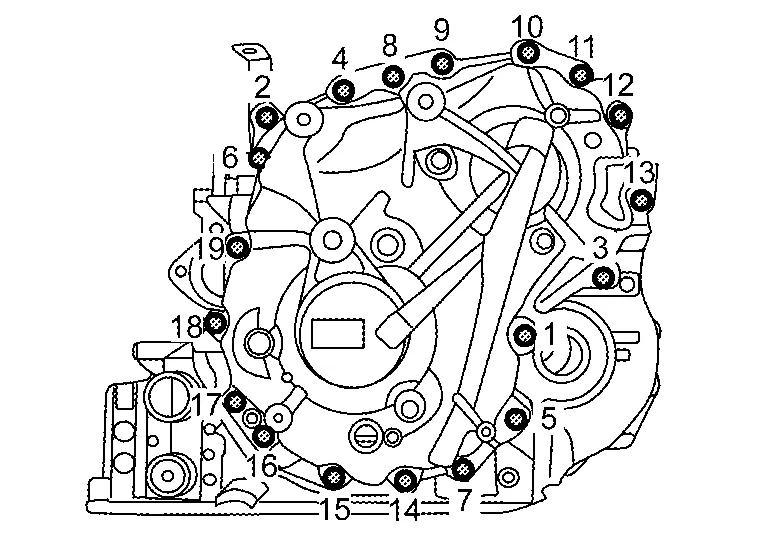
Install the new side cover bolts and temporary tighten them. And then, tighten the bolts to specified torque in the order shown.
Install the new pulley bracket bolts with new O-rings ( ) to side cover as following procedure.
Install four bolts with O-rings first, hand tight.
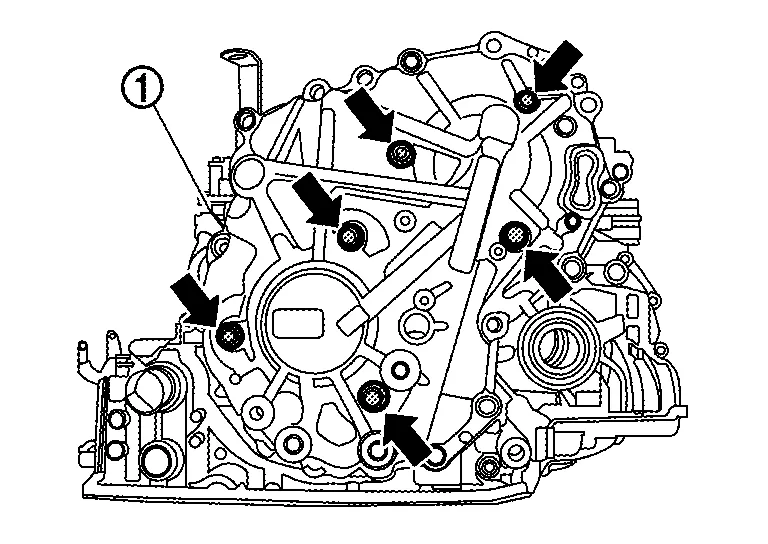
Remove the assembly guide pins, pulley bracket [SST: KV31500300 (J-52272)] from the pulley bracket.
Install the last two bolts with O-rings, hand tight.
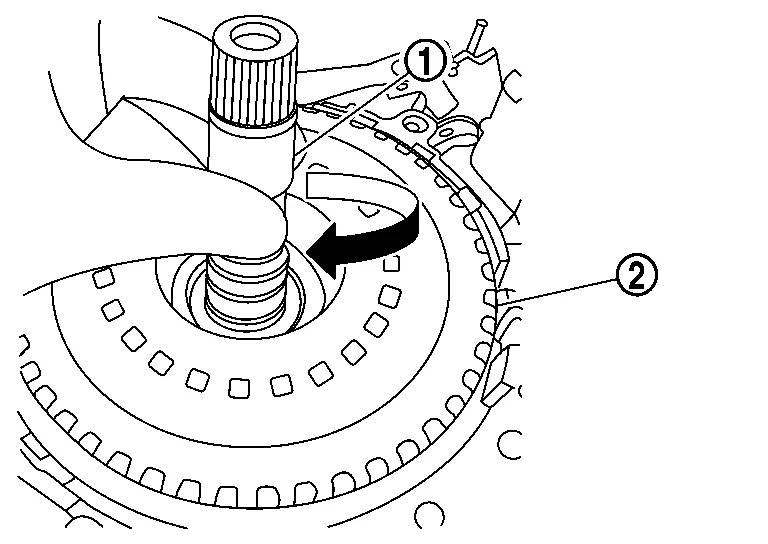
Confirm the parking rod operation with the following procedure.
Rotate the shift select lever
counter clockwise and check that all detents for each of the P-R-N-D-L are detect.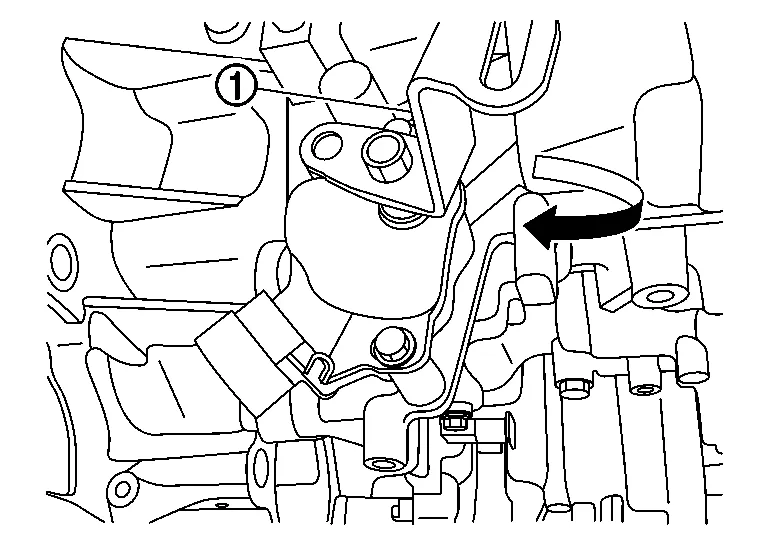
Rotate the lever clockwise to return the rod back to the P position.
If the lever does not rotate or if all detents are not detect, lift the sub-assembly and remove all sealant, and repeat from step 72.
Check the rotational smoothness of the primary pulley with the following procedure.
With clean hand, access the primary pulley from the bottom of the CVT to rotate.
Rotate the primary pulley by hand and confirm that the characteristic is the same as previously checked at step 47.
If the rotational characteristic worse than before the sub-assembly was replaced, perform the following.
Remove the side cover.
Remove the lubricating caps.
Wipe and clean the sealant completely from both the transaxle case rim and side cover rim.
Restart sub-assembly installation from Step 37.
Tighten pulley bracket bolts ( ) to the specified torque.
|
: Side cover |
Install the differential side oil seal using the universal driver handle [SST: ST35325000 (J-8092)] (A) and output seal installer (case side) [SST: KV31500800 (J–52283)] (B).
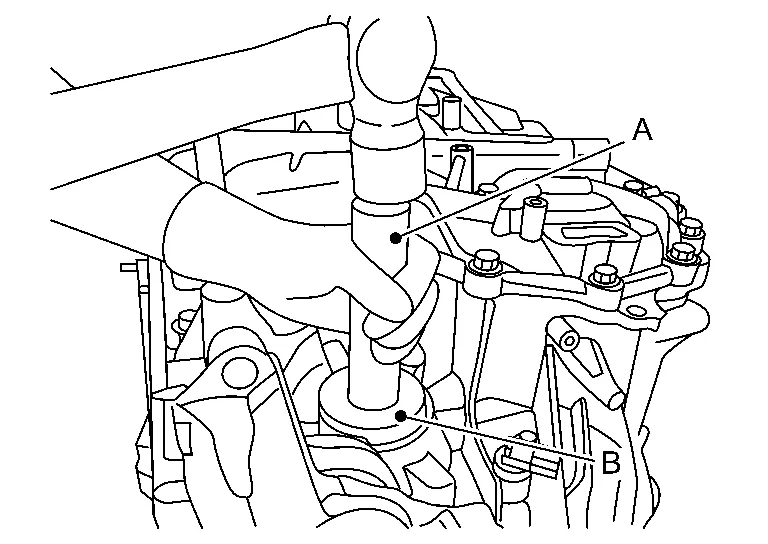
Set the CVT on the work bench with the side cover facing down on the bench.
Remove the converter housing which was temporarily installed with 3 bolts ( ).
Calculate total end play with the following procedure.
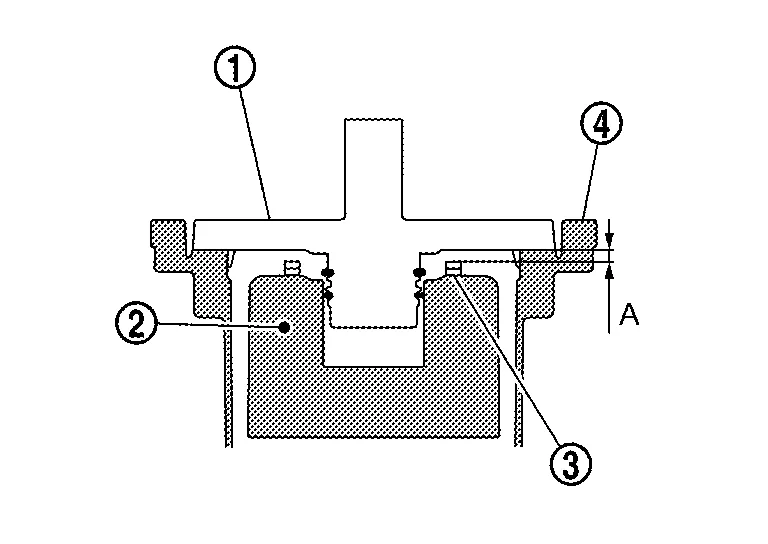
|
: Thrust bearing |
|
: Transaxle case |
Measure the average distance (D) from the dummy cover installation surface of the transaxle case
to the needle bearing installation surface of the forward clutch drum .Average distance (D) : (D1 + D2)/2 A : Gauge block [SST: KV315J0400 (J-50271)] B : Digital Depth Gauge [SST: KV315J0500 (J-50272)] 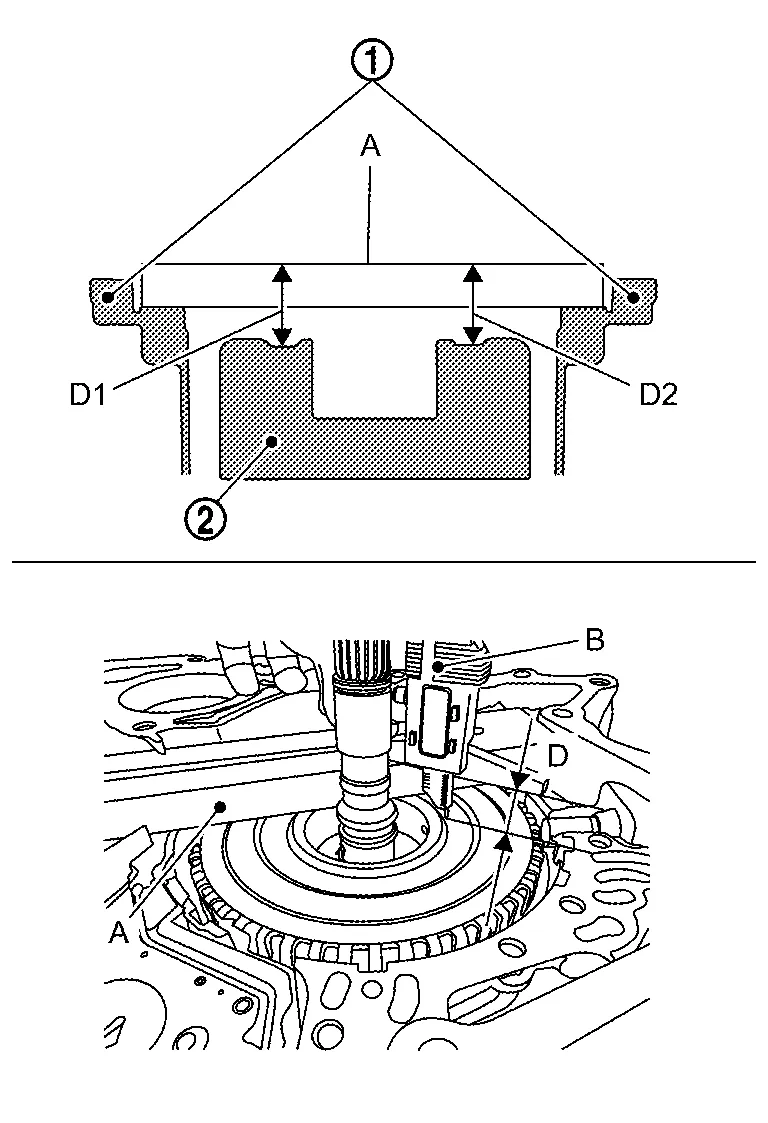
Clean the dummy cover surfaces
that contact the transaxle case and thrust beaning.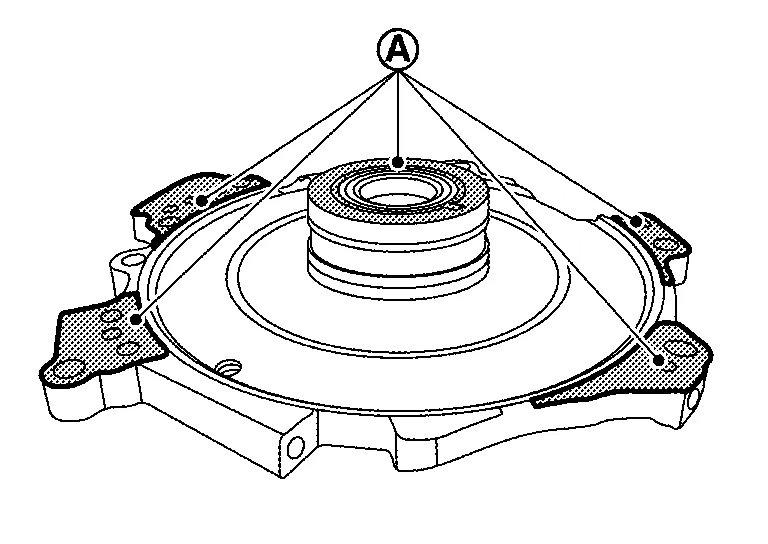
Measure the distance (H) from the edge of the dummy cover
to the installation surface on the transaxle case.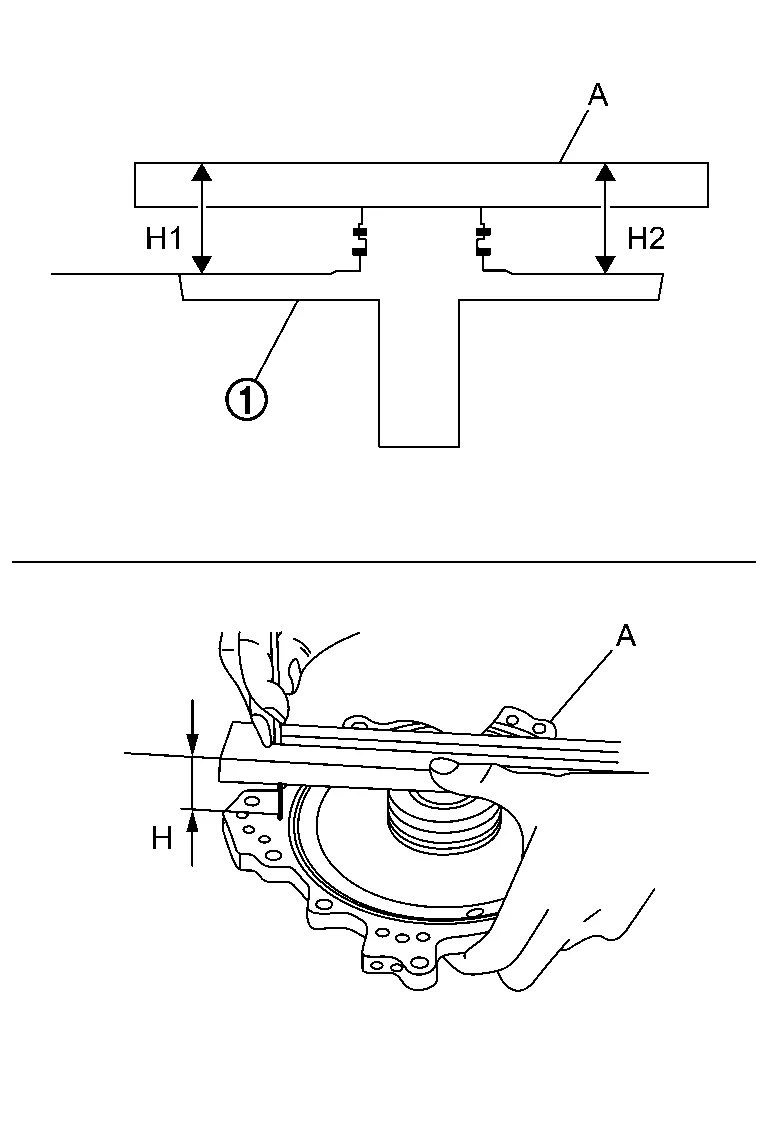
Average distance (H) : (H1 + H2)/2 A : Gauge block [SST: KV315J0400 (J-50271)] Measure the distance (J) from the edge of the dummy cover to the thrust race seats
.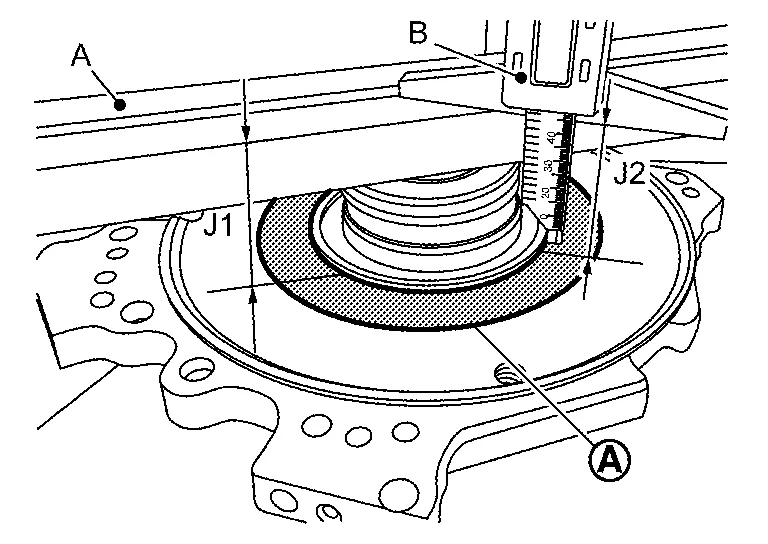
Average distance (J) : (J1 + J2)/2 A : Gauge block [SST: KV315J0400 (J-50271)] B : Digital Depth Gauge [SST: KV315J0500 (J-50272)] Measure thickness (E) of thrust bearing
without thrust race.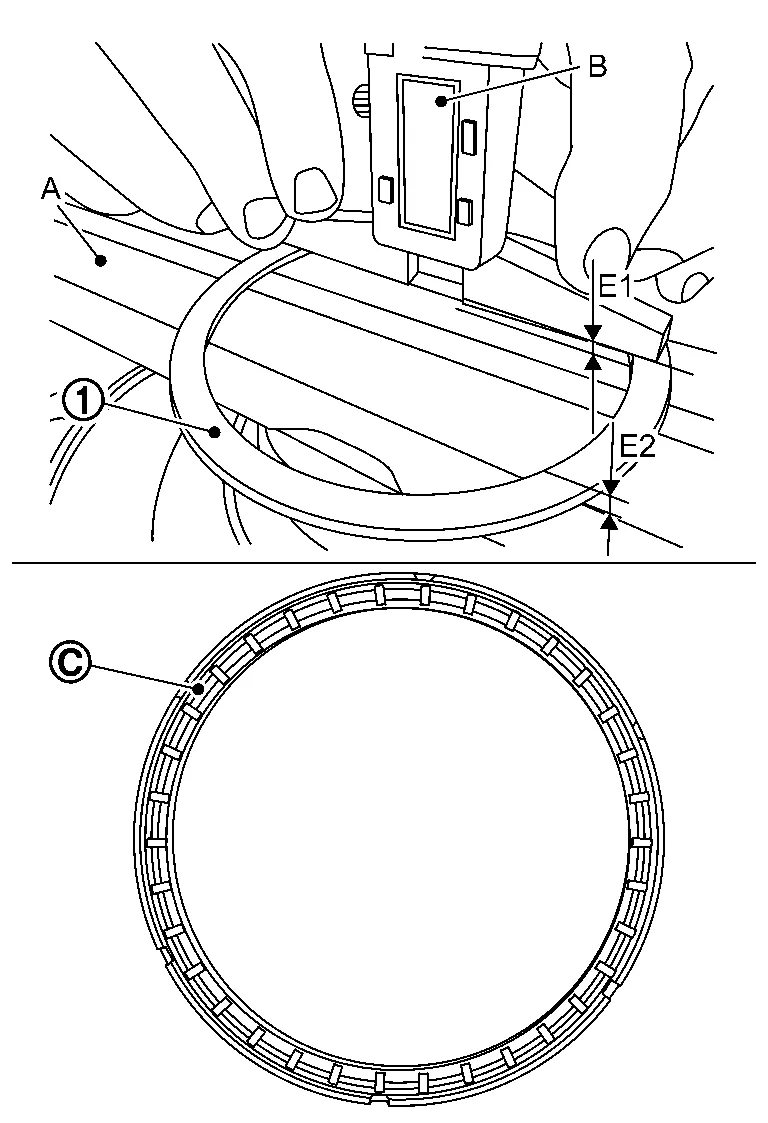
Average thickness (E) : (E1 + E2)/2 A : Gauge block [SST: KV315J0400 (J-50271)] B : Digital Depth Gauge [SST: KV315J0500 (J-50272)] 
: Roller side Calculate the total end play with the following formula, and choose the appropriate thrust race from table.
(D) - 20 mm + [(J) - (H)] - (E) = Total end play (A)

Total end play (A) Bearing thickness (R) 0.90 - 1.08 mm 0.6 mm 1.09 - 1.29 mm 0.8 mm 1.30 - 1.50 mm 1.0 mm 1.51 - 1.70 mm 1.2 mm 1.71 - 1.90 mm 1.4 mm 1.91 - 2.10 mm 1.6 mm 2.11 - 2.30 mm 1.8 mm
Install the thrust bearing on the clutch drum.
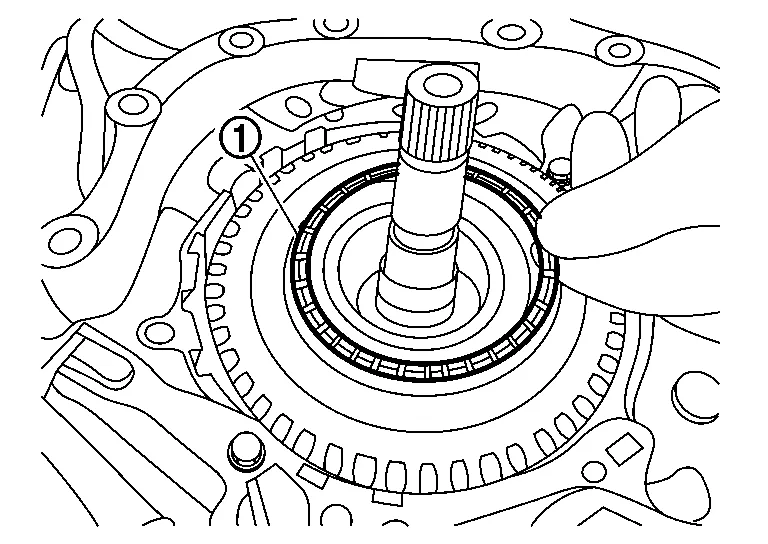
Install the thrust race on the dummy cover .
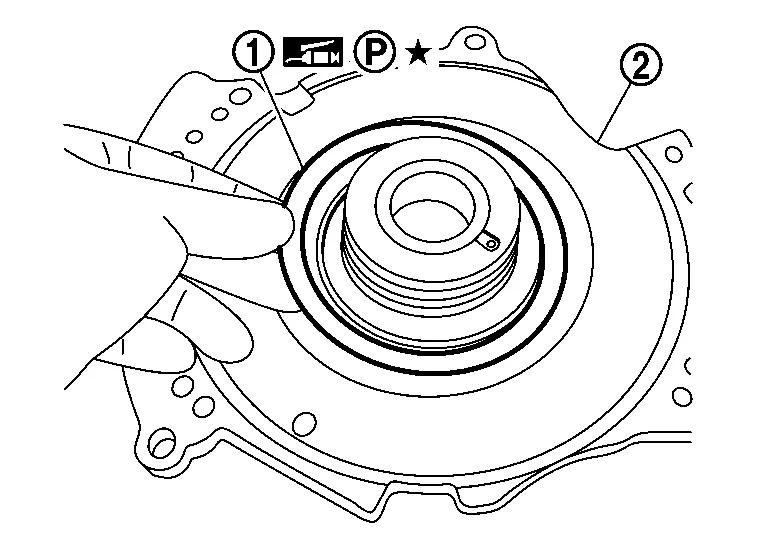
Remove the baffle plate from the converter housing.
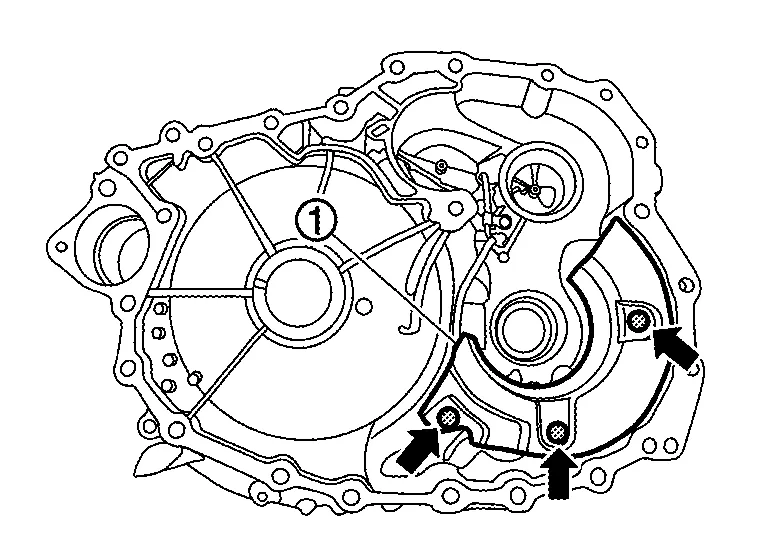
|
: Bolt |
Remove the bolt ( ) and then remove the lubrication tube and bracket .

Clean hydraulic circuit of converter housing lubrication tube and dummy cover with parts cleaner and blowing air, check holes for blowing air.
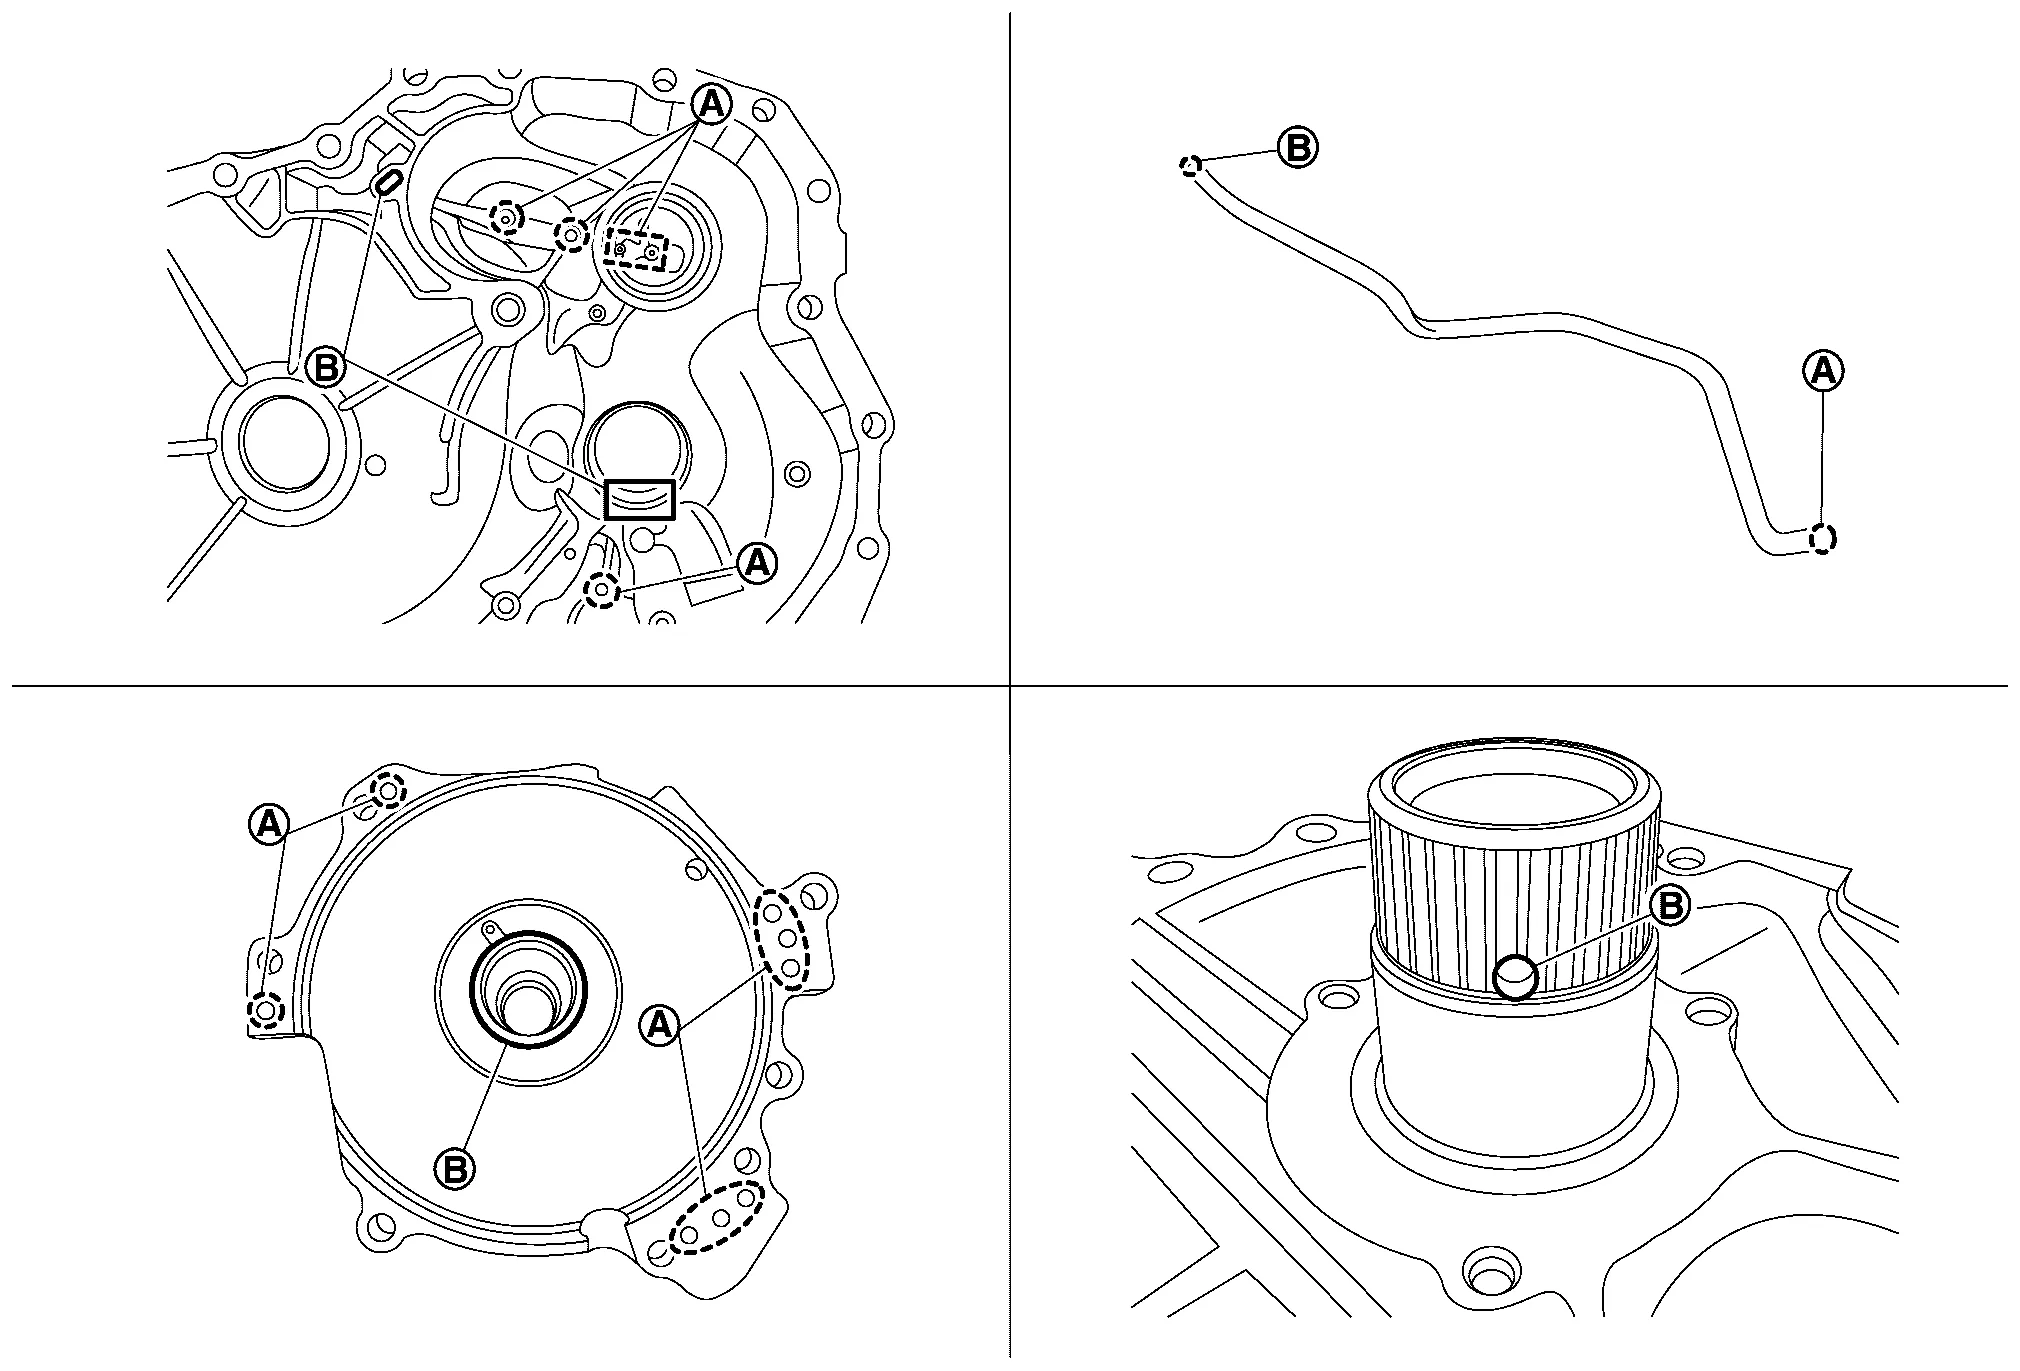
Install the lubrication tube , bracket and bracket ().
Install the baffle plate to the converter housing.
|
: Bolt |
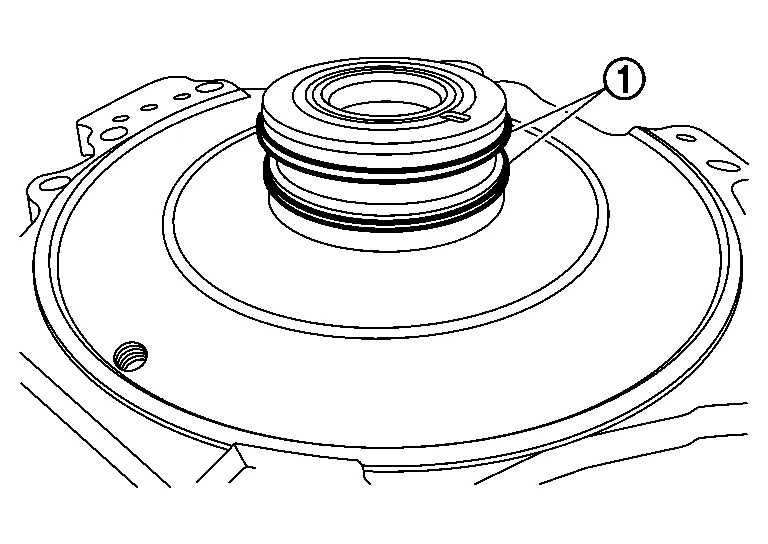
Apply petroleum jelly to the seal rings before installing the dummy cover to the transaxle case and clean the area .
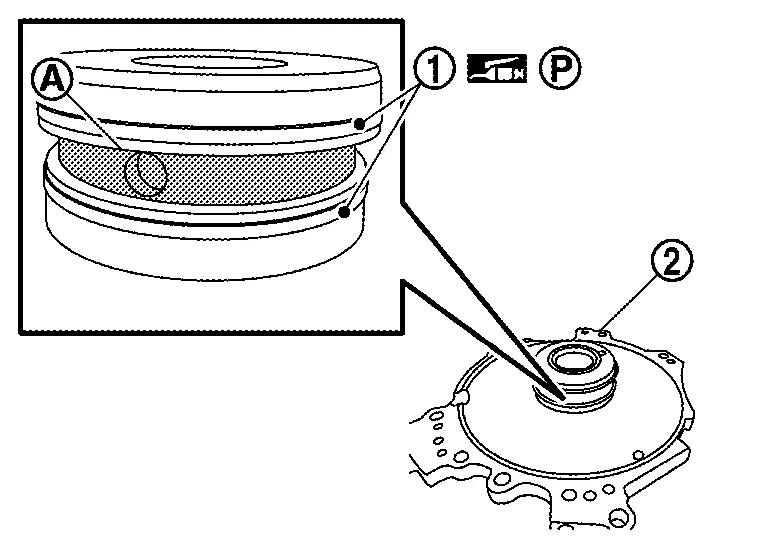
Check the seal rings are in the correct positions and clean the area .
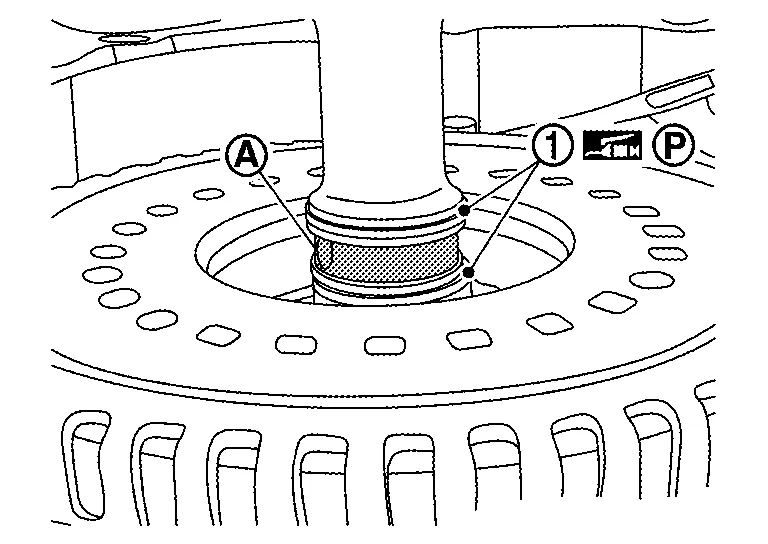
Install the dummy cover and chain guide .
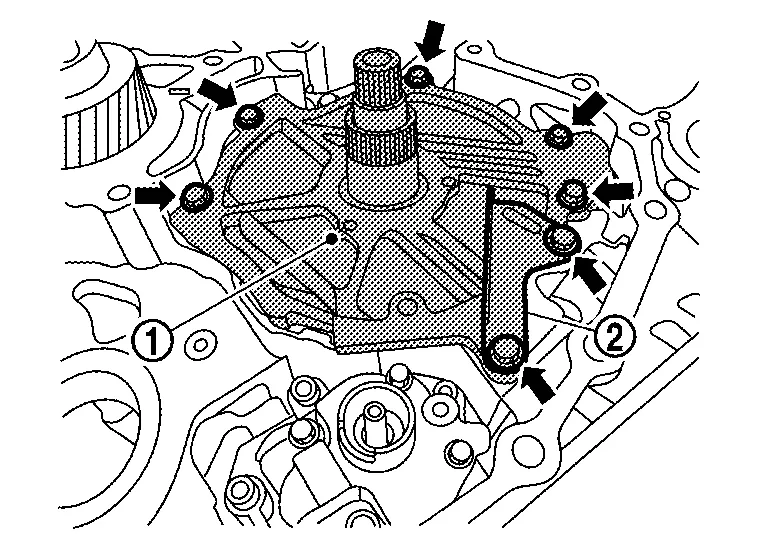
Install baffle plate and bracket with the related bolts finger tight. And tighten the bolts to the specified torque.
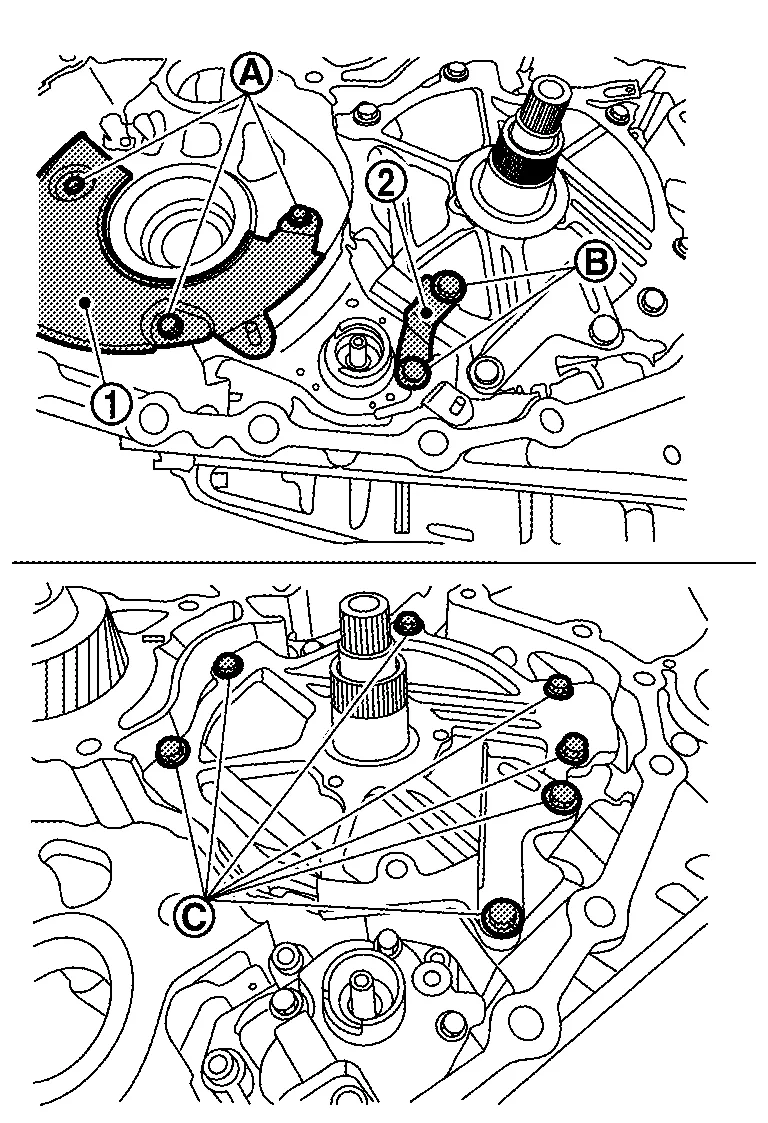
|
: 5,9 N·m |
|
: 26 N·m. |
|
: 19 N·m |
Install the thrust washer onto the dummy cover .

Install the drive sprocket , driven sprocket , and chain as an assembly.

Spread the snap ring using snap ring pliers.
Press down on the driven sprocket until it "snaps" and locks into place.
Pull up after install sprocket and check lockup to confirm adopt correctly.
Install the oil chain cover and tighten the mounting nut.
|
: Nut |
Install the differential assembly into the transaxle case.
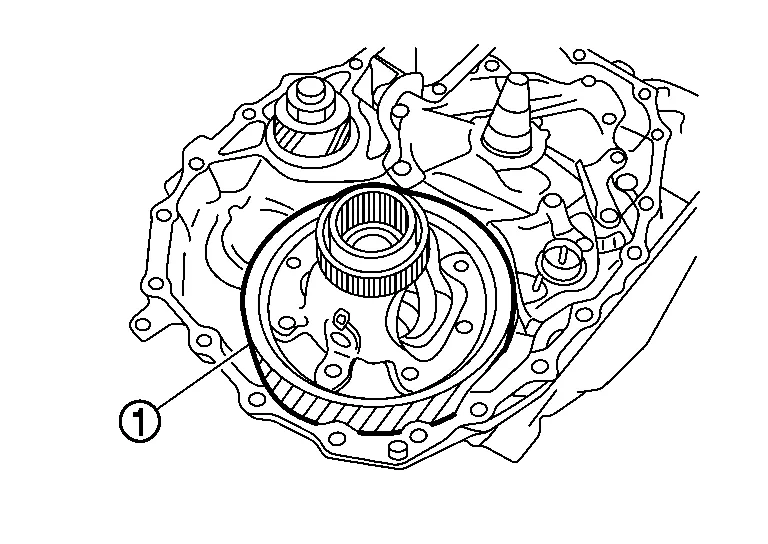
Install the reduction gear assembly into the transaxle case.
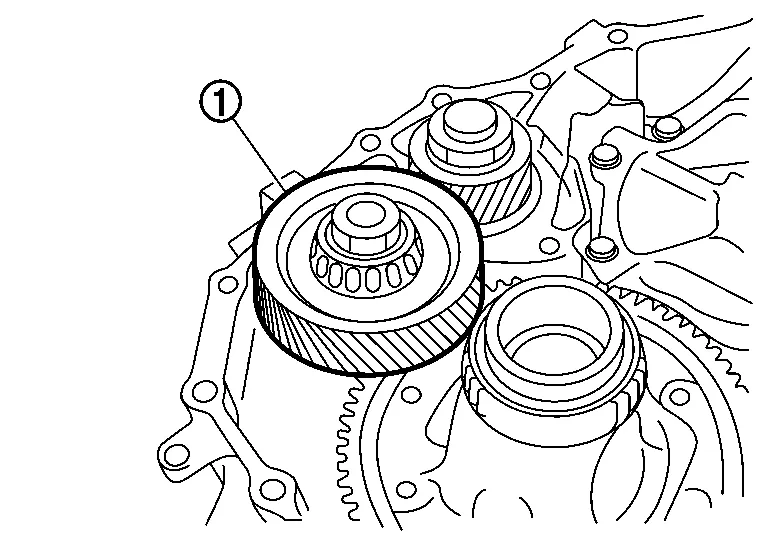
Install the new CVT fluid filter with grommet seal and O-ring .
Install the CVT fluid filter cover and tighten the bolts ( ) to the specified torque.
Check that retaining pin of manual shaft locates on the original position.
Apply Loctite 5460 on the converter housing installation surface of the transaxle case.
Install the converter housing onto the transaxle case and temporary tighten the new converter housing bolts. And then, tighten the bolts to specified torque in the order shown.

Install the new converter housing oil seal evenly using the oil pump seal installer [SST: KV31500700 (J-50818)] (A)
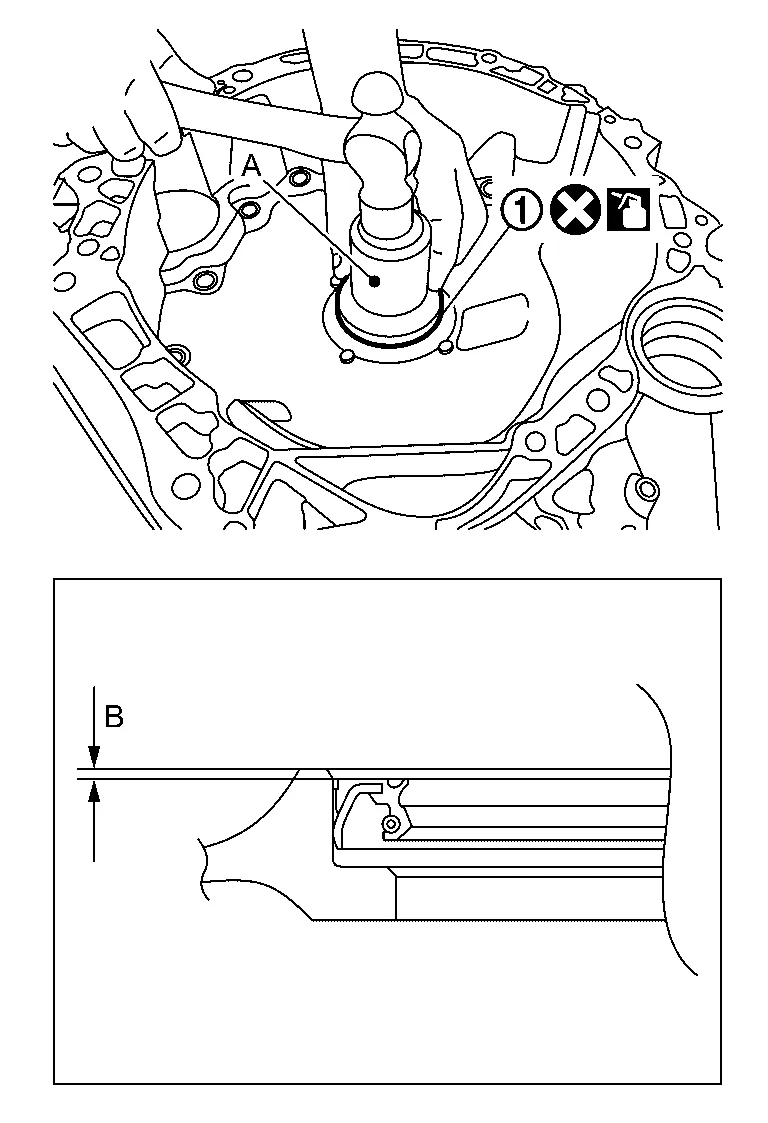
| (B) | : 0.5 mm (0.02 inch) |
FWD
Install the differential side oil seal using the output seal installer (troque converter side) [SST: KV31500900 (J-52284)] (A) and universal driver handle [SST: ST35325000 (J-8092)] (B).
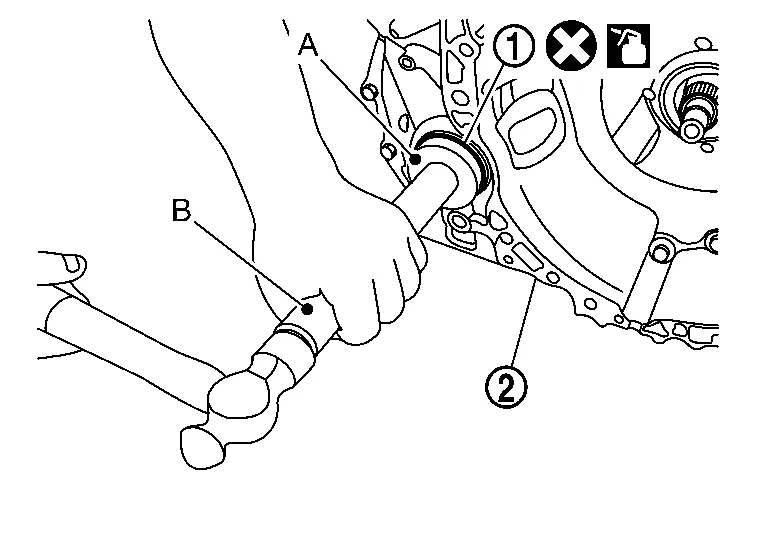
|
: Converter housing |
Install the O-ring on the input shaft.

Install the lip seal to the transaxle case.
|
: Front |
Install the control valve to the transaxle case.
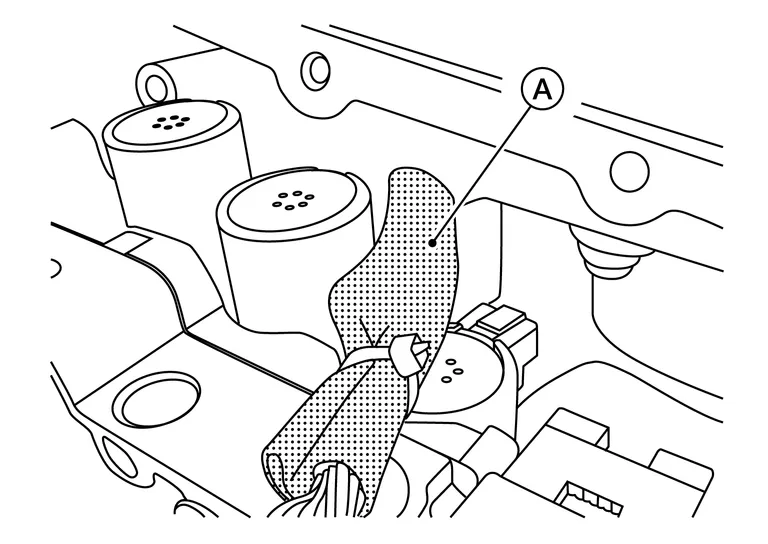
Secure the control valve using bolts , and .
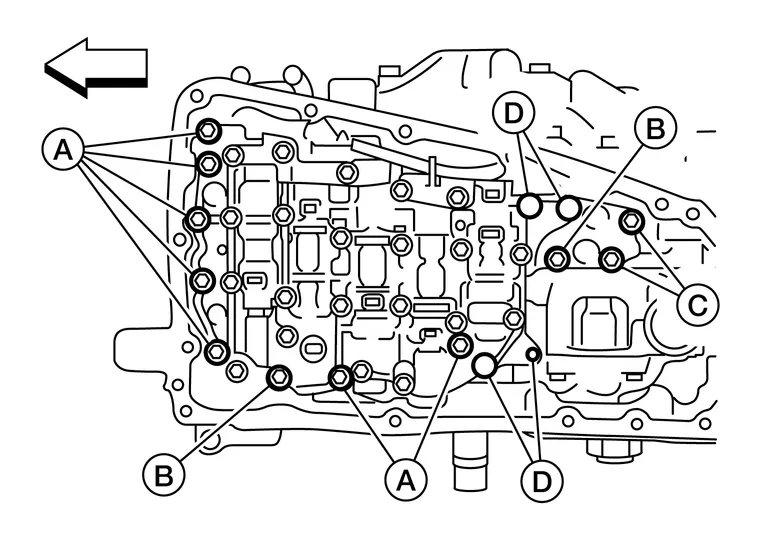
| Bolt | Bolt length mm (in) | Number of bolts |
|---|---|---|
|
54 (2.13) | 7 |
|
44 (1.73) | 2 |
|
25 (0.98) | 2 |
|
: Front |
Connect the control valve harness connector .
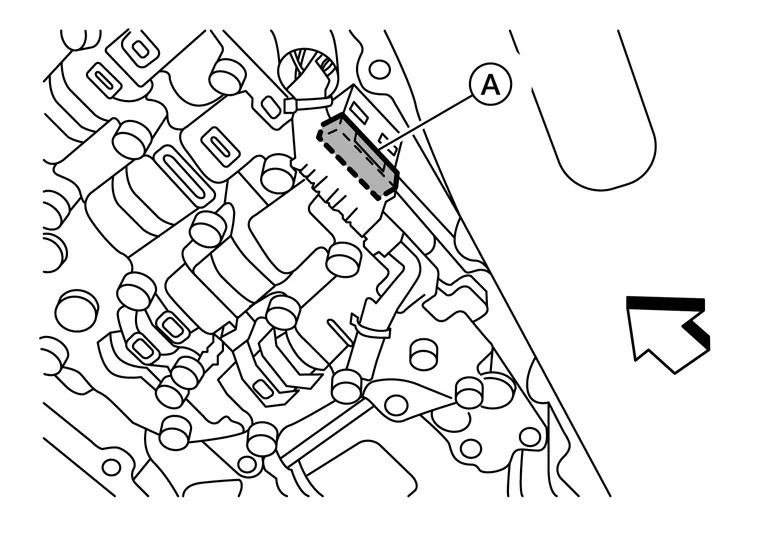
|
: Front |
Install the CVT fluid temperature sensor bracket to the valve body with bolt .
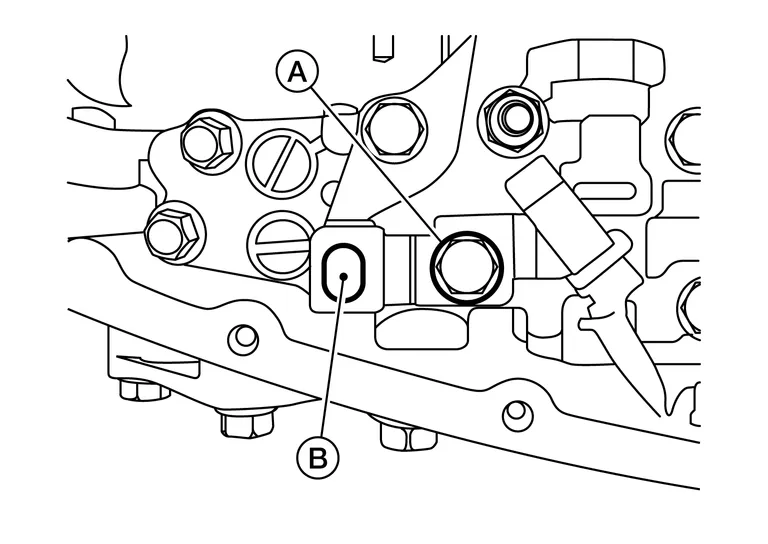
| Bolt | Bolt length mm (in) | Number of bolts |
|---|---|---|
|
54 (2.13) | 1 |
Install new O-ring to oil strainer assembly.
Install new oil strainer with bolts .
| Bolt | Bolt length mm (in) | Number of bolts |
|---|---|---|
|
54 (2.13) | 2 |
Install the manual plate while aligning the ends as shown.
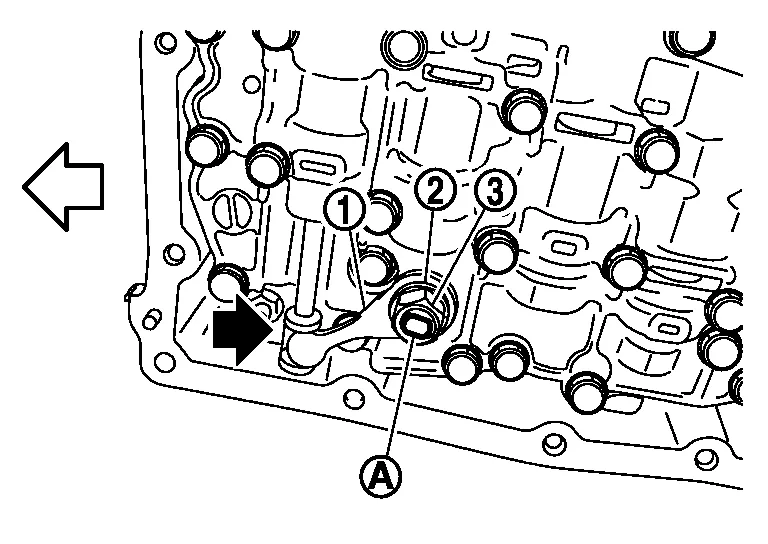
Align the slot of the manual plate with the manual shaft
.Align the end of the manual plate with the cutout of the manual valve.
|
: Cutout |
|
: Front |
Install the spring washer and the lock-nut , and then tighten to the specified torque.
Install the magnets in the oil pan in their original location.
Install the oil pan to the transaxle case with the following procedure.Install the oil pan gasket to the oil pan.
Install the oil pan assembly to the transaxle case, and then temporarily tighten the oil pan bolts. Tighten the oil pan bolts in the order shown to the specified torque.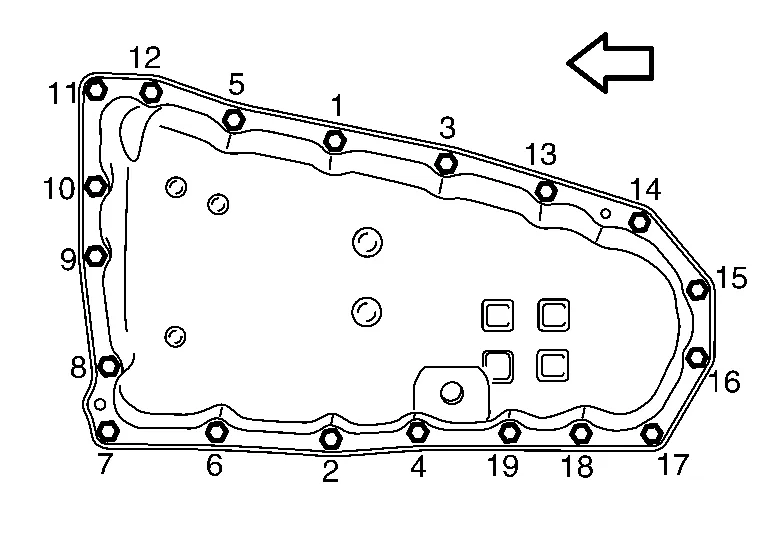
|
: Front |
Install drain plug gasket to drain plug.
Install drain plug to oil pan.
Install new QR code sticker on Transmission Range (inhibitor) switch .
Install the torque converter to the transaxle in the following procedure.
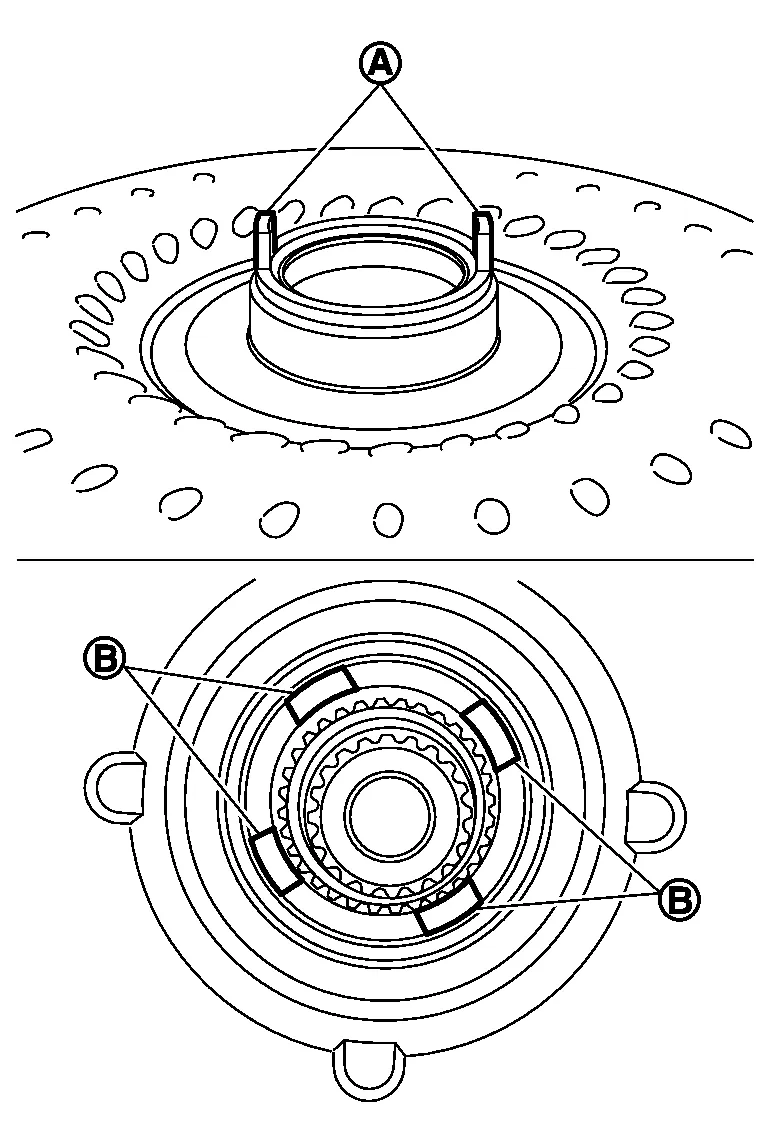
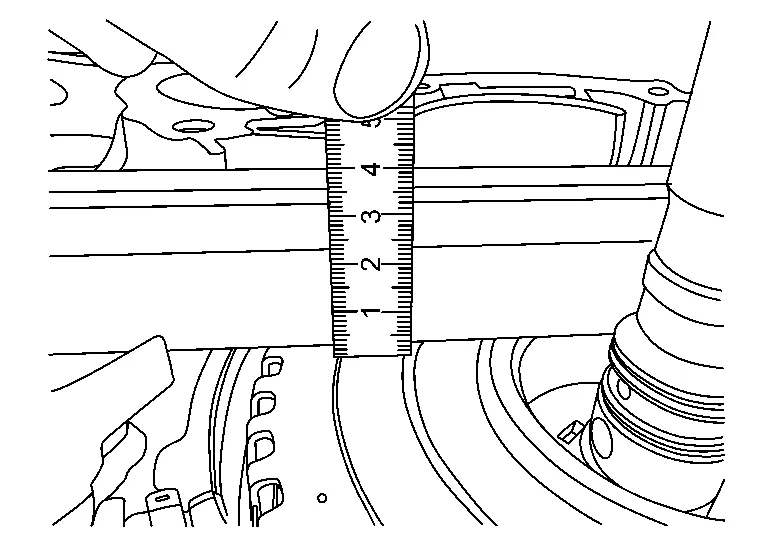
After inserting a torque converter to the CVT, check dimension (A) with in the reference value limit.

| (B) | : Scale |
| (C) | : Straightedge |
Install the primary speed sensor.
Install the transaxle assembly into the Nissan Murano vehicle. Refer to Removal and Installation - FWD (FWD) or Removal and Installation - AWD (AWD).
If replacing CVT, flush the CVT fluid cooler and lines. Refer to CVT Fluid Cooler Flush.
Fill the transaxle assembly with CVT fluid. Refer to Refilling.
Perform "ADDITIONAL SERVICE WHEN REPLACING CONTROL VALVE." Refer to Description.
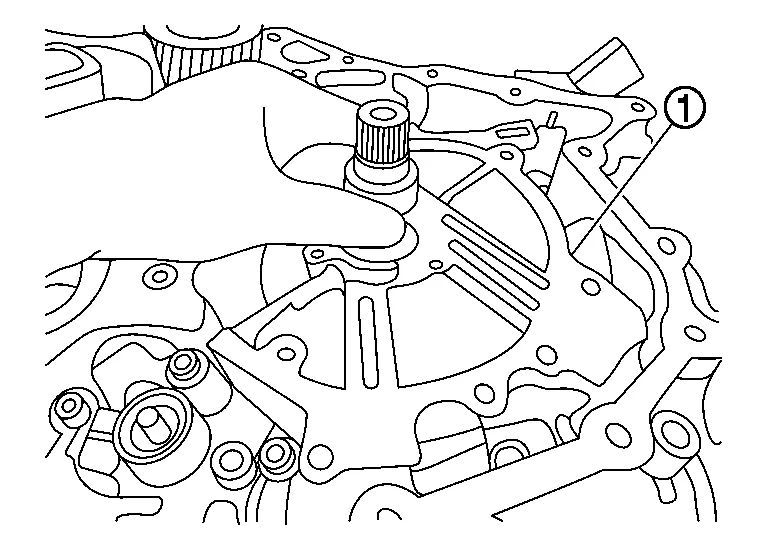
The Dummy Cover Will Not Sit Flush
Remove the dummy cover
.
Pull up the forward clutch assembly
by the input shaft to remove the entire forward clutch assembly.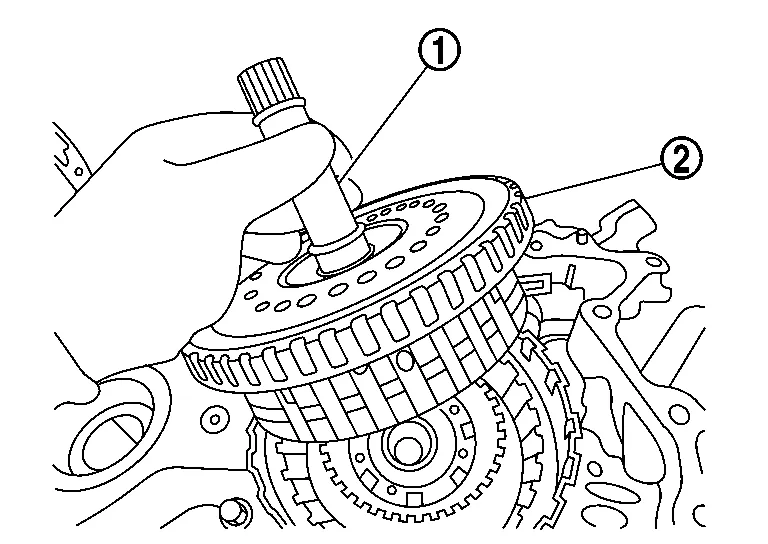
Using an appropriate tool (A) , Gently align the layers of the forward clutch assembly
.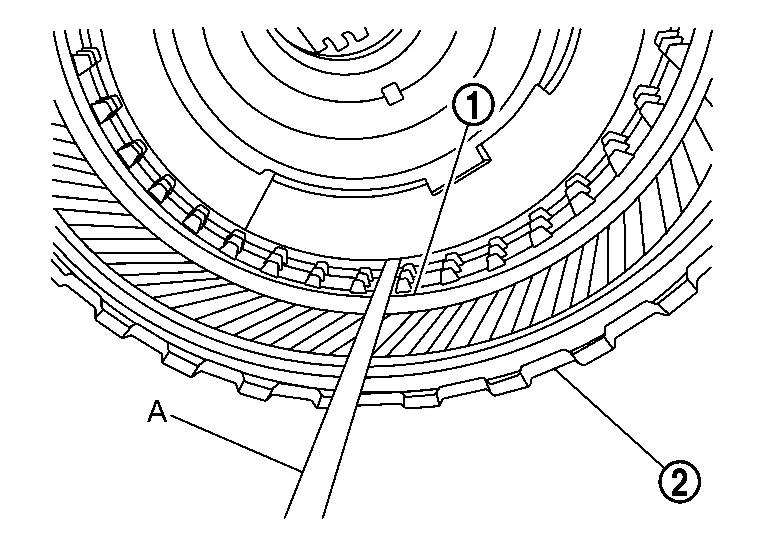
: Forward clutch assembly Re-insert the entire forward clutch assembly
while holding the input shaft .