Lights
Headlights
For additional information on headlight bulb replacement, refer to the instructions outlined in this section.
Replacing the halogen headlight bulb
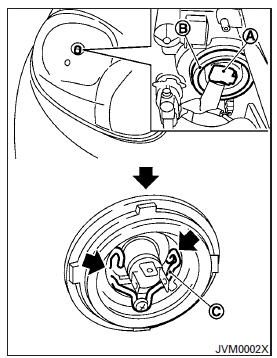
The headlight is a semi-sealed beam type which uses a replaceable headlight (halogen) bulb.
They can be replaced from inside the engine compartment without removing the headlight assembly.
CAUTION
- High-pressure halogen gas is sealed inside the bulb. The bulb may break if the glass envelope is scratched or the bulb is dropped.
- Aiming should not be necessary after replacing the H4 bulb. When aiming adjustment is necessary, it is recommended that you visit a NISSAN dealer for this service.
- Do not leave the headlight assembly open without a bulb installed for a long period of time. Dust, moisture, smoke, etc. entering the headlight body may affect bulb performance. Remove the bulb from the headlight assembly just before a replacement bulb is installed.
- Only touch the base when handling the bulb. Never touch the glass envelope.
Touching the glass could significantly affect bulb life and/or headlight performance.
- Use the same number and wattage as shown in the chart.
1. Disconnect the battery negative cable.
2. Disconnect the electrical connector A from the rear end of the bulb.
3. Pull off the rubber cap B .
4. Push and turn the retaining pin C to loosen it.
5. Remove the headlight bulb. Do not shake or rotate the bulb when removing it.
6. Install the new bulb in the reverse order of removal.
Fog may temporarily form inside the lens of the exterior lights in the rain or in a car wash. A temperature difference between the inside and the outside of the lens causes the fog. This is not a malfunction. If large drops of water collect inside the lens, it is recommended that you visit a NISSAN dealer for servicing.
Fog lights (if so equipped)
For additional information on fog light bulb replacement, refer to the instructions outlined in this section.
Replacing the fog light bulb
If fog light bulb replacement is required, it is recommended that you visit a NISSAN dealer for this service.
CAUTION
- High pressure halogen gas is sealed inside the halogen bulb. The bulb may break if the glass envelope is scratched or the bulb is dropped.
- When handling the bulb, do not touch the glass envelope.
- Use the same number and wattage as originally installed as shown in the chart.
- Do not leave the bulb out of the fog light for a long period of time as dust, moisture and smoke may enter the fog light body and affect the performance of the fog light.
Exterior and interior lights

Always check with the Parts Department at a NISSAN dealer for the latest parts information.
* It is recommended that you visit a NISSAN dealer for replacement.
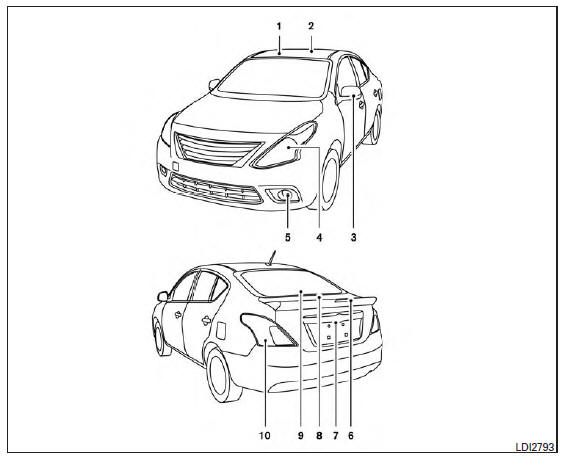
1. Map lights (if so equipped)
2. Room light
3. Door mirror turn signal light (if so equipped)
4. Headlight assembly
5. Fog light (if so equipped)
6. High-mounted stop light (spoiler) (if so equipped)
7. License plate light
8. Trunk light
9. High-mounted stop light (inside) (if so equipped)
10. Rear combination light
Replacement procedures
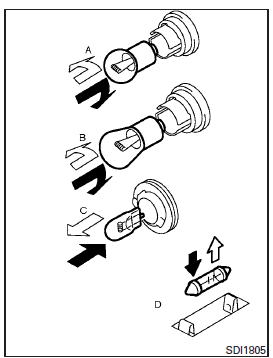
All other lights are either type A, B, C or D. When replacing a bulb, first remove the lens, lamp and/or cover.
 Indicates bulb removal
 Indicates bulb installation
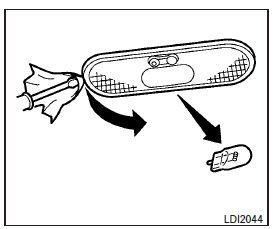
Map lights (if so equipped)
Use a cloth to protect the housing.
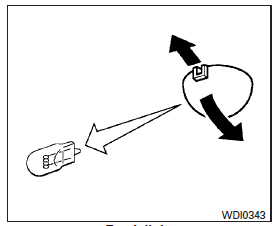
Trunk light
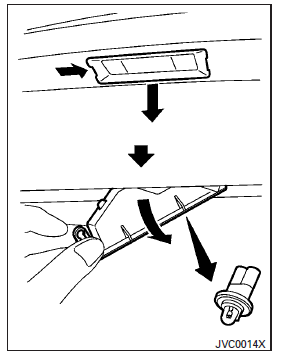
License plate light

Rear combination light
To change the stop/tail, turn signal or backup (reversing) light bulbs, perform the following: 1. Disconnect the negative battery cable.
2. Remove the two clips A and carefully pull the carpet back.
3. Remove the two nuts B and the rear combination light from the vehicle.

4. Disconnect the electrical connector C from the rear combination light.
5. Remove four screws D and the housing from the rear combination light.
6. Replace the necessary bulbs.
Follow the instruction in reverse order to install the rear combination light and carpet.