Interpreting XR25 bar graphs

INSTRUCTIONS For diagnosis, this bargraph must be lit.
| Try the diagnostic tool on another vehicle. |
Check:
Repair if necessary. |
Check:
Repair if necessary. |
Connect the breakout box in place of the ECU and check the insulation and continuity of the circuit: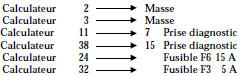 Repair. |
AFTER REPAIR Clear the ECU memory using G0**.
Try to start the vehicle. Switch the ignition on, then deal with the other faults.
Do not forget to carry out a status and parameters check!

INSTRUCTIONS Nothing to report.
The ECU must be non-compliant or faulty. Replace the ECU.
AFTER REPAIR Clear the ECU memory using G0**.
Try to start the vehicle. Switch the ignition on, then deal with the other faults.
Do not forget to carry out a status and parameters check!

INSTRUCTIONS Ignore this bargraph if the vehicle has no immobilizer.
| Connect the breakout box in place of the ECU and check the insulation, the continuity and the absence of parasitic resistance on the wiring of ECU pin 37. Repair if necessary. |
| The fault persists, refer to the immobilizer diagnosis. |
AFTER REPAIR Clear the ECU memory using G0**.
Try to start the vehicle. Switch the ignition on, then deal with the other faults.
Do not forget to carry out a status and parameters check!

INSTRUCTIONS If bargraph 6D is also lit, check ECU line 46.
Connect the breakout box in place of the ECU and check the insulation and continuity of the circuit: Repair if necessary. |
| Check the sensor resistance. Replace it if necessary. |
| The problem is still not resolved! The injection ECU must therefore be replaced. WARNING: The destruction of the ECU is probably due to an electrical shock. The cause of the destruction must be found before fitting a new ECU. |
AFTER REPAIR Clear the ECU memory using G0**.
Try to start the vehicle. Switch the ignition on, then deal with the other faults.
Do not forget to carry out a status and parameters check!

INSTRUCTIONS If bargraph 3D is flashing, raise the engine speed to 2,500 rpm.
for 5 minutes. If bargraph 3D has become steady, deal with the fault.
| Check the connection and the condition of the oxygen sensor connector. |
Check, with the ignition on during the delay phase, for the presence of:
Repair if necessary. |
Connect the breakout box in place of the ECU and check the insulation and continuity of the circuit: Repair if necessary. |
| The fault persists. Replace the oxygen sensor. |
| The problem is still not resolved! The injection ECU must therefore be replaced. WARNING: The destruction of the ECU is probably due to an electrical shock. The cause of the destruction must be found before fitting a new ECU. |
AFTER REPAIR Run the engine, switch the ignition on and clear the ECU memory using G0**. Try to start the vehicle. Switch the ignition on, then deal with the other faults. Do not forget to carry out a status and parameters check!

INSTRUCTIONS If bargraph 6G or bargraph 5G is also lit, check ECU line 44.
Connect the breakout box in place of the ECU and check the insulation and continuity of the circuit: Repair if necessary. |
| Check the sensor resistance. Replace it if necessary. |
| The problem is still not resolved! The injection ECU must therefore be replaced. WARNING: The destruction of the ECU is probably due to an electrical shock. The cause of the destruction must be found before fitting a new ECU. |
AFTER REPAIR Clear the ECU memory using G0**.
Try to start the vehicle. Switch the ignition on, then deal with the other faults.
Do not forget to carry out a status and parameters check!

INSTRUCTIONS Carry out a road test if bargraph 4D is flashing.
Check, on the vehicle speed sensor, for the presence of:
Repair if necessary. |
| Check that the sensor is correctly positioned. |
Connect the breakout box in place of the ECU and check the insulation, the continuity and the absence of parasitic resistance on the line: Repair if necessary. |
| The fault persists! Replace the sensor. |
| The problem is still not resolved! The injection ECU must therefore be replaced. WARNING: The destruction of the ECU is probably due to an electrical shock. The cause of the destruction must be found before fitting a new ECU. |
AFTER REPAIR Clear the ECU memory using G0**.
Try to start the vehicle. Switch the ignition on, then deal with the other faults.
Do not forget to carry out a status and parameters check!

INSTRUCTIONS If bargraph 6D is also lit steady, check ECU line 45.
If bargraph 6G or bargraph 4G is also lit, check ECU line 44.
| Check that the pressure sensor is connected electrically and pneumatically. Check the condition of the pressure sensor hose (it must not be blocked, punctured, etc.). |
Connect the breakout box in place of the ECU and check the insulation, the continuity and the absence of parasitic resistance on the line: Repair if necessary. |
| The fault persists! Replace the sensor. |
| The problem is still not resolved! The injection ECU must therefore be replaced. WARNING: The destruction of the ECU is probably due to an electrical shock. The cause of the destruction must be found before fitting a new ECU. |
AFTER REPAIR Clear the ECU memory using G0**.
Try to start the vehicle. Switch the ignition on, then deal with the other faults.
Do not forget to carry out a status and parameters check!

INSTRUCTIONS If bargraph 5D is flashing, clear the ECU memory using G0**.
Make an attempt to start the vehicle.
If bargraph 5D has become steady or is flashing, deal with this fault.
| *25 = CO.0 *25 = CC.0 |
Check the condition of the flywheel, especially if it has been removed. |
Connect the breakout box in place of the ECU and check the insulation, the continuity and the absence of parasitic resistance on the line: Repair if necessary. |
|
| The fault persists! Replace the sensor. | |
| The problem is still not resolved! The injection ECU must therefore be replaced. WARNING: The destruction of the ECU is probably due to an electrical shock. The cause of the destruction must be found before fitting a new ECU. |
| *25 = In | Check that the target sensor is correctly connected (the sensor connector must not be reversed). Repair if necessary. |
| The fault persists! Replace the sensor. |
AFTER REPAIR Clear the ECU memory using G0**.
Try to start the vehicle. Switch the ignition on, then deal with the other faults.
Do not forget to carry out a status and parameters check!

INSTRUCTIONS If bargraph 6G is flashing, clear the ECU memory using G0**. Run the engine at 3,000 rpm for 3 min. If bargraph 6G has become steady or is flashing, deal with this fault. If bargraph 4G or bargraph 5G is also lit, check ECU line 44.
Connect the breakout box in place of the ECU and check the insulation, the continuity and the absence of parasitic resistance on the line: Repair if necessary. |
| The fault persists! Replace the relevant knock sensor. |
| The problem is still not resolved! The injection ECU must therefore be replaced. WARNING: The destruction of the ECU is probably due to an electrical shock. The cause of the destruction must be found before fitting a new ECU. |
AFTER REPAIR Clear the ECU memory using G0**.
Try to start the vehicle. Switch the ignition on, then deal with the other faults.
Do not forget to carry out a status and parameters check!

INSTRUCTIONS If bargraph 5G is also lit steady, check ECU line 45. If bargraph 3G is also lit, check ECU line 46.
Connect the breakout box in place of the ECU and check the insulation, the continuity and the absence of parasitic resistance on the line: Repair if necessary. |
| Check the resistance of the throttle potentiometer. The fault persists! Replace the throttle potentiometer. |
| The problem is still not resolved! The injection ECU must therefore be replaced. WARNING: The destruction of the ECU is probably due to an electrical shock. The cause of the destruction must be found before fitting a new ECU. |
AFTER REPAIR Clear the ECU memory using G0**.
Try to start the vehicle. Switch the ignition on, then deal with the other faults.
Do not forget to carry out a status and parameters check!

INSTRUCTIONS If bargraph 8G is flashing, clear the ECU memory using G0**. Make a starting attempt. If bargraph 6G has become steady or is flashing, deal with this fault.
In some cases bargraph 13D is lit. Do not take it into account if the ADAC is not present.
| Perform the fuel pump relay actuator test: G10*. Does the fuel pump relay click? |
|
| The fuel pump relay does not click | Check for the presence of 12 V on pin L1 of the fuel pump relay holder. If necessary, repair the power line up to the 15 A fuse. |
Check the insulation, the continuity and the absence of parasitic resistance on the line: Repair if necessary. |
|
| The fuel pump relay still clicks. Replace the fuel pump relay. | |
| The problem is still not resolved! The injection ECU must therefore be replaced. WARNING: The destruction of the ECU is probably due to an electrical shock. The cause of the destruction must be found before fitting a new ECU. |
|
| The fuel pump relay clicks | Check for 12 V on pin L3 of the fuel pump relay holder. Repair the wiring up to the 30 A fuse if necessary. |
Check the insulation and continuity of the line: Repair if necessary. NOTE: If this line is shorted, check all the components supplied by this power feed. |
|
| The fault persists. Replace the fuel pump relay. | |
| The problem is still not resolved! The injection ECU must therefore be replaced. WARNING: The destruction of the ECU is probably due to an electrical shock. The cause of the destruction must be found before fitting a new ECU. |
|
AFTER REPAIR Clear the ECU memory using G0**.
Try to start the vehicle. Switch the ignition on, then deal with the other faults.
Do not forget to carry out a status and parameters check!

INSTRUCTIONS XX = 14 => Cylinder 1 or 4 line 30 of the ECU. XX = 23 => Cylinder 2 or 3 line 4 of the ECU. If warning light BG 11G is flashing, erase the ECU memory using G0**. Attempt to start the engine. If BG 11G has come on steady or is flashing, troubleshoot this fault.
| With ignition on and during the time-delay phase, check for 12 V on pin 1 of the faulty injector. Repair the injector 1 line to L5 of the fuel pump relay if necessary. |
Connect the breakout box in place of the ECU and check the insulation and continuity of the line: Repair if necessary. |
| The fault persists! Replace the faulty injector. NOTE: It is strongly recommended to check the insulation and continuity of the other injector lines, as well as the resistance of these injectors. |
The problem is still not resolved! The injection ECU must therefore be replaced.CAUTION: The ECU failure is probably due to an electrical shock.The cause of the failure must be found before fitting a new ECU. |
AFTER REPAIR Run the engine, switch ignition on and erase the ECU memory using G0**. Try to start the vehicle. Switch ignition on, then troubleshoot the other faults. Don't forget to check the states and parameters!

Nothing to reportINSTRUCTIONS
Disregard this bar graph, as this vehicle is not equipped with a TA.AFTER REPAIR Clear the ECU memory using G0**.
Try to start the vehicle. Switch the ignition on, then deal with the other faults.
Do not forget to carry out a status and parameters check!

INSTRUCTIONS Nothing to report.
This bargraph only lights up if the ECU power supply has been cut (disconnecting the battery, the ECU, etc.).Check the ECU power supply:

Repair if necessary.
Run the engine.
Switch off the ignition.
Switch on the ignition.
Establish communication with the ECU.
Erase the ECU memory using G0**.
NOTE: Stored faults are erased. A road test is therefore useful to check that there are no faults in the injection system.
AFTER REPAIR Clear the ECU memory using G0**.
Try to start the vehicle. Switch the ignition on, then deal with the other faults.
Do not forget to carry out a status and parameters check!

INSTRUCTIONS This vehicle is not currently fitted with ADAC. If another warning light is on, refer to the diagnosis for that warning light.
| If your vehicle is fitted with ADAC, this diagnostic method will not provide a solution for this fault. |
This warning light has often been seen on steady or flashing in the following cases:
|
AFTER REPAIR Clear the ECU memory using G0**.
Try to start the vehicle. Switch the ignition on, then deal with the other faults.
Do not forget to carry out a status and parameters check!

INSTRUCTIONS If BG 14G is flashing, erase the ECU memory using G0**. Attempt to start the engine (if the engine does not start, crank it with the starter).
If BG 14G has come on steady or is flashing, troubleshoot this fault.
Check the insulation, continuity and absence of parasitic resistance of the line: Repair if necessary. NOTE: This procedure can be carried out without removing the throttle body. |
| Check the resistance of the idle speed control stepper motor. Check the idle control valve if necessary. |
| The problem is still not resolved! The injection ECU must therefore be replaced. WARNING: The destruction of the ECU is probably due to an electrical shock. The cause of the destruction must be found before fitting a new ECU. |
AFTER REPAIR Clear the ECU memory using G0**.
Try to start the vehicle. Switch the ignition on, then deal with the other faults.
Do not forget to carry out a status and parameters check!

INSTRUCTIONS If BG 14D is flashing, erase the ECU memory using G0**.
Start the vehicle.
If BG 14D has come on steady with the engine running, troubleshoot this fault.
| Check the resistance of the EVAP purge valve. Replace the valve if necessary. |
| With ignition on and during the time-delay phase, check for 12 V on pin A of the EVAP purge valve. Repair if necessary. |
Connect the breakout box in place of the ECU and check the insulation and continuity of the circuit: Repair if necessary. |
| The problem is still not resolved! The injection ECU must therefore be replaced. WARNING: The destruction of the ECU is probably due to an electrical shock. The cause of the destruction must be found before fitting a new ECU. |
AFTER REPAIR Run the engine, switch ignition on and erase the ECU memory using G0**. Try to start the vehicle. Switch ignition on, then troubleshoot the other faults. Don't forget to check the states and parameters!

INSTRUCTIONS Check whether the vehicle has air conditioning. If it does not, check the other warning lights first.
Engine running, select air conditioning.
| Connect the breakout box in place of the ECU and check the insulation and continuity of ECU line 51. Repair if necessary. |
| If the fault persists, refer to the air conditioning diagnosis. |
AFTER REPAIR Clear the ECU memory using G0**.
Try to start the vehicle. Switch the ignition on, then deal with the other faults.
Do not forget to carry out a status and parameters check!

INSTRUCTIONS Nothing to report.
Ignore this bargraph, as this vehicle is not fitted with EGR.AFTER REPAIR Clear the ECU memory using G0**.
Try to start the vehicle. Switch the ignition on, then deal with the other faults.
Do not forget to carry out a status and parameters check!

INSTRUCTIONS XX = 14 => Cylinder 1 or 4 line 28 of the ECU
XX = 23 => Cylinder 2 or 3 line 29 of the ECU
NOTE: If CO is present, *16 = XX.CC may be displayed instead of *16 = XX.CO.
| Check the +APC (ignition-switched) supply to the affected coil on pin 2. Repair if necessary. |
| Check the resistance of the faulty coil. Replace the coil if necessary. |
| Check the suppression capacitor on pin 1 of the coil. |
Connect the breakout box in place of the ECU and check the insulation and continuity of the line: Repair if necessary. |
| The problem is still not resolved! The injection ECU must therefore be replaced. WARNING: The destruction of the ECU is probably due to an electrical shock. The cause of the destruction must be found before fitting a new ECU. |
AFTER REPAIR Run the engine, switch ignition on and erase the ECU memory using G0**. Try to start the vehicle. Switch ignition on, then troubleshoot the other faults. Don't forget to check the states and parameters!
Test yourself
A quick Renault Kangoo quiz: every answer comes with an explanation and a link to the manual page.