Fault location tree
| ALP 1 | No communication with the ECU |
INSTRUCTIONS
Nothing to report.
| Try the diagnostic tool on another vehicle. Check that the tool has an update later than CD-ROM No. 32. |
Check:
|
| Check that the CLIP probe is powered through pins 16 (+12 V) and 4 and 5 (ground) of the diagnostic socket, indicated by both red indicator lights on the probe coming on. Check that the CLIP probe is powered by the computer's USB port. Check that the CLIP tool communicates with the vehicle's ECUs, indicated by both green LEDs on the CLIP lighting up. |
| Check the following circuits at the diagnostic socket: pin 1 → + After ignition Repair if necessary. |
| Check the continuity, insulation and absence of parasitic resistance of the lines: CAN H (pin 6 of the diagnostic socket) |
| Using a multimeter, check that the voltages at the diagnostic socket terminals are approximately: - 2.5 V between CAN H (pin 6) and earth (pins 4 and 5) |
| If, after all these checks, communication still cannot be established with the Cabin Central Unit, contact your Techline. |
AFTER REPAIR
Check that no fault is present any longer.
Check that the system operates correctly.
| ALP 2 | "Tyre pressure to be readjusted" message illuminates (the affected wheel becomes solid on the display) |
Note: On vehicles with Vdiag 44, the "service" warning light comes on in addition to the message on the instrument panel.
INSTRUCTIONS
Check that all the wheels concerned are fitted with tyre pressure monitoring valves.
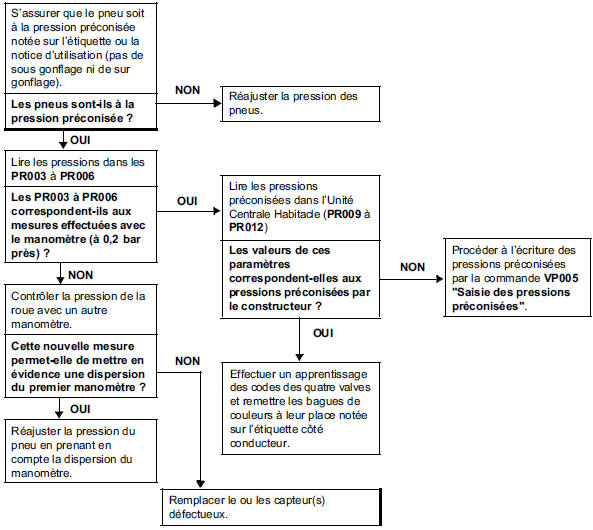
AFTER REPAIR
Carry out a full check with the diagnostic tool.
| ALP 3 | "Tyre pressure to be readjusted" message illuminates (2 wheels become solid on the display) |
Note: On vehicles with Vdiag 44, the "service" warning light comes on in addition to the message on the instrument panel.
INSTRUCTIONS
Check that all the wheels concerned are fitted with tyre pressure monitoring valves.
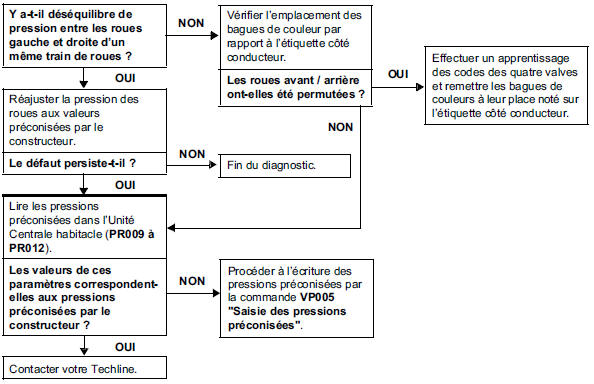
AFTER REPAIR
Carry out a full check with the diagnostic tool.
| ALP 4 | "Tyre sensor out of service" message illuminates (one wheel indicator disappears) |
INSTRUCTIONS
Check that all the wheels concerned are fitted with tyre pressure monitoring valves.
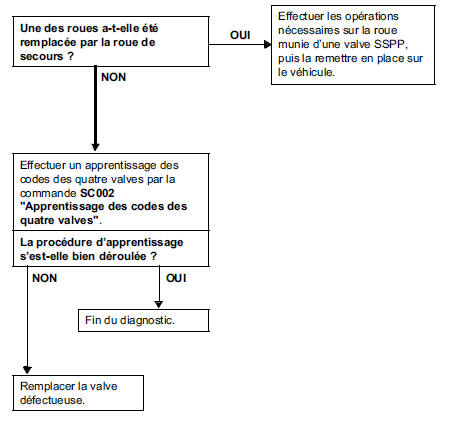
AFTER REPAIR
Carry out a full check with the diagnostic tool.
| ALP 5 | "Tyre sensor out of service" message illuminates (all 4 wheel indicators disappear) |
INSTRUCTIONS
Check that all the wheels are fitted with tyre pressure monitoring valves.
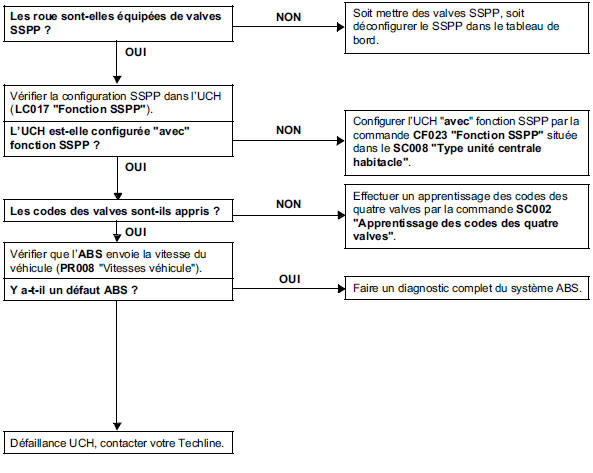
AFTER REPAIR
Carry out a full check with the diagnostic tool.
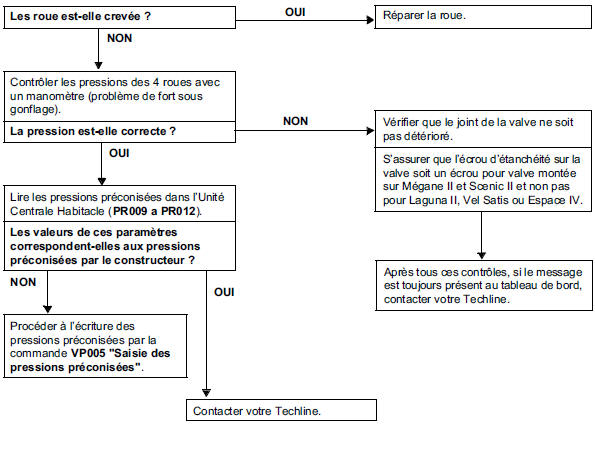
| ALP 6 | "Puncture, change the wheel" message illuminates (the wheel becomes solid on the display) |
INSTRUCTIONS
Without.
AFTER REPAIR
Carry out a full check with the diagnostic tool.
Test yourself
A quick Renault Megane quiz: every answer comes with an explanation and a link to the manual page.