Preliminaries
1. APPLICABILITY OF THIS DOCUMENT
This document describes the diagnosis applicable to all Electrical Central Units with the following characteristics:
| Vehicle(s): MEGANE II Function concerned: TYRE PRESSURE MONITORING SYSTEM |
Control unit name: UCH Program number: 0B20 Vdiag number: 44 - 48 - 4C |
2. ESSENTIAL ITEMS FOR DIAGNOSIS
Documentation type
Diagnostic methods (this document):
- Assisted diagnosis (integrated into the diagnostic tool), paper (Repair Manual 364 and 366 or Technical Notes), Dialogys.
Wiring diagrams:
- Visu-Schéma (CD-ROM), paper (Technical Note 8206A).
Diagnostic tool type
- CLIP
Essential tool type
ESSENTIAL SPECIALIST TOOLS |
|
| Multimeter | |
| Elé. 1681 | Universal breakout box |
| Ms. 1607 | Valve exciter |
| Pressure gauge | |
| Tyre inflation system | |
3. REMINDERS
Procedure
To diagnose the vehicle control units, switch the ignition to diagnostic mode (+ after forced ignition).
Proceed as follows:
- Place the vehicle key on the key holder (vehicles without key scenario 1, entry level, without hands-free and scenario 2, high end, with hands-free),
- long press (more than 5 seconds) on the "START" button when starting conditions are not met,
- connect the diagnostic tool and carry out the required operations.
Diagnosis is therefore only possible after switching the ignition to diagnostic mode (+ after forced ignition) and switching on the dipped headlights.
To cut the + after ignition (+AC), proceed as follows:
- disconnect the diagnostic tool,
- briefly press the "START" button twice (less than 3 seconds each time),
- check that the + after ignition supply has been cut by confirming that the ECU warning lights go out on the instrument panel.
Faults
The "present" status of faults must be checked when the diagnostic tool is started after switching on the + after ignition supply (without acting on the system components).
For a present fault, deal with the fault following the procedure given in the chapter "Fault interpretation".
No fault is stored in the Tyre Pressure Monitoring System.
Conformity check
The conformity check aims to verify the states and parameters that show no fault on the diagnostic tool when they are inconsistent. This step therefore allows you to:
- diagnose faults with no fault display that may correspond to a customer complaint,
- verify correct operation of the system and make sure a fault will not reappear after repair.
This chapter therefore contains a diagnosis of states and parameters, under the conditions required for their check.
If a state does not operate normally or a parameter is out of tolerance, refer to the corresponding diagnostic page.
Customer complaints - Fault locating tree
If the diagnostic tool check is correct but the customer complaint is still present, deal with the problem using "customer complaints".
4. DIAGNOSTIC PROCEDURE
Procedure to carry out before starting diagnosis with the tool
- Were the wheels concerned fitted with pressure sensor valves, or were they fitted with them at the time of the incident?
- Check the position of the wheels on the vehicle (wheel sensor colour code). Refit the wheels in their original position and carry out a learning procedure of the four wheel sensor codes if the wheels are not in their original position.
- Check the wheel pressures with a pressure gauge. Do they match the pressures shown on the door label or in the owner's manual?
4. DIAGNOSTIC PROCEDURE
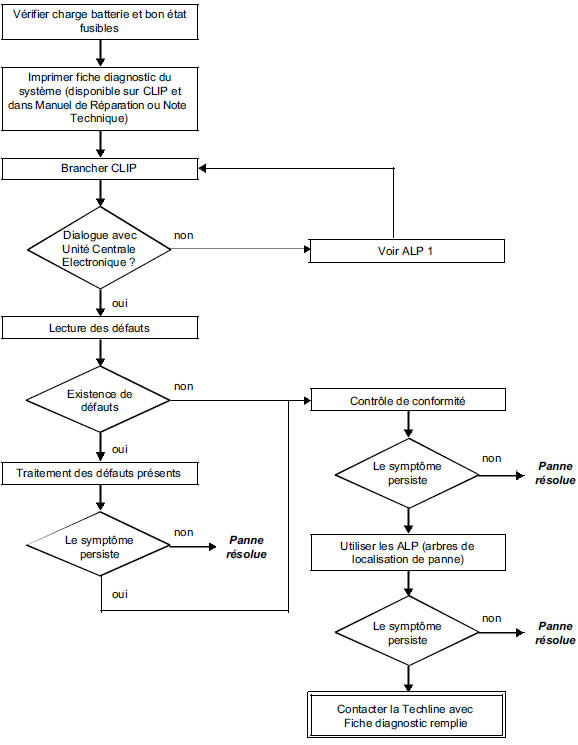
5. DIAGNOSTIC SHEET
WARNINGAll incidents on a complex system must be subject to a full diagnosis using suitable tools. The DIAGNOSTIC SHEET, to be completed during diagnosis, provides and keeps a record of the diagnosis carried out. It is an essential element of communication with the manufacturer.
A DIAGNOSTIC SHEET MUST THEREFORE BE COMPLETED EACH TIME A DIAGNOSIS IS CARRIED OUTThis sheet will always be requested:
- When requesting technical assistance from the techline.
- For approval requests, when replacing parts that require mandatory approval.
- To be attached to the "monitored" parts returned. It is then required for warranty reimbursement and helps with a better analysis of the removed parts.
6. SAFETY INSTRUCTIONS
Any operation on a component requires compliance with safety rules to avoid any material or personal injury:
- Check that the battery is correctly charged to avoid damage to the ECUs in case of low charge.
- Use the appropriate tools.
7. ABBREVIATIONS GLOSSARY
- ALP: Fault Locating Tree.
- APC: After Contact (after ignition on).
- CAN: Controller Area Network.
- CC: Short circuit.
- CO: Open circuit.
- MR: Repair Manual.
- NT: Technical Note.
- SSPP: Tyre Pressure Monitoring System.
- UCE: Electronic Central Unit (ECU).
- UCH: Cabin Central Unit.
- VIN: Vehicle Identification Number.
Test yourself
A quick Renault Megane quiz: every answer comes with an explanation and a link to the manual page.