Chassis
Lower arm
In this manual: Chassis
~3min read
Essential equipment |
| diagnostic tool |
Tightening torques |
|
| lower arm to subframe mounting bolts | 7 daN.m |
| steering ball joint nut | 3.7 daN.m |
| stabiliser bar link ball joint nut | 4.4 daN.m |
| lower balljoint bolt | 6.2 daN.m |
| front radiator crossmember mounting bolts | 10.5 daN.m |
| rear radiator crossmember mounting bolt | 2.1 daN.m |
| lower side member brace bolts | 2.1 daN.m |
| wheel bolt | 11 daN.m |

Never use the lower arm as a support point for the lifting equipment.
REMOVAL
- Position the vehicle on a two-post lift.
- Disconnect the battery, starting with the negative terminal.
- Strap the radiator to the grille.
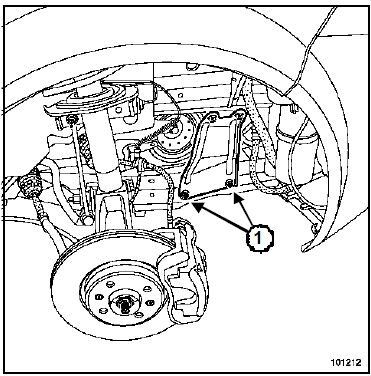
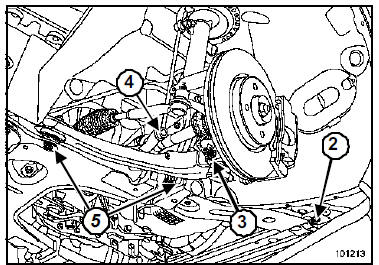
- Remove:
- the front wheel,
- the wheel arch liners,
- the undertray,
- the lower side member brace bolts (1),
- the front radiator crossmember mounting bolts (2),
- the rear radiator crossmember mounting nuts,
- the radiator crossmember.
- Unclip the wheel speed sensor wiring.
- Disconnect the wheel speed sensor connector in the wheel arch.
- Remove:
- the lower balljoint bolt (3),
- the anti-roll bar link nut (4),
- Disconnect the ride height sensor link (if the vehicle is equipped).
- Remove:
- the front and rear lower arm mounting bolts (5),
- the lower arm.
INSTALLATION
- Refit in the reverse order of removal.
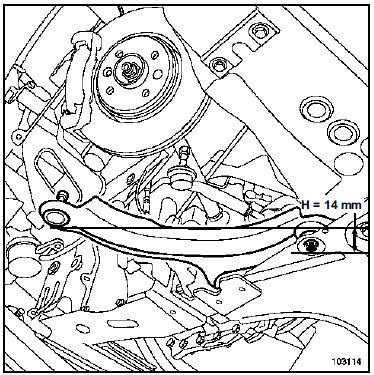
- Position the lower arm so that the height difference between the lower balljoint plane and the head of the rear subframe mounting bolt is (H = 14 mm).
- Tighten the lower arm to subframe mounting bolts to torque (7 daN.m) in this position.
- Refit the lower balljoint into the steering knuckle carrier.
- Always replace the subframe and arm mounting fasteners with new ones.
- Always fit a 10 mm thick spacer between the radiator crossmember and the subframe before tightening the radiator crossmember fasteners to torque.
- Refit and tighten to torque:
- the steering ball joint nut (3.7 daN.m),
- the anti-roll bar link nut (4.4 daN.m),
- the lower balljoint bolt (6.2 daN.m),
- the radiator crossmember and the front radiator crossmember mounting bolts (10.5 daN.m),
- the rear radiator crossmember mounting bolts (2.1 daN.m),
- the lower side member brace bolts (2.1 daN.m),
- the front wheels and the wheel mounting bolts (11 daN.m).
Connect the battery; carry out the necessary relearn procedures (Chapter Battery).
- Adjust the running gear (see General chapter).
If the running gear has been adjusted, perform the torque and angle sensor learning procedure using the diagnostic tool (refer to the diagnostic manual).
Test yourself
A quick Renault Megane quiz: every answer comes with an explanation and a link to the manual page.
Was this page helpful?