Fault handling
FAULTY SEGMENT
INSTRUCTIONS
First check that the control unit at the end of the faulty segment is properly powered (earth, + battery, + accessory, or + after ignition).
Always check the conformity of the control unit.
Warning: the tool may not be able to determine exactly which segment(s) are faulty. It then proposes several segments that may be defective. In this case, repair the segment closest to the diagnostic socket.
| Isolate the faulty segment by disconnecting both ends of the segment. Check the condition of the connectors. Check the continuity and insulation of the CAN H and CAN L lines between the two connectors of the isolated segment. See the chapter "Short-circuit search aid" for the allocation of the circuits at the control units and connections. Carry out the necessary operations to restore continuity of both lines (e.g. replace the wiring). Check that the control unit fitted to the vehicle is compatible with the Mégane II and that the information it provides is correct. |
| Reconnect the segment. Carry out a new multiplexed network test with the diagnostic tool. Is the segment still reported as faulty? |
| No | ||
| Yes | Are there other faulty segments? | |
| No | Repeat the multiplexed network checks to ensure continuity and insulation of the CAN H and CAN L lines between the end of the faulty segment and the diagnostic socket. | |
| Yes | Apply the same procedure to each segment. | |
AFTER REPAIR
Carry out a new multiplexed network test with the diagnostic tool.
Erase the faults stored in all control units connected to the network.
Deal with any other faults.
FAULTY CONTROL UNIT
INSTRUCTIONS
- Check that the control units physically fitted to the vehicle are conforming and compatible with the Mégane II.
- Check that the control units are properly powered (earth, + battery, + accessory, or + after ignition).
The wake-up mode is:
- timed supply: Cabin Central Unit, Instrument Panel.
- + accessory: Protection and Switching Unit, Climate control panel, Car radio, Control and Communication Unit.
- + After ignition: Injection, ABS, airbag, Electric Power Steering, Automatic Gearbox, LPG, Steering Column Lock, Roof Control Unit, Driving School Box, Automatic Parking Brake, Park Assist.
- + After ignition + dipped beam: Xenon lamps.
Communication with the Xenon lamps is only possible with + After ignition and the dipped beam switched on.
Test communication with the ECUs.
|
| After these checks, if no fault, open circuit or short circuit has been detected, contact your Techline. |
AFTER REPAIR
Carry out a new multiplexed network test with the diagnostic tool.
Erase the faults stored in all control units connected to the network.
Deal with any other faults.
ECUS NOT RECOGNISED ON THE NETWORK
INSTRUCTIONS
- Check that the ECUs are compatible with the Mégane II.
| Check that the CLIP diagnostic tool update is recent enough to take into account the faults on the Mégane II. |
| Switch to ECU diagnostic mode. Test communication with the ECUs.
|
|
| If no fault, open circuit or short circuit has been detected after these checks, contact your Techline. |
AFTER REPAIR
Carry out a new multiplexed network test with the diagnostic tool.
Erase the faults stored in all control units connected to the network.
Deal with any other faults.
MULTIPLEX NETWORK FAULTY
Aid to locating a short circuit on the network
INSTRUCTIONS
Have the vehicle's multiplex network wiring diagram and the diagnostic socket diagram to hand.
In the event of a short circuit to + battery, leave the battery connected.
The check procedure consists of disconnecting the network elements one after another to isolate the faulty section.Check the condition of the connectors.
Check the condition of the multiplex network wires (CAN H - CAN L).
Repair any damaged components.
Always re-run the multiplex network test after each operation and check whether the fault has cleared. If the fault is still reported, continue disconnecting the connectors and ECUs one after another.
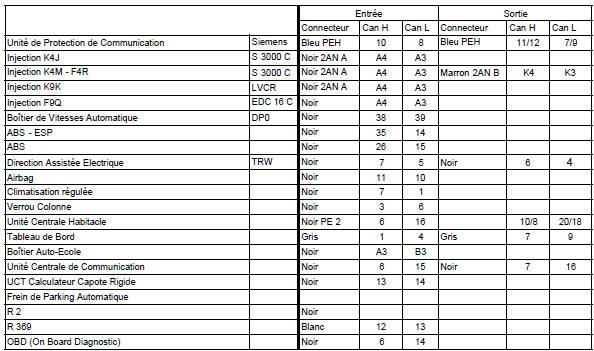
If the fault cannot be seen, contact your Techline.
AFTER REPAIR
Carry out a new multiplexed network test with the diagnostic tool.
Erase the faults stored in all control units connected to the network.
Deal with any other faults.
Test yourself
A quick Renault Megane quiz: every answer comes with an explanation and a link to the manual page.