Engine and peripherals
Turbocharger
In this manual: Engine and peripherals
~9min read
K9K
Tightening torques |
|
| turbocharger exhaust manifold nuts | 2.6 daN.m |
| side support bracket mounting screw | 2.5 daN.m |
| rear catalytic converter mounting screw | 2.1 daN.m |
| side support bracket mounting screw on the engine | 4.4 daN.m |
| turbocharger mounting screw on the exhaust manifold | 2.6 daN.m |
| exhaust gas recirculation solenoid valve heat shield mounting screw | 1.2 daN.m |
| turbocharger oil supply pipe fitting | 2.3 daN.m |
| turbocharger oil supply pipe fitting on the cylinder head | 2.3 daN.m |
| turbocharger oil return pipe on the turbocharger | 1.2 daN.m |
| turbocharger mounting studs on the exhaust manifold | 0.9 daN.m |
| turbocharger mounting studs on the turbocharger | 0.9 daN.m |

REMOVAL
- Position the vehicle on a two-post lift.
- Remove the engine covers.
- Disconnect the battery.
- Remove the engine undertray.
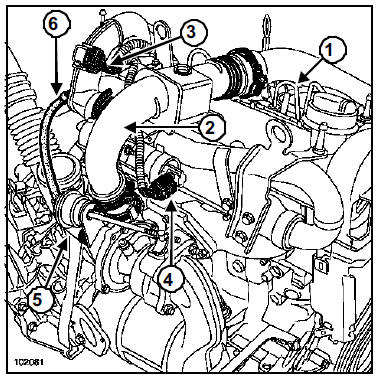
- Disconnect the air duct (1).
- Remove the air duct (2) from the turbocharger.
- Disconnect:
- the boost pressure sensor (3),
- the exhaust gas recirculation solenoid valve (4),
- the boost pipe (5) from the turbocharger,
- the rubber hose (6) from the boost pressure control valve to the air duct.
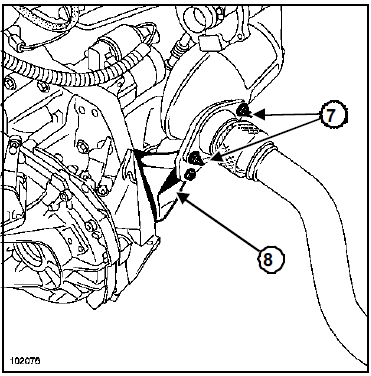
- Remove:
- the exhaust flange fasteners (7),
- the support bracket (8) fastener on the catalytic converter.
- Loosen the other support bracket fasteners on the gearbox.
- Remove the support bracket (8).
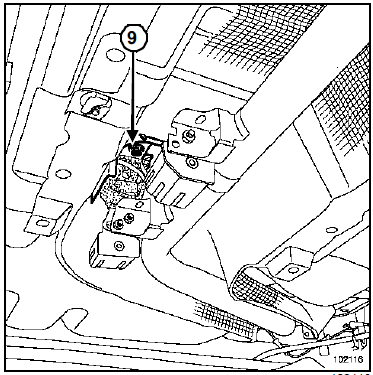
- Remove the mounting screw (9) of the exhaust line rubber mount bracket on the body.
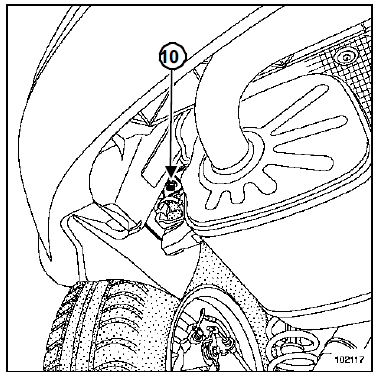
- Remove the mounting screw (10) of the silencer rubber mount bracket on the body.
- Move the exhaust line rearward.
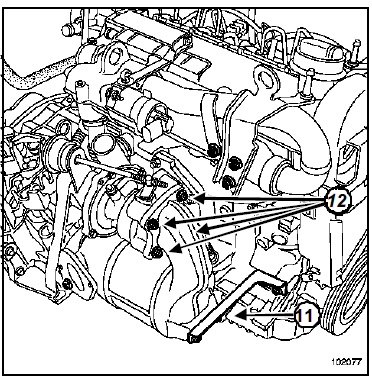
- Remove:
- the catalytic converter support bracket (11),
- the four mounting nuts (12) of the catalytic converter on the turbocharger,
- the catalytic converter
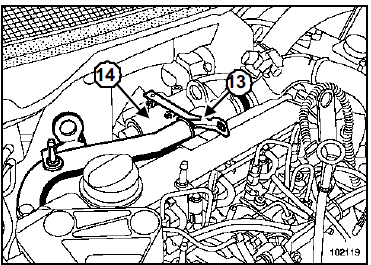
- Remove:
- the bracket (13),
- the heat shield of the EGR solenoid valve (14).
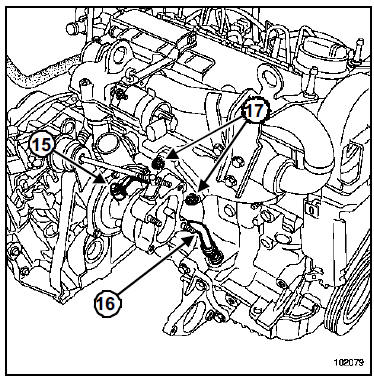
- Remove:
- the oil supply pipe (15),
- the oil return pipe (16),
- the two upper mounting nuts (17) of the turbocharger,
- the lower mounting nut from underneath,
- the turbocharger.
INSTALLATION
WARNING- When refitting, make sure no foreign matter enters the turbine or the compressor.
- Check that the turbocharger oil return pipe is not partially or completely blocked by carbon deposits. Make sure it is not leaking; if so, replace it.
- Always replace:
- all O-rings and the two copper sealing washers of the turbocharger oil supply pipe,
- the exhaust flange gasket,
- any damaged heat shield.
- Refit in the reverse order of removal.
- Fit the catalytic converter.
- Hand-tighten the mounting bolts.
- Tighten to the following torques:
- the catalytic converter mounting nuts on the turbocharger (2.6 daN.m),
- the side stand mounting bolts (2.5 daN.m),
- the rear catalytic converter mounting bolts (2.1 daN.m).
- After a turbocharger failure, check that the air-to-air intercooler is not full of oil.
If so, remove it, rinse it with cleaning product, then let it drain thoroughly.
- Apply LOCTITE FRENTANCH to the threads of the turbocharger oil supply pipe fitting on the cylinder head.
- Tighten to the following torques:
- the side stand mounting bolts on the engine (4.4 daN.m),
- the turbocharger mounting bolts on the exhaust manifold (2.6 daN.m),
- the EGR solenoid valve heat shield mounting bolts (1.2 daN.m),
- the turbocharger oil supply pipe fitting (2.3 daN.m),
- the turbocharger oil supply pipe fitting on the cylinder head (2.3 daN.m),
- the turbocharger oil return pipe on the turbocharger (1.2 daN.m),
- the turbocharger studs on the manifold (0.9 daN.m),
- the turbocharger studs on the turbocharger (0.9 daN.m).
- Connect the battery; carry out the necessary re-learns (see Electrical Equipment chapter).
- Before starting, disconnect the flow actuator connector (do not start the engine).
- Crank the starter until the oil pressure warning light goes out (press for a few seconds).
- Switch off the ignition.
- Reconnect the flow actuator connector.
- Start the engine.
- Let the engine idle, then rev it several times without load.
- Switch off the ignition.
- Check for oil leaks.
- Connect the diagnostic tool and erase the stored faults.
- Check that all heat shields on the exhaust line are present and correctly secured.
- Check that there is no contact with the underbody.
F9Q
Essential equipment |
| Essential equipment |
Tightening torques |
|
| turbocharger exhaust manifold nuts | 2.6 +/- 0.2 daN.m |
| catalytic converter bracket nut, timing belt side | 3 daN.m |
| catalytic converter bracket bolt, timing belt side | 5 daN.m |
| catalytic converter bracket nuts, flywheel side | 2.1 daN.m |
| catalytic converter bracket bolt, flywheel side | 2.1 daN.m |
| exhaust line bracket mounting bolts | 2.1 daN.m |
| torque rod bolt on the engine | 18 daN.m |
| torque rod bolt on the subframe | 10.5 daN.m |
| turbocharger mounting nuts | 2.4 +/- 0.1 daN.m |
| oil supply fitting on the turbocharger | 2.4 +/- 0.44 daN.m |
| oil supply fitting on the engine | 2.6 +/- 0.2 daN.m |
| oil supply union bolt | 1.2 +/- 0.1 daN.m |

REMOVAL
- Position the vehicle on a two-post lift.
- Remove the engine covers.
- Disconnect the battery.
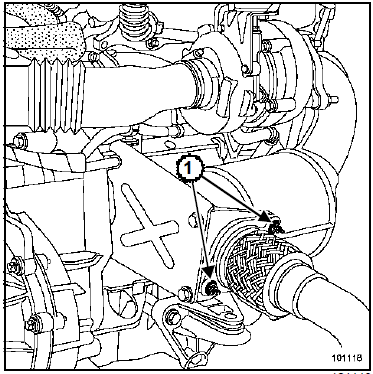
- Remove:
- the front right wheel,
- the engine undershield,
- the two nuts (1) of the exhaust flange.
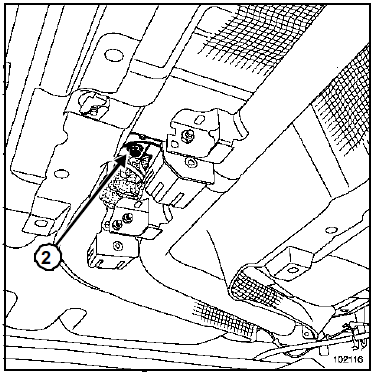
- Remove the mounting bolt (2) of the exhaust line rubber mount bracket from the body,
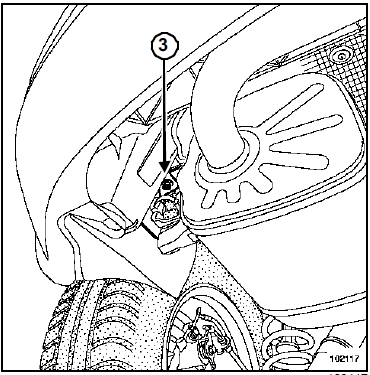
- Remove the mounting bolt (3) of the silencer rubber mount bracket.
- Move the exhaust line rearward.
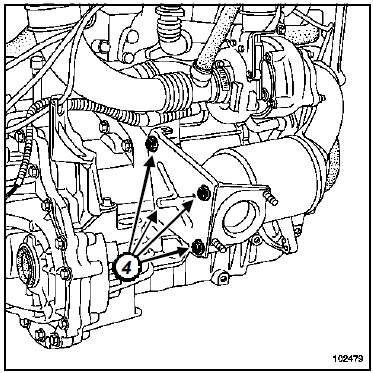
- Remove:
- the mountings (4) of the catalytic converter bracket, flywheel side,
- the catalytic converter bracket, flywheel side,
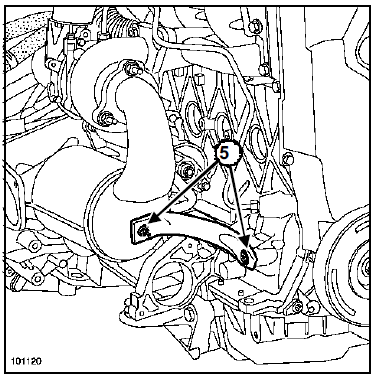
- Remove:
- the mountings (5) of the catalytic converter bracket, timing belt side,
- the catalytic converter bracket, timing belt side.
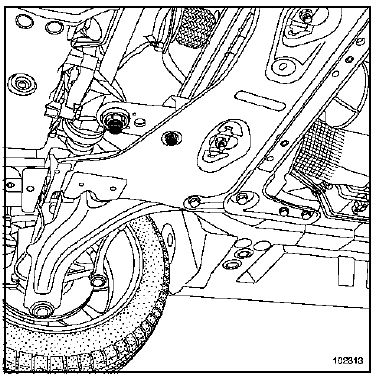
- Remove the lower torque rod.
- Remove the engine lifting bracket.
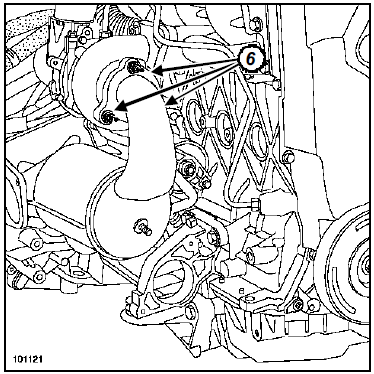
- Remove:
- the three mounting nuts (6) of the catalytic converter on the turbocharger,
- the catalytic converter, from underneath the vehicle.
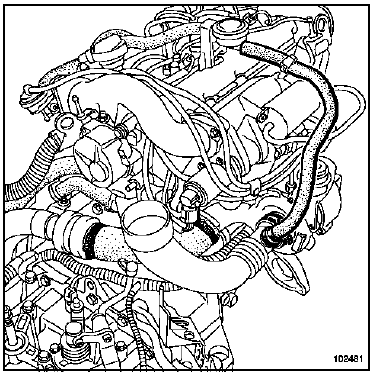
- Disconnect the air inlet and outlet pipes from the turbocharger.
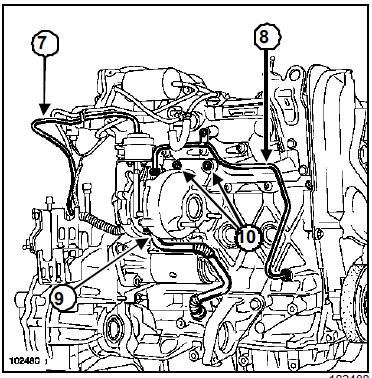
- Disconnect the rubber hose (7) from the wastegate actuator.
- Remove:
- the turbocharger oil supply pipe (8),
- the turbocharger oil return pipe (9),
- the three turbocharger mounting nuts (10),
- the turbocharger.
INSTALLATION
WARNINGSpecial precautions:
- Before refitting, check that the turbocharger bearings are correctly lubricated.
To do this:
- disconnect the high-pressure regulator connector,
- crank the starter (do not start the engine) (clear the ECU memory),
Oil must flow freely through the oil feed pipe (place a container underneath).
Otherwise, replace the lubrication pipe.
- When refitting, make sure no foreign matter enters the turbine or the compressor.
- After a turbocharger failure, check that the air-to-air intercooler is not full of oil. If so, remove it, rinse it with cleaning product, then let it drain.
- Check that the turbocharger oil return pipe is not partially or completely blocked by carbon deposits. Also check that it is fully sealed. Otherwise, replace it.
- Always replace:
- the copper sealing washer at the turbocharger oil supply union,
- the oil return pipe gasket,
- the catalytic converter gaskets with new gaskets,
- any damaged heat shield.
- Refit in the reverse order of removal.
- Refit the catalytic converter.
- Tighten the catalytic converter mounting nuts to the turbocharger to torque (2.6 +/- 0.2 daN.m).
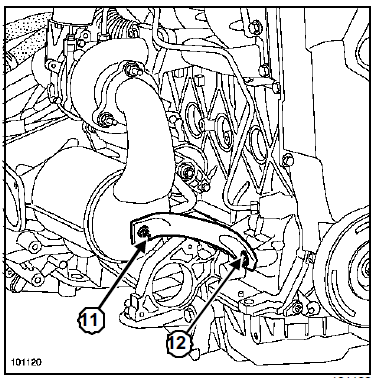
- Refit the timing-side catalytic converter bracket, fitting the bolts by hand (do not tighten):
- the nut (11),
- the bolt (12).
- Tighten in sequence and to torque:
- the timing-side catalytic converter bracket mounting nut (3 daN.m),
- the timing-side catalytic converter bracket bolt (5 daN.m).
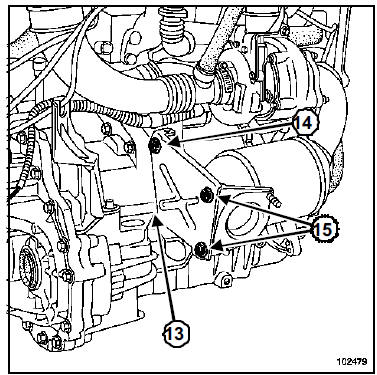
- Refit the flywheel-side catalytic converter bracket, fitting the bolts by hand (do not tighten):
- the bracket mounting nuts (13) and (14).
- the bracket mounting bolts (15),
- Tighten in the following order and to the following torques:
- the flywheel-side catalytic converter bracket mounting nuts (2.1 daN.m),
- the flywheel-side catalytic converter bracket bolts (2.1 daN.m).
- Tighten to torque:
- the exhaust line support mounting bolts (2.1 daN.m),
- the torque rod bolt on the engine (18 daN.m),
- the torque rod bolt on the subframe (10.5 daN.m),
- the turbocharger mounting nuts (2.4 +/- 0.1 daN.m),
- the oil supply union on the turbocharger (2.4 +/- 0.44 daN.m),
- the oil supply union on the engine (2.6 +/- 0.2 daN.m),
- the oil union bolts (1.2 +/- 0.1 daN.m).
- Check that all heat shields on the exhaust line are present and correctly secured.
- Refit the exhaust line, aligning it with the marks made previously.
- Check that there is no contact with the underbody.
After each removal and refitting or replacement of the catalytic converter, carry out a road test (let the engine cycle the cooling fan on two starts).
WARNING- Connect the battery; carry out the necessary re-learns (see Electrical Equipment chapter).
- Disconnect the flow actuator connector (do not start the engine).
- Crank the starter until the oil pressure warning light goes out (press for a few seconds).
- Switch off the ignition.
- Reconnect the flow actuator connector.
- Start the engine.
- Let the engine idle, then rev it several times without load.
- Switch off the ignition.
- Check for oil leaks.
- Connect the diagnostic tool and erase the stored faults.
- Check the boost pressure sensor and solenoid valve.
Test yourself
A quick Renault Megane quiz: every answer comes with an explanation and a link to the manual page.
Was this page helpful?