Drive chain replacement
Use the special tool in the following procedures, to cut and rejoin the drive chain.
Notewhen using the special tool, apply a small quantity of grease to the threaded parts of the special tool.
Special tool : 09922–22711 (drive chain cutting
and joint tool set)
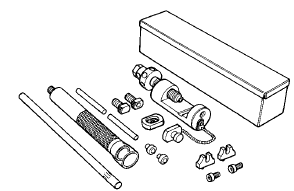
Drive chain cutting
- Set up the special tool as shown in the figure.

- Tool body
- Grip handle
- Pressure bolt [a]
- Pressure bolt [b]
- Bar
- Adjuster bolt (with through hole)
- Pin remover
- Chain holder (engraved mark 500) with reamer bolt m5 x 10
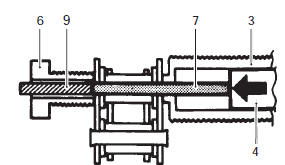
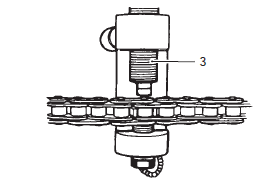
the tip of pin remover (7) should be positioned inside “a” approximately 5 mm (0.2 In) from the end face of pressure bolt [a] (3) as shown in the figure.
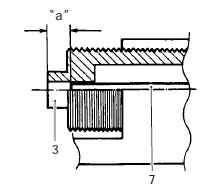
5 Mm (0.2 In)
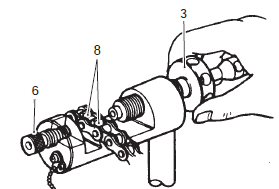
- Place the drive chain link being disjointed on the chain holder (8) of the tool.
- Turn in both the adjuster bolt (6) and pressure bolt [a] (3) so that each of their end hole fits over the chain joint pin properly.
- Tighten the pressure bolt [a] (3) with the bar.
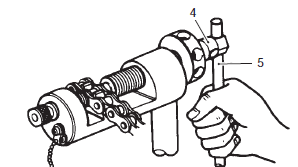
- Turn in the pressure bolt [b] (4) with the bar (5) and force out the drive chain joint pin (9).
continue turning in the pressure bolt [b] (4) until the joint pin should been completely pushed out of the chain.
Noteafter the joint pin (9) is removed, loosen the pressure bolt [b] (4) and then pressure bolt [a] (3).
- Remove the joint pin (9) of the other side of joint plate.
Caution never reuse joint pins, o-rings and plates.
Drive chain connecting

Do not use joint
clip type of drive chain. The joint clip may have a chance to drop which may cause severe damage to motorcycle and severe injury.
- Set up the special tool as shown in the figure.
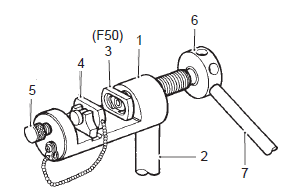
- Tool body
- Grip handle
- Joint plate holder (engraved mark “f50”)
- Wedge holder & wedge pin
- Adjuster bolt (without hole)
- Pressure bolt [a]
- Bar
- Apply grease to the joint pins (8), o-rings (9) and plates (10).
Caution replace the joint pins (8), o-rings (9) and plates (10) with new ones.
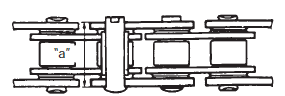
- Connect both ends of the drive chain with the joint pins (8) inserted from the wheel side “a” as installed on the motorcycle.

- Apply grease on the recessed portion of the joint plate holder (3) and set the joint plate (10).
when positioning the joint plate (10) on the tool, its stamp mark must face the joint plate holder (3) side.
- Set the drive chain on the tool as illustrated and turn in the adjuster bolt (5) to secure the wedge holder and wedge pin (4).
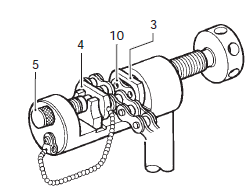
- Turn in the pressure bolt [a] (6) and align two joint pins (8) properly with the respective holes of the joint plate (10).
- Turn in the pressure bolt [a] (6) further using the bar (7) to press the joint plate over the joint pins.
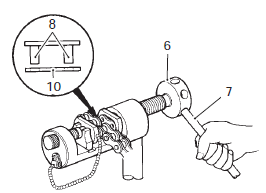
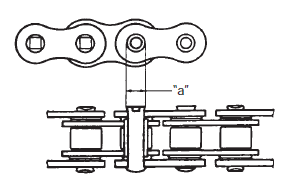
- Continue pressing the joint plate until the distance between the two joint plates comes to the specification.
if pressing of the joint plate makes the dimension out of specification excessively, the work must be carried out again by using new joint parts.
Joint pin staking
- Set up the special tool as shown in the figure.
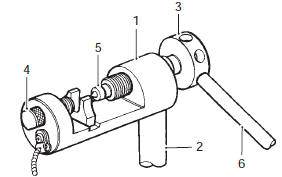
- Tool body
- Grip handle
- Pressure bolt [a]
- Adjuster bolt (without hole)
- Staking pin (stowed inside grip handle behind rubber cap)
- Bar
before staking the joint pin, apply a small quantity of grease to the staking pin (5).
- Stake the joint pin by turning (approximately 7/8 turn) the pressure bolt [a] (3) with the bar until the pin end diameter becomes the specified dimension.
- after joining of the chain has been completed, check to make sure that the link is smooth and no abnormal condition is found.
- Should any abnormal condition be found, reassemble the chain link using the new joint parts.
- Adjust the drive chain slack, after connecting it.
Refer to “drive chain inspection and adjustment” in section 0b .
Test yourself
A quick Suzuki GSX-R 1000 quiz: every answer comes with an explanation and a link to the manual page.