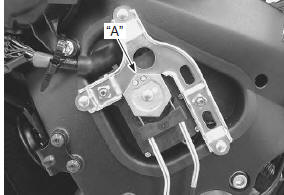
Remove the front seat. Refer to “exterior parts removal and installation” in section 9d (page 9d- 6).
Remove the left side cowling. Refer to “exterior parts removal and installation” in section 9d .
Connect the special tool (mode select switch) to the dealer mode coupler. Refer to “self-diagnostic procedures” in section 1a .
After turning the mode select switch on, turn the ignition switch on.
Special tool (a): 09930–82720 (mode selection switch)
Check that the cable slots of the excva pulley comes to the middle (adjustment position) “a”.
Turn the ignition switch off.
Caution
before removing the excv cables, be sure to set the excva pulley to the adjustment position.
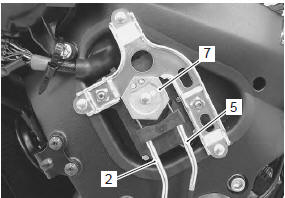
Loosen the lock-nut (1) on the no. 2 Cable (2) and turn in the cable adjuster (3) fully.
Loosen the lock-nut (4) on the no. 1 Cable (5) and turn in the cable adjuster (6) fully.
Disconnect the no. 2 Cable (2) and no. 1 Cable (5) from the excva pulley (7).
Loosen the lock-nuts.
Disconnect the no. 2 Cable (2) and no. 1 Cable (5) from the excv pulley (8).
Installation
Caution the cable slots of excva pulley must be located adjustment position.
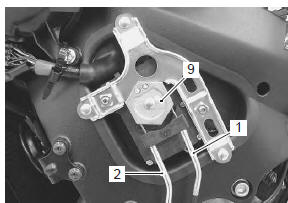
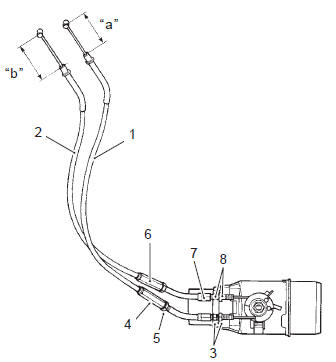
Temporarily connect the excv cable no. 1 (47H0cl) (1) and no. 2 (47H0op) (2) to the exhaust pipe and excv pulley.
Note the excv cables are identified by the letters.
No. 1 Cable (1): 47h0cl no. 2 Cable (2): 47h0op
Tighten the lock-nuts (3) on the no. 1 Cable.
Adjust the inner cable length “a” of no. 1 Cable in 42 – 43 mm (1.65 – 1.69 In) by turning the adjuster (4), then tighten the lock-nuts (5).
Turn in the adjuster (6) on the no. 2 Cable fully.
Turn the no. 2 Cable adjuster (7) in or out until the inner cable length “b” becomes 60 – 61 mm (2.36 – 2.40 In).
After adjusting the inner cable length “b”, tighten the lock-nuts (8).
Connect the other end of excv cable no. 1 (1) And no. 2 (2) To the excva pulley (9).
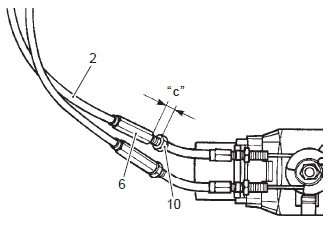
After connecting the no. 2 Cable (2), loosen the locknut (10) and turn the adjuster (6) in or out until 11 – 12 mm (0.43 – 0.47 In) of the thread length “c” on the cable adjuster can be provided and tighten the locknut (10).
Inspect the excva position sensor output voltage.
Refer to “excva adjustment” .
?
Test yourself
A quick Suzuki GSX-R 1000 quiz: every answer comes with an explanation and a link to the manual page.
 (a): 09930–82720 (mode selection