Transmission / transaxle
Gearshift shaft / gearshift cam plate removal and installation
In this manual: Transmission / transaxle
13steps
~78min
3/5difficulty
Done 0 of 13
Removal
 : 09900–06107 (snap ring remover
(open type))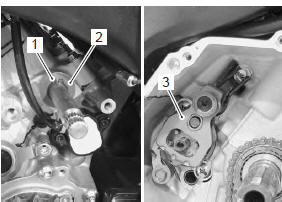
 : 09900–06107 (snap ring remover
(open type))
Installation : Thread lock cement
99000–32030 (thread lock cement super “1303” or equivalent) Tightening torque gearshift arm stopper (a): 19 N·m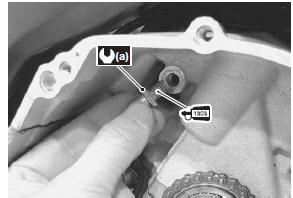

 : Thread lock cement
99000–32110 (thread lock cement super “1322” or equivalent) Tightening torque gearshift cam plate bolt (c): 13 N·m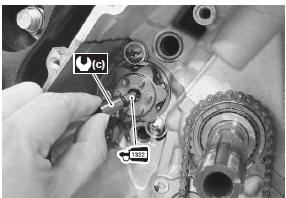
 : Thread lock cement
99000–32110 (thread lock cement super “1322” or equivalent) Tightening torque gearshift shaft end screw (d): 8,5 N·m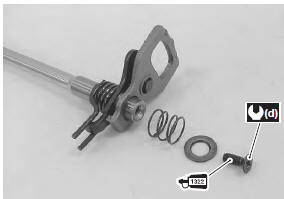
 : 09900–06107 (snap ring remover
(open type))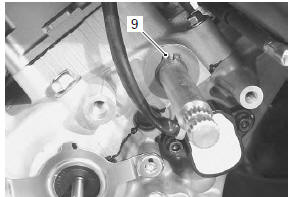
- Remove the engine sprocket cover. Refer to “engine sprocket removal and installation” in section 3a .
- Remove the clutch components. Refer to “clutch removal” in section 5c .
- Remove the snap ring (1) and washer (2) from the gearshift shaft.
: 09900–06107 (snap ring remover (open type))
- Remove the gearshift shaft assembly (3).
- Remove the following parts from the gearshift shaft.
: 09900–06107 (snap ring remover (open type))
- Washer
- Snap ring
- Gearshift shaft return spring
- Gearshift cam drive plate
- Gearshift plate return spring
- Washer
- Gearshift shaft end screw
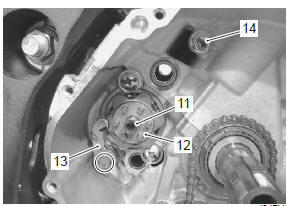
- Remove the gearshift cam plate bolt (11) and gearshift cam plate (12).
- Remove the gearshift cam stopper (13).
- Remove the gearshift arm stopper (14).
Installation
Install the gearshift shaft and gearshift cam plate in the reverse order of removal. Pay attention to the following points:
Caution the removed snap rings must be replaced with new ones.
- Apply a small quantity of thread lock to the gearshift arm stopper and tighten it to the specified torque.
: Thread lock cement 99000–32030 (thread lock cement super “1303” or equivalent) Tightening torque gearshift arm stopper (a): 19 N·m
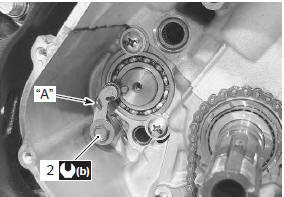
- Assemble the gearshift cam stopper (1), bolt (2), washer (3) and return spring (4).
- Tighten the gearshift cam stopper bolt (2) to the specified torque.
Note hook the return spring end “a” to the stopper.
Tightening torque gearshift cam stopper bolt (b): 10 N·m- Check the gearshift cam stopper moves smoothly.
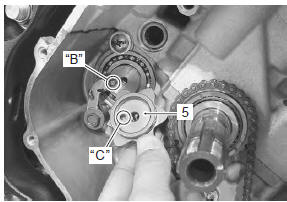
- Locate the gearshift cam in the neutral position.
- Install the gearshift cam plate (5).
Note align the gearshift cam pin “b” with the gearshift cam plate hole “c”.
- Apply a small quantity of thread lock to the gearshift cam plate bolt and tighten it to the specified torque.
: Thread lock cement 99000–32110 (thread lock cement super “1322” or equivalent) Tightening torque gearshift cam plate bolt (c): 13 N·m
- Apply a small quantity of thread lock to the gearshift shaft end screw and tighten it to the specified torque.
: Thread lock cement 99000–32110 (thread lock cement super “1322” or equivalent) Tightening torque gearshift shaft end screw (d): 8,5 N·m
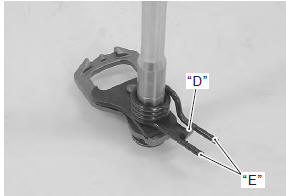
- When installing the gearshift shaft return spring, position the stopper “d” of gearshift arm between the shaft return spring ends “e”.
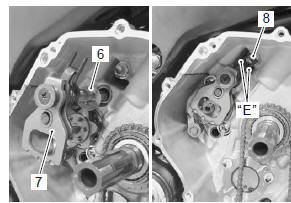
- Install the washer (6) and gearshift shaft assembly (7).
Note pinch the gearshift arm stopper (8) with return spring ends “e”.
- Install a new snap ring (9).
: 09900–06107 (snap ring remover (open type))
- After installing the gearshift lever, check the gearshift lever height. Refer to “gearshift lever height inspection and adjustment” .
Test yourself
A quick Suzuki GSX-R 1000 quiz: every answer comes with an explanation and a link to the manual page.
Was this page helpful?