Supplement
1. FOR UNITED KINGDOM
1-1. ASBESTOS INFORMATION

When handling a replacement part bearing the above WARNING LABEL, or any of the parts listed above, observe the following precautions:
- Work outdoors or in a well-ventilated area whenever possible.
- Use hand tools or low-speed tools whenever possible, fitted with a dust extraction device if necessary. High-speed tools must always be fitted with one.
- Wet the material before cutting or drilling, whenever possible.
- Wet any remaining dust, place it in a sealed container and dispose of it safely.
Asbestos Warning List
Item |
Part name |
AUTOMATIC TRANSMISSION |
|
| 1. | Timing cover gasket (1.6 l) |
| 2. | Timing gasket (1.6 l) |
| 3. | Oil pan gasket (1.6 l) |
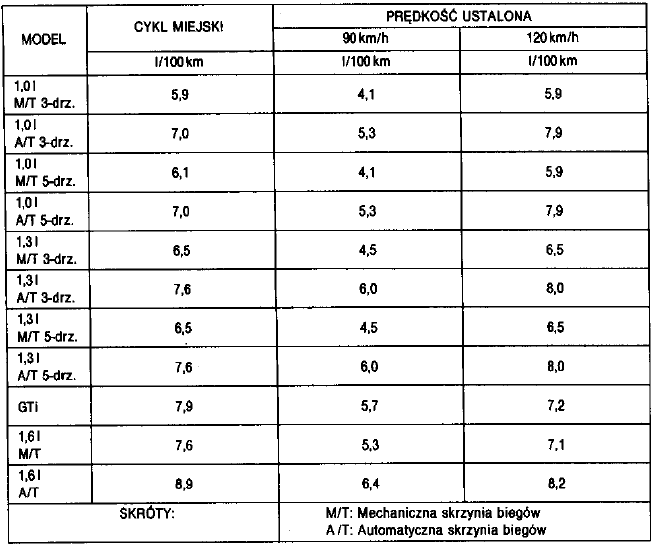
1-2. FUEL CONSUMPTION
2. FOR AUSTRALIA
2-1. MANUFACTURE DATE
The manufacture date is shown on the vehicle identification plate.
“Manufacture date” means the month and year in which the body and running gear were joined together and the vehicle left the production line.
2-2. CHILD SAFETY
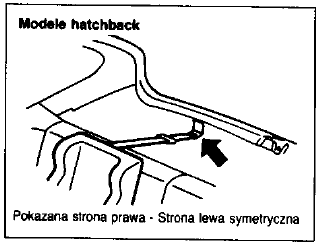
This vehicle is designed to accommodate a safety child seat on the rear seat. When using this seat, carefully read and follow the instructions supplied with it.
Anchor Point Location
On hatchback models, the anchor points are located on both sides of the cargo area.
On 4-door models, the anchor points are located on both sides of the rear parcel shelf anchor.
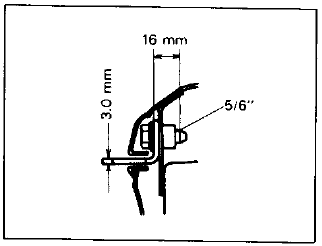
When installing a child seat in the vehicle, the following parts are essential: For 4-door models
- 5 mm thick washer.
Anchor Point Installation
For hatchback models
- Remove the cover.
- Install the anchor point.
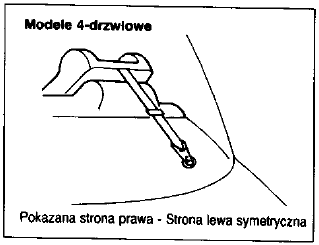
For 4-door models
- Open the trunk lid.
- Locate the welded 5/16" nut under the cover and punch through the rear parcel shelf trim at the nut.
- Cut the rear parcel shelf trim around the hole so that the washer contacts the metal panel directly.
- Install the anchor point.
For any questions regarding child seat installation, consult an authorized SUZUKI dealer.
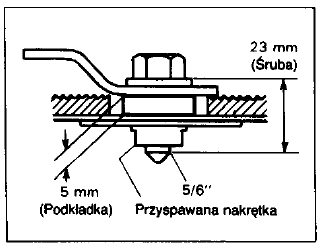
WARNING Child seat anchorage points are designed to withstand loads from a properly installed child seat. Under no circumstances may they be used to anchor adult seat belts.
2-3. SEAT BELT WARNING
In addition to the seat belt guidelines in this manual, also observe the following WARNING.
ADR 4/00
4.2.8.1 “WARNING: Seat belt design relies on the bony structure of the body. Depending on type, belts should be worn low around the pelvis or hips, chest and shoulder. Avoid wearing the lap portion of the belt across the abdomen.
“Seat belts should be fitted as tightly as possible while remaining comfortable, to provide the protection for which they were designed. A loose belt greatly reduces occupant protection.
“Take care to avoid contaminating the webbing with cleaning agents, oils and chemicals, especially battery electrolyte. Cleaning can be carried out safely with water and a mild soap. The belt should be replaced if the webbing is frayed, contaminated or damaged.
“It is essential to replace the entire belt assembly that was involved in a serious accident, even if no damage is visible.
“Seat belt webbing must not be twisted during use.
“Each belt assembly may be used by only one occupant. Placing the belt around a child seated on a passenger's lap is dangerous.
4.2.8.2 Where the “Seat Belt Assembly” includes an “Automatic Locking and Length-Adjusting Retractor” or a “Locking Retractor”: 4.2.8.2.1 “WARNING: The user must not make any modifications or additions that prevent the belt adjusting devices from taking up slack, or adjust the belt to remove slack.” 4.2.8.2.2 Based on the “Seat Belts” instructions in this manual, fit the seat belt so that the lap and shoulder portions of the “Seat Belt Assembly” fit as closely as possible while remaining comfortable.
2-4. HIGH-MOUNTED STOP LIGHT
To access the bulb, remove the two screws at the front of the light housing.
Hatchback Models
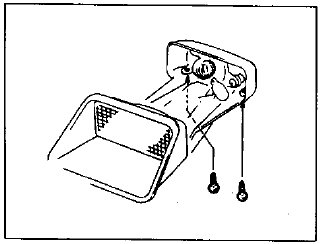
To access the bulb, remove the two screws at the front of the light housing.
4-door models
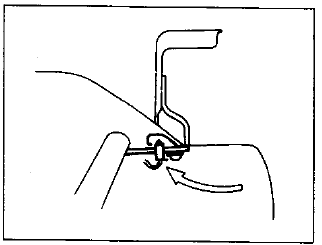
To access the bulb, open the luggage compartment lid and reach under the cover, as shown in the illustration.
3. FOR GERMANY
3-1 ASBESTOS INFORMATION
Some vehicle parts may contain asbestos, but not pyrite asbestos. Check the marking on replacement parts.
3-2 HIGH BEAM LEVELLING SWITCH
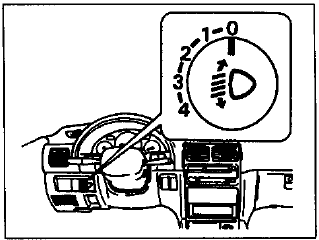
The headlight beam angle is adjusted for load conditions by turning the switch. Use the table below to find the correct switch position for the load.
Vehicle load |
Switch position |
| Driver | 0 |
| Driver + passenger (front seat) | 0 |
| Driver + 4 passengers, no luggage | 2 |
| Driver + 4 passengers, with luggage | 3 |
4. FOR SWEDEN SERVICE SCHEDULE
Frequency: Items 2-1, 2-3, 4-1 and 4-2 should be performed only based on the odometer reading.
5. IGNITION SWITCH (only for vehicles in Saudi Arabia)
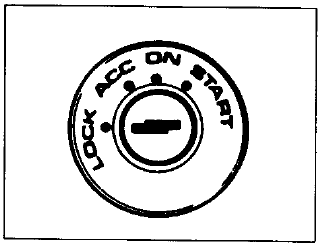
The ignition switch has the following four positions:
LOCK
This is the normal parking position – the only position in which the key can be removed.
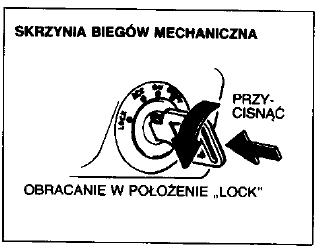
Manual transmission vehicles
To turn the key to the "LOCK" position, it must be pressed in. This locks the ignition and prevents normal use of the steering wheel after the key is removed.
Vehicles with automatic transmission
The selector lever must be in "P" (Park) position to turn the key to "LOCK". This locks the ignition and prevents normal use of the steering wheel and selector lever.
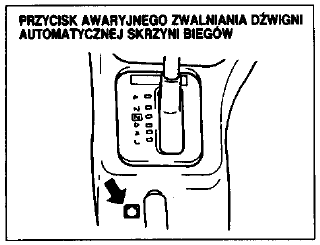
Even if the selector lever is in "P" and the key is in "LOCK" or removed, the lever can be moved out of this position by pressing the selector emergency release button (see illustration).
The lever can be moved back to "P" without pressing the button.
To release the steering lock, insert the key into the ignition and turn it clockwise to one of the other positions.
If turning the key to release the steering lock is difficult, try moving the steering wheel gently left and right while turning the key.
ACC
Accessories such as the radio can operate, but the engine is off.
ON
Normal operating position. All electrical circuits are powered.
START
This position is used to start the engine with the starter. Release the key from this position as soon as the engine starts.
WARNING- Never remove the key from the ignition while the vehicle is moving. The steering wheel will lock and steering will not be possible.
- Never leave children unattended in a parked vehicle; always remove the key. Unattended children may cause uncontrolled movement of the vehicle, which may result in a serious accident.
- Do not operate the starter for more than five seconds at a time. If the engine does not start, wait five to ten seconds before trying again. If the engine does not start after several attempts, check the fuel and ignition systems, or consult a SUZUKI service station.
- Do not leave the key in the "ON" position when the engine is not running, as this will discharge the battery.
Test yourself
A quick Suzuki Swift quiz: every answer comes with an explanation and a link to the manual page.