Indicator Circuit
The warning indicator lights are installed in the combination meter assembly.
WIRING DIAGRAM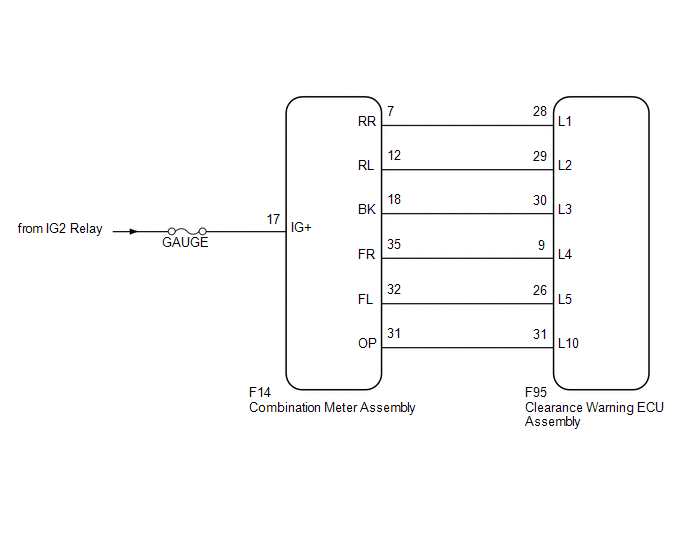
CAUTION / NOTICE / HINT
NOTICE:
Inspect the fuses for circuits related to this system before performing the following inspection procedure.
PROCEDURECHECK HARNESS AND CONNECTOR (COMBINATION METER ASSEMBLY - BATTERY)
(a) Disconnect the F14 combination meter assembly connector. |
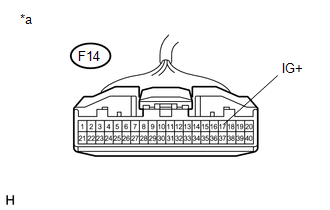 |
(b) Measure the voltage according to the value(s) in the table below.
Standard Voltage:
Tester Connection | Switch Condition | Specified Condition |
|---|---|---|
F14-17 (IG+) - Body ground |
Ignition switch ON |
11 to 14 V |
*a |
Front view of wire harness connector (to Combination Meter Assembly) |
| NG |  | REPAIR OR REPLACE HARNESS OR CONNECTOR |
|

CHECK HARNESS AND CONNECTOR (CLEARANCE WARNING ECU ASSEMBLY - COMBINATION METER ASSEMBLY)
(a) Disconnect the F95 clearance warning ECU assembly connector.
(b) Disconnect the F14 combination meter assembly connector.
(c) Measure the resistance according to the value(s) in the table below.
Standard Resistance:
Tester Connection | Condition | Specified Condition |
|---|---|---|
F95-9 (L4) - F14-35 (FR) |
Always |
Below 1 Ω |
F95-26 (L5) - F14-32 (FL) |
Always |
Below 1 Ω |
F95-28 (L1) - F14-7 (RR) |
Always |
Below 1 Ω |
F95-29 (L2) - F14-12 (RL) |
Always |
Below 1 Ω |
F95-30 (L3) - F14-18 (BK) |
Always |
Below 1 Ω |
F95-31 (L10) - F14-31 (OP) |
Always |
Below 1 Ω |
F95-9 (L4) - Body ground |
Always |
10 kΩ or higher |
F95-26 (L5) - Body ground |
Always |
10 kΩ or higher |
F95-28 (L1) - Body ground |
Always |
10 kΩ or higher |
F95-29 (L2) - Body ground |
Always |
10 kΩ or higher |
F95-30 (L3) - Body ground |
Always |
10 kΩ or higher |
F95-31 (L10) - Body ground |
Always |
10 kΩ or higher |
| OK | | PROCEED TO NEXT SUSPECTED AREA SHOWN IN PROBLEM SYMPTOMS TABLE |
| NG | | REPAIR OR REPLACE HARNESS OR CONNECTOR |
Test yourself
A quick Toyota 4Runner quiz: every answer comes with an explanation and a link to the manual page.