Installation
1. INSTALL COOLER DRYER
(a) Using pliers, install the cooler dryer.
(b) Apply a sufficient amount of compressor oil to the contact surfaces of a new O-ring and the cap. Compressor oil: ND-OIL 8 or equivalent |
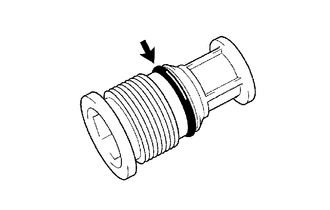 |
(c) Install the O-ring to the cap.
(d) Using a 14 mm socket hexagon wrench, install the cap to the modulator.
Torque:
2,9 N·m {30 kgf·cm, 26 in·lbf}
2. INSTALL COOLER CONDENSER ASSEMBLY
(a) Install the cooler condenser with the 3 bolts as shown in the illustration. Torque: for bolt A : 5,4 N·m {55 kgf·cm, 48 in·lbf} for bolt B : 4,4 N·m {44 kgf·cm, 39 in·lbf} |
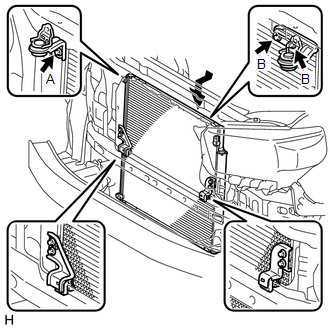 |
3. CONNECT NO. 1 COOLER CONDENSER BRACKET
(a) Connect the No. 1 cooler condenser bracket with the bolt.
4. CONNECT NO. 2 COOLER CONDENSER BRACKET
(a) Connect the No. 2 cooler condenser bracket with the bolt.
5. CONNECT COOLER REFRIGERANT LIQUID PIPE A
(a) Remove the attached vinyl tape from the pipe and the connecting part of the cooler condenser.
(b) Sufficiently apply compressor oil to a new O-ring and the fitting surface of the liquid pipe A joint.
Compressor oil:
ND-OIL 8 or equivalent
(c) Install the O-ring to liquid pipe A.
(d) Connect liquid pipe A to the cooler condenser with the bolt.
Torque:
5,4 N·m {55 kgf·cm, 48 in·lbf}
NOTICE:
- When tightening the bolts, do not allow any tools to contact the pipe.
- When tightening the bolts, hold a part of the pipe near the connector.
6. CONNECT DISCHARGE HOSE SUB-ASSEMBLY
(a) Remove the attached vinyl tape from the hose and the connecting part of the cooler condenser.
(b) Sufficiently apply compressor oil to a new O-ring and the fitting surface of the discharge hose joint.
Compressor oil:
ND-OIL 8 or equivalent
(c) Install the O-ring to the discharge hose.
(d) Connect the discharge hose to the cooler condenser with the bolt.
Torque:
5,4 N·m {55 kgf·cm, 48 in·lbf}
NOTICE:
- When tightening the bolt, do not allow any tools to contact the pipe.
- When tightening the bolt, hold a part of the pipe near the connector.
7. CHARGE REFRIGERANT

8. INSTALL RADIATOR ASSEMBLY
(a) Install the radiator assembly (See page
).
9. ADD ENGINE COOLANT
(a) Add the engine coolant (See page ).
10. WARM UP ENGINE
11. CHECK FOR ENGINE COOLANT LEAK
(a) Check for engine coolant leak (See page
).
12. CHECK FOR REFRIGERANT GAS LEAK
Test yourself
A quick Toyota 4Runner quiz: every answer comes with an explanation and a link to the manual page.