Air Conditioning Pressure Sensor
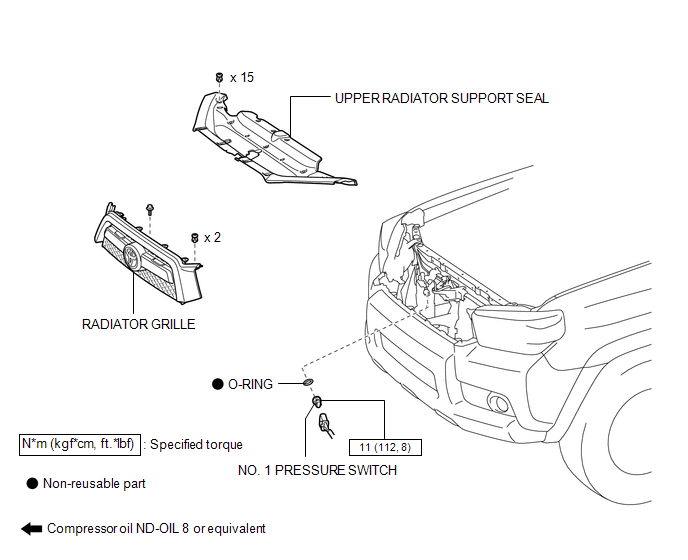
On-vehicle Inspection ON-VEHICLE INSPECTION PROCEDURE
1. INSPECT NO. 1 PRESSURE SWITCH
(a) Connect a manifold gauge set. |
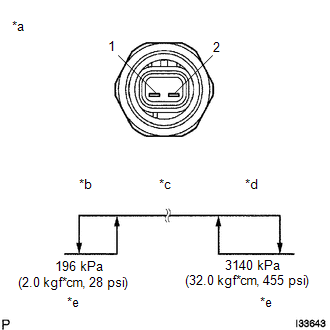 |
(b) Connect the positive (+) lead from the ohmmeter to terminal 1 and the negative (-) lead to terminal 2.
(c) Measure the resistance between terminals when refrigerant pressure is charged, as shown in the illustration.
If operation is not as specified, replace the pressure switch.
Text in Illustration*a |
Component without harness connected (No. 1 Pressure Switch) |
*b |
Low Pressure Side |
*c |
On (Below 1.0 Ω) |
*d |
High Pressure Side |
*e |
Off (10 kΩ or higher) |
1. INSTALL NO. 1 PRESSURE SWITCH
(a) Sufficiently apply compressor oil to a new O-ring and the fitting surface of the No. 1 pressure switch.
Compressor oil:
ND-OIL 8 or equivalent
(b) Install the O-ring to the No. 1 pressure switch.
(c) Install the No. 1 pressure switch.
Torque:
11 N·m {112 kgf·cm, 8 ft·lbf}
(d) Connect the connector.
2. CHARGE REFRIGERANT

3. WARM UP ENGINE
4. CHECK FOR REFRIGERANT GAS LEAK
5. INSTALL RADIATOR GRILLE
(a) Install the radiator grille (See page ).
6. INSTALL UPPER RADIATOR SUPPORT SEAL
Removal REMOVAL PROCEDURE
1. REMOVE UPPER RADIATOR SUPPORT SEAL

2. REMOVE RADIATOR GRILLE
(a) Remove the radiator grille (See page ).
3. RECOVER REFRIGERANT FROM REFRIGERATION SYSTEM
4. REMOVE NO. 1 PRESSURE SWITCH
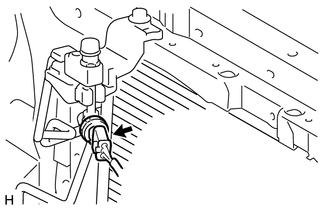
(a) Disconnect the connector.
(b) Remove the No. 1 pressure switch.
(c) Remove the O-ring from the No. 1 pressure switch.
NOTICE:
Seal the openings of the disconnected parts using vinyl tape to prevent moisture and foreign matter from entering them.
Test yourself
A quick Toyota 4Runner quiz: every answer comes with an explanation and a link to the manual page.