Removal
REMOVAL
PRECAUTION / NOTICE / HINT
The procedures necessary (adjustment, calibration, initialization or registration) that must be performed once parts have been removed, installed or replaced during removal/installation of the electric power steering column sub-assembly are indicated below.
Procedure Required After Replacing / Removing / Installing PartsReplacement part or procedure | Necessary Procedures | Effects / Inoperative Function When Necessary Procedure Not Performed | Link |
|---|---|---|---|
Disconnect the cable from the negative (-) battery terminal. |
Initialize Back Door Lock |
Door Lock Control System |
 |
Memorize Steering Angle Neutral Point |
Lane Departure Alert System (with Steering Control) |
|
|
Pre-Collision System |
|||
Electric Power Steering Column Sub-assembly |
Torque Sensor Zero Point Calibration |
|
|
PROCEDURE
1. PRECAUTIONS
Click here
2. ALIGN FRONT WHEELS STRAIGHT AHEAD
3. REMOVE HORN BUTTON ASSEMBLY
Click here
4. REMOVE STEERING WHEEL ASSEMBLY
Click here
5. REMOVE LOWER INSTRUMENT PANEL AIRBAG ASSEMBLY NO. 1
Click here
6. REMOVE STEERING COLUMN LOWER COVER SUB-ASSEMBLY
NOTICE:
If the steering column lower cover sub-assembly is not removed in the specified order, parts may break.
(a) Release the tilt and telescopic lever, and fully extend and lower the steering column assembly.
(b) Lock the tilt and telescopic lever.
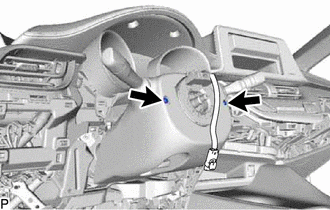
(c) Remove the 2 screws. |
 |
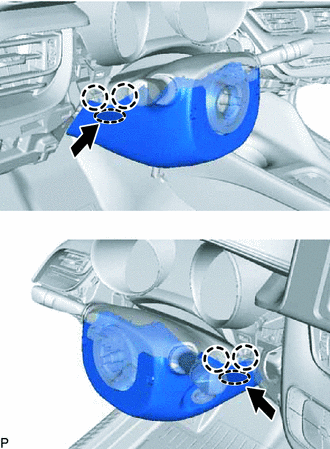
(d) Press the steering column upper cover and release the 4 claws as shown in the illustration.
 |
Pressure Point |
 |
Push in |
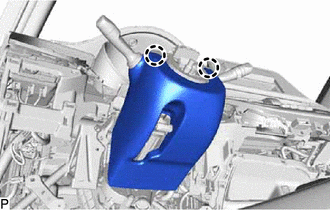
(e) Release the 2 claws. |
 |
(f) Release the tilt and telescopic lever, and fully extend and raise the steering column assembly.
(g) Lock the tilt and telescopic lever.
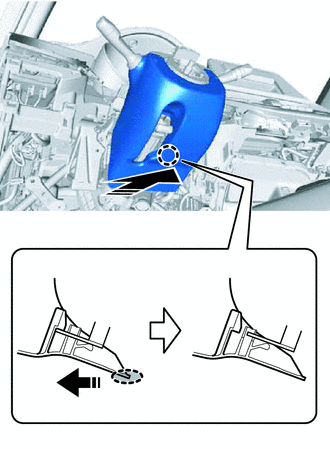
(h) Pull the steering column lower cover sub-assembly toward the rear of the vehicle to release the claw, then remove the steering column lower cover sub-assembly.
|
Place hands here |
 |
Remove in this direction |
7. REMOVE STEERING COLUMN UPPER COVER
(a) Release the tilt and telescopic lever, and fully extend and lower the steering column assembly.
(b) Lock the tilt and telescopic lever.
(c) Release the claw and remove the steering column upper cover.
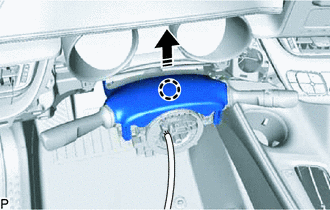
|
Remove in this direction |
(d) Release the 2 claws and 4 clips to remove the steering column upper cover. |
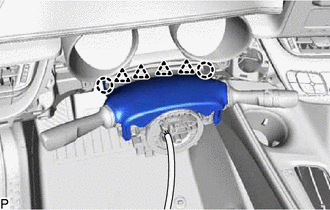 |
8. REMOVE TURN SIGNAL SWITCH ASSEMBLY WITH SPIRAL CABLE SUB-ASSEMBLY
NOTICE:
- Do not replace the spiral cable sub-assembly with sensor while the battery is connected and the ignition switch is in the ON position.
- Do not swap the spiral cable sub-assembly with sensor without the steering wheel installed while the battery is connected and the ignition switch is in the ON position.
- Make sure the steering wheel assembly is installed and in the straight-ahead position when checking the steering angle sensor.
(a) Disconnect each connector from the turn signal switch assembly and the spiral cable sub-assembly.
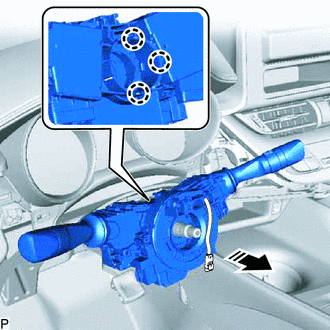
|
Remove in this direction |
(b) Release the 3 claws to remove the turn signal switch assembly with spiral cable sub-assembly from the steering column assembly.
9. REMOVE CONSOLE BOX INSERT
Click here
10. REMOVE AIR DUCT NO. 1
(a) Remove the 2 bolts. |
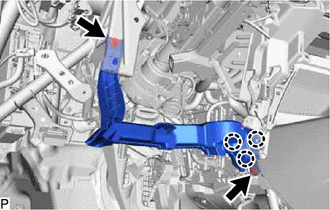 |
(b) Release the 3 claws to remove the air duct No. 1.
11. REMOVE STOP LIGHT SWITCH ASSEMBLY
Click here
12. REMOVE STEERING COLUMN HOLE COVER ACOUSTIC INSULATION SHEET
(a) Release the claw to open the steering column hole cover acoustic insulation sheet. |
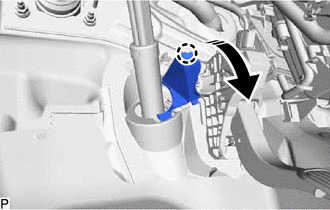 |
(b) Release the 2 claws to remove the steering column hole cover acoustic insulation sheet.
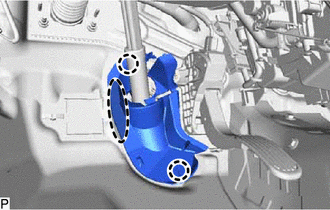
|
Place hands here |
13. DISCONNECT STEERING INTERMEDIATE SHAFT NO. 2 ASSEMBLY
(a) Make alignment marks on the steering intermediate shaft No. 2 assembly and the steering gear assembly. |
|
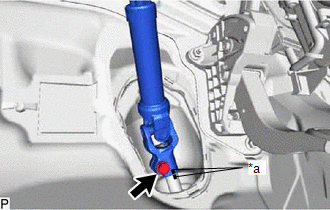
(b) Remove the bolt.
(c) Separate the steering intermediate shaft No. 2 assembly from the steering gear assembly.
14. REMOVE STEERING INTERMEDIATE SHAFT NO. 2 ASSEMBLY
(a) Make alignment marks on the steering intermediate shaft No. 2 assembly and the steering column assembly. |
|
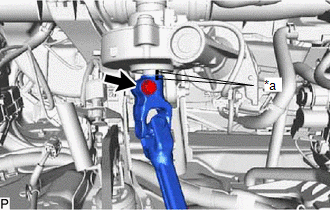
(b) Remove the bolt.
(c) Remove the steering intermediate shaft No. 2 assembly from the steering column assembly.
15. REMOVE STEERING COLUMN ASSEMBLY
(a) Disconnect the 2 power steering ECU connectors. |
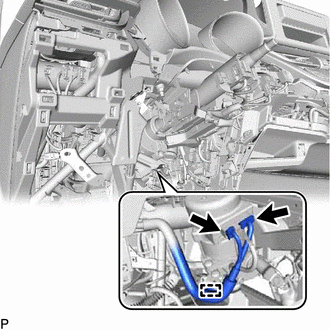 |
(b) Release the wire harness clamp from the power steering ECU.
(c) Disconnect each connector and release each clamp from the steering column assembly.
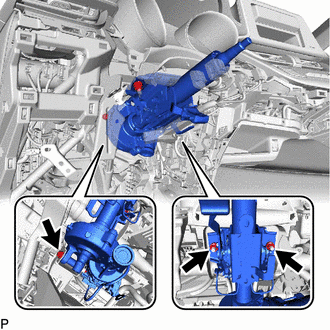
(d) Remove the bolt, 2 nuts and the steering column assembly. |
 |