Removal
REMOVAL
PRECAUTION / NOTICE / HINT
The procedures required (adjustment, calibration, initialization or registration) that must be performed after parts have been removed and installed, or replaced during removal/installation of the rear door window frame moulding, are shown below.
Procedure Required After Replacing / Removing / Installing PartsReplaced Part or Performed Procedure | Required Procedure | Effect/Inoperative Function When Required Procedure Is Not Performed | Link |
|---|---|---|---|
Disconnect the cable from the negative (-) battery terminal. |
Initialize Back Door Lock |
Door Lock Control System |
 |
Memorize Steering Angle Neutral Point |
Lane Departure Alert System (with Steering Control) |
|
|
Pre-Collision System |
|||
|
Initialize Power Window Control System |
|
|
HINT:
- Repeat the same procedure for the right side and the left side.
- The following procedure applies to the left side.
PROCEDURE
1. REMOVE REAR DOOR BELT MOULDING ASSEMBLY
Click here
2. REMOVE REAR DOOR WEATHERSTRIP
Click here
3. REMOVE REAR DOOR OUTSIDE MOULDING SUBASSEMBLY
HINT:
When removing the rear door outside moulding subassembly, heat the vehicle body and the rear door outside moulding subassembly using a heat lamp.
Heating TemperatureItem | Temperature |
|---|---|
Vehicle Body |
40 à 60 °C |
Rear Door Outside Moulding Subassembly |
20 à 30 °C |
CAUTION:
- Do not touch heated parts or the heat lamp. Touching them may cause burns.
- Prolonged contact with heated parts may cause burns.
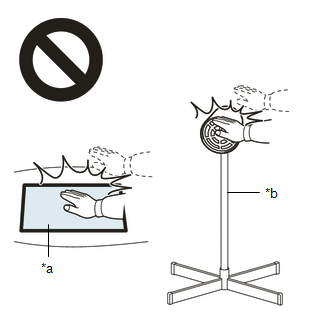
*a |
Hot Surface |
*b |
Heat Lamp |
NOTICE:
Do not overheat the vehicle body or the rear door outside moulding subassembly.
(a) Using a heat lamp, heat the rear door outside moulding subassembly.
(b) Apply masking tape around the rear door outside moulding subassembly, as shown in the illustration.
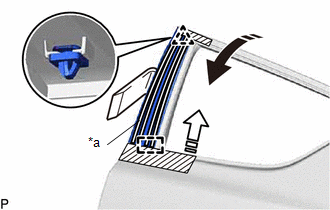
*a |
Double-sided adhesive tape |
 |
Remove in this direction (1) |
 |
Remove in this direction (2) |
 |
Protective tape |
(c) Using a D-shaped moulding remover, release the clip and guide, and remove the double-sided adhesive tape and sealing sponge to remove the rear door outside moulding subassembly, as shown in the illustration.
4. REMOVE REAR DOOR WINDOW FRAME UPPER MOULDING
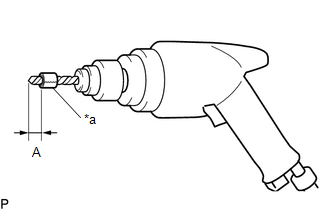
(a) Install a 4.0 mm (0.157 in.) drill bit into a drill.
(b) Wrap tape around the 4.0 mm (0.157 in.) drill bit at 5.0 mm (0.197 in.) from the tip, as shown in the illustration. Standard measurement:
NOTICE: This tape on the 4.0 mm (0.157 in.) drill bit prevents it from drilling too deep. |
|
(c) Lightly press the drill bit against the rivets to drill the rivet edges, and remove the 5 rivets.
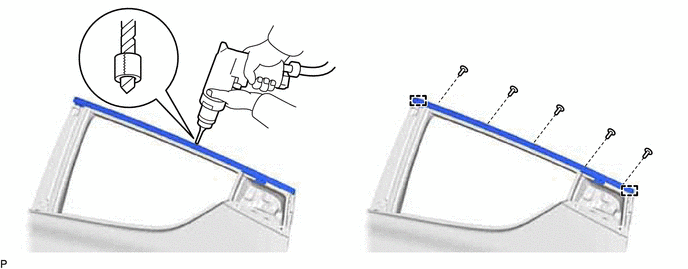
CAUTION:
Caution: Drilled rivets may be hot. Handle with care.
NOTICE:
- Excessive pressure on the drill will cause the rivet to spin and not be drilled.
- Prying on the rivets with the drill may damage the rivet holes or the drill bit.
(d) Using a vacuum cleaner, remove rivet fragments and chips from the drilled areas.
(e) Release the guides to remove the rear door window frame upper moulding.
5. REMOVE REAR DOOR WINDOW FRAME REAR MOULDING
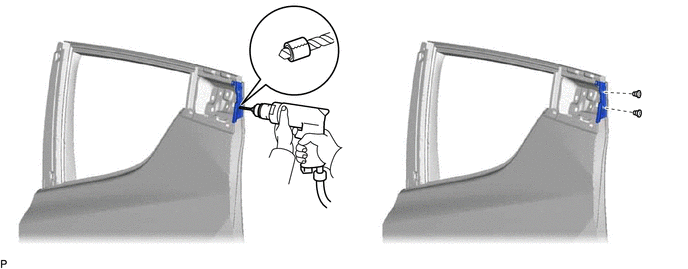
(a) Install a 4.0 mm (0.157 in.) drill bit into a drill.
(b) Wrap tape around the 4.0 mm (0.157 in.) drill bit at 5.0 mm (0.197 in.) from the tip, as shown in the illustration. Standard measurement:
NOTICE: This tape on the 4.0 mm (0.157 in.) drill bit prevents it from drilling too deep. |
|
(c) Lightly press the drill bit against the rivets to drill the rivet edges, and remove the 2 rivets and the rear door window frame rear moulding.
CAUTION:
Caution: Drilled rivets may be hot. Handle with care.
NOTICE:
- Excessive pressure on the drill will cause the rivet to spin and not be drilled.
- Prying on the rivets with the drill may damage the rivet holes or the drill bit.
(d) Using a vacuum cleaner, remove rivet fragments and chips from the drilled areas.