Removal
REMOVAL
PRECAUTION / NOTICE / HINT
The procedures required (adjustment, calibration, initialization or registration) that must be performed after parts have been removed and installed, or replaced during removal/installation of the front door belt moulding are shown below.
Procedure Required After Replacing / Removing / Installing PartsReplaced Part or Performed Procedure | Required Procedure | Effect/Inoperative Function When Required Procedure Is Not Performed | Link |
|---|---|---|---|
Disconnect the cable from the negative (-) battery terminal. |
Initialize Back Door Lock |
Door Lock Control System |
 |
Memorize Steering Angle Neutral Point |
Lane Departure Alert System (with Steering Control) |
|
|
Pre-Collision System |
|||
|
Initialize Power Window Control System |
|
|
HINT:
- Repeat the same procedure for the right side and the left side.
- The following procedure applies to the left side.
PROCEDURE
1. PRECAUTIONS
NOTICE:
After turning the ignition switch OFF, a waiting time may be required before disconnecting the cable from the negative (-) battery terminal. Therefore, be sure to read the precautions for disconnecting the cable from the negative (-) battery terminal before performing the work.
Click here
2. DISCONNECT THE CABLE FROM THE NEGATIVE BATTERY TERMINAL
Click here
NOTICE:
When the cable has been disconnected, some systems must be reset after the cable is reconnected.
Click here
3. REMOVE THE OUTSIDE REAR VIEW MIRROR ASSEMBLY
Click here
4. REMOVE THE FRONT DOOR SERVICE HOLE COVER
Click here
5. REMOVE THE FRONT DOOR GLASS SUB-ASSEMBLY
Click here
6. REMOVE THE FRONT DOOR BELT MOULDING ASSEMBLY
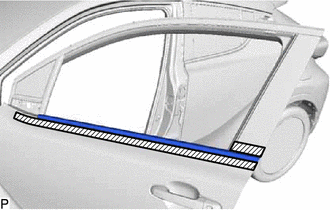
(a) Apply protective tape around the front door belt moulding assembly.
 |
Protective tape |
 |
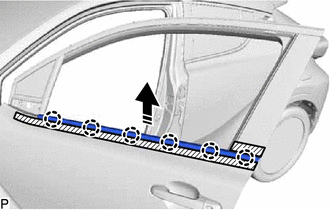
Remove in this direction |
(b) Release the claws, as shown in the illustration, to remove the front door belt moulding assembly.