Removal
REMOVAL
PRECAUTION / NOTICE / HINT
HINT:
When removing the model designation plates, heat the vehicle body, back door outer garnish and model designation plates using a heat light.
Heating TemperatureItem | Temperature |
|---|---|
Vehicle Body |
40 à 60 °C |
|
20 à 30 °C |
CAUTION:
- Do not touch heated parts or the heat lamp. Touching them may cause burns.
- Prolonged contact with heated parts may cause burns.
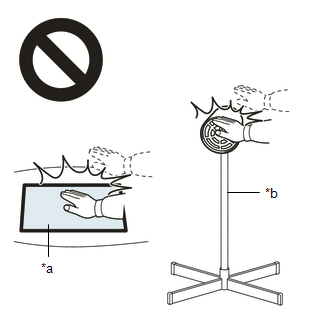
*a |
Hot Surface |
*b |
Heat Lamp |
NOTICE:
Do not overheat the vehicle body, back door outer garnish or model designation plate.
PROCEDURE
1. REMOVE BACK DOOR MODEL DESIGNATION PLATE NO. 2
(a) Apply protective tape around the back door model designation plate No. 2 as shown in the illustration.
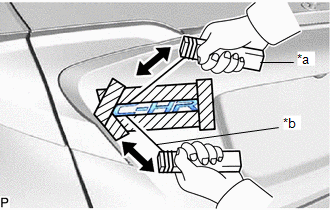
*a |
Wooden Block |
*b |
Piano Wire |
 |
Protective tape |
(b) Insert piano wire between the back door outer garnish and the back door model designation plate No. 2.
(c) Attach objects that can be used as handles (such as wooden blocks) to both ends of the wire.
(d) Pull the piano wire and cut the double-sided tape that secures the back door model designation plate No. 2 to the back door outer garnish to remove the back door model designation plate No. 2.
NOTICE:
Be careful not to damage the back door outer garnish.
(e) Remove the protective tape.
2. REMOVE BACK DOOR MODEL DESIGNATION PLATE NO. 1
(a) Apply protective tape around the back door model designation plate No. 1 as shown in the illustration.
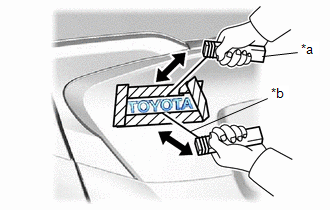
*a |
Wooden Block |
*b |
Piano Wire |
|
Protective tape |
(b) Insert piano wire between the back door outer garnish and the back door model designation plate No. 1.
(c) Attach objects that can be used as handles (such as wooden blocks) to both ends of the wire.
(d) Pull the piano wire and cut the double-sided tape that secures the back door model designation plate No. 1 to the back door outer garnish to remove the back door model designation plate No. 1.
NOTICE:
Be careful not to damage the back door outer garnish.
(e) Remove the protective tape.
3. REMOVE BACK DOOR EMBLEM NO. 1
(a) Apply protective tape around the back door emblem No. 1 as shown in the illustration.
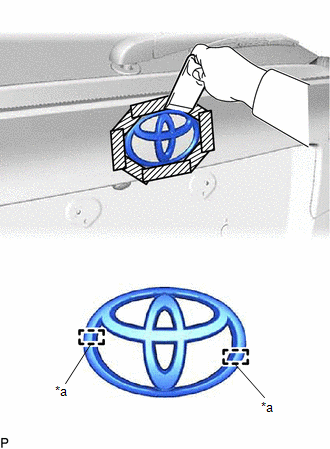
*a |
Position Pin |
|
Protective tape |
(b) Using a D moulding remover, detach the double-sided tape and release the pins to remove the back door garnish sub-assembly.
NOTICE:
Be careful not to damage the back door outer garnish.
(c) Remove the masking tape.