Fluid Temperature Adjustment
FLUID TEMPERATURE ADJUSTMENT
PRECAUTION / NOTICE / HINT
CAUTION:
- Be careful not to burn yourself when the fluid temperature is high.
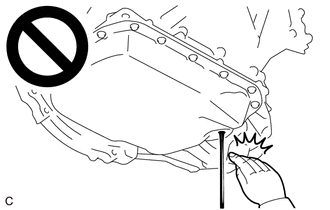
- To prevent injury from contact with a serpentine belt or a running cooling fan, keep your hands and clothing away from the serpentine belt and the cooling fans whenever working in the engine compartment with the engine running and the ignition switch ON.
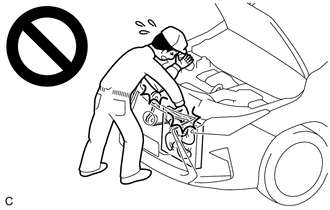
PROCEDURE
1. ADJUST CVT FLUID LEVEL AT HIGH TEMPERATURE
(a) Warm up the engine, then stop the engine.
(b) Check the fluid temperature.
(1) With the ignition switch OFF, connect the Techstream to the DLC3.
(2) Turn the ignition switch ON and turn on the Techstream.
NOTICE:
To reduce the load, make sure that all electrical systems, such as the air conditioning, lighting system, electric fan and audio system, are turned OFF.
(3) Select the following menu items: Powertrain / Engine and ECT / Data List / Engine Speed, A/T Oil Temperature 1.
Powertrain > Engine and ECT > Data ListTester display |
|---|
Engine Speed |
A/T Oil Temperature 1 |
NOTICE:
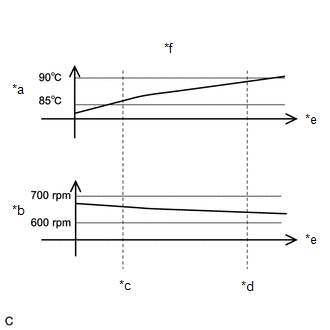
- If the fluid temperature tends to decrease when it is between 85 °C and 90 °C with the engine idling, make sure the fluid temperature is above 90 °C before starting work.
- If the fluid temperature tends to increase when it is between 85 °C and 90 °C with the engine idling, make sure the fluid temperature is below 85 °C before starting work.
- If the fluid temperature tends to remain unchanged when it is between 85 °C and 90 °C with the engine idling, make sure the fluid temperature is 88 °C before starting work.
(c) Depress the brake pedal and hold it down.
(d) Start the engine.
(e) Slowly move the shift lever from P to D, then back to P (hold the shift lever in each position for about 3 seconds).
HINT:
Slowly move the shift lever to circulate the fluid through each part of the continuously variable transmission assembly.
(f) Raise the vehicle.
NOTICE:
Place the vehicle on a lift so that it is held level when raised (make sure the inclination angle between the front and rear of the vehicle is +/-1°).
(g) Remove the No. 1 engine under cover.
Click here
(h) Remove the rear left engine under cover.
Click here
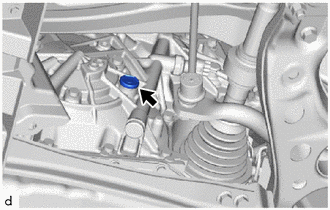
(i) Loosen the filler plug. |
 |
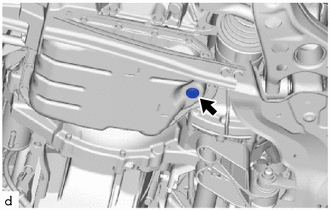
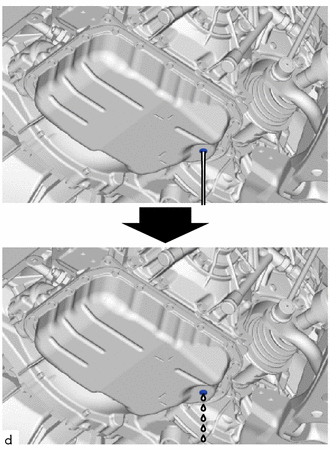
(j) Using a 6 mm hexagon socket wrench, remove the level plug and gasket from the CVT oil pan sub-assembly. [*1]
CAUTION:
Be careful, as the fluid flowing out of the level plug hole is hot.
NOTICE:
- Before removing the level plug, make sure the fluid temperature is between 85 °C and 90 °C and the engine idle speed is within the range specified in the tables in step [*3].
- When adding fluid (step [*3]), add the specified amount according to the engine idle speed.
- If no fluid flows out, install the level plug, add fluid through the filler hole until fluid flows out, then repeat the procedure from step [*1].
(1) Make sure the fluid temperature and engine idle speed remain within the appropriate range until the level plug is tightened in step [*2]. |
|
(k) Wait until the fluid flow decreases and only a few drops remain. HINT: If the fluid temperature rises, the fluid flow does not stop completely because the fluid volume increases along with the temperature. |
 |
(l) Using a 6 mm hexagon socket wrench, install a new gasket and the level plug to the CVT oil pan sub-assembly. [*2] Torque: 40 N·m {408 kgf·cm, 30 ft·lbf} |
|
(m) Lower the vehicle.
(n) Set the ignition switch to OFF.
(o) Remove the filler cap and gasket from the Continuously Variable Transaxle (CVT) assembly. |
|
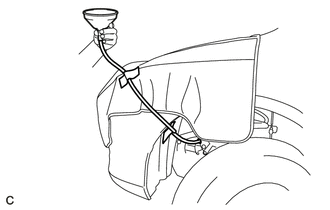
(p) Install a hose and a funnel on the filler hole as shown in the illustration. NOTICE:
HINT: Be sure to use a hose that is 1,250 mm (4.1 ft) long with an outside diameter of 16 mm (0.63 in.). |
 |
(q) Add the specified amount of fluid through the filler hole. [*3]
(1) To determine the specified amount of fluid to add, refer to the table below.
Specified amount to add:
Engine speed (rpm) | Specified amount to add at a fluid temperature of 85 °C to 90 °C |
|---|---|
550 à 850 |
250 g (8.8 oz.) (300 cm3 (18.3 in3)) |
NOTICE:
- If any fluid remains in the hose, the fluid amount will be out of specification. Therefore, when adding fluid, make sure no fluid remains in the hose.
- When adding fluid, the acceptable margin of error is +/-20 g (0.7 oz.).
- Use genuine Toyota CVT FE fluid.
HINT:
- The values in the table are reference values when the temperature of the fluid to be added is between 10 °C and 30 °C.
- If fluid overflows (the fluid amount is not within specification), perform the procedure in step [*1] again.
(2) If the specified amount of fluid to add must be determined by volume, calculate it based on the weight and the density at each temperature.
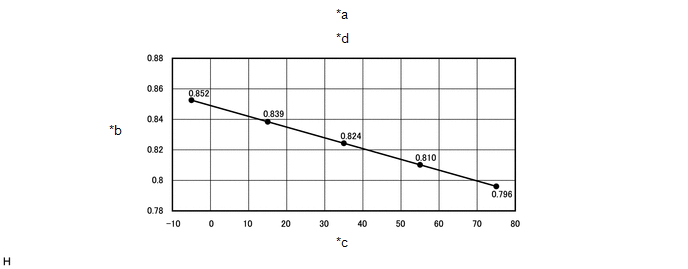
*a |
This example shows the volume of fluid to add at a fluid temperature of 10 °C to 30 °C. |
*b |
Density [g/cm3] |
*c |
Fluid temperature to be measured [°C] |
*d |
Relationship between temperature and density of Toyota genuine CVT FE fluid |
(r) Install a new gasket and the filler cap to the CVT assembly.
Torque:
49 N·m {500 kgf·cm, 36 ft·lbf}
(s) Disconnect the Techstream from the DLC3.
2. REASSEMBLY
(a) Raise the vehicle.
(b) Clean each part.
(c) Check for any leaks.
(d) Install the No. 2 engine under cover (rear left side).
Click here
(e) Install the No. 1 engine under cover.
Click here
(f) Lower the vehicle.