Reassembly
REASSEMBLY
PROCEDURE
1. INSTALL TAILGATE EMBLEM NO. 1
Click here
2. INSTALL TAILGATE MODEL NAME PLATE NO. 2
Click here
3. INSTALL TAILGATE MODEL NAME PLATE NO. 1
Click here
4. INSTALL TAILGATE OUTER GARNISH SEAL
HINT:
- Using the same procedure, install all of the tailgate outer garnish seals.
- When installing the tailgate outer garnish seal, heat the rear spoiler with a heat lamp.
Heating temperature:
Item | Temperature |
|---|---|
Tailgate outer garnish |
20 à 30 °C |
CAUTION:
- Do not touch heated parts or the heat lamp. Touching them may cause burns.
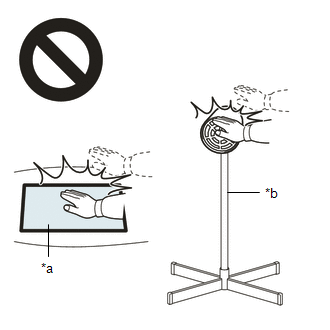
*a
Hot Surface
*b
Heat Lamp
- Prolonged contact with heated parts may cause burns.
NOTICE:
Do not overheat the tailgate outer garnish.
(a) Clean the surface of the tailgate outer garnish.
(1) Using a heat lamp, heat the surface of the tailgate outer garnish.
(2) Remove the double-sided adhesive tape from the tailgate outer garnish.
(3) Remove any adhesive residue using a cleaning agent.
(b) Using a heat lamp, heat the tailgate outer garnish.
(c) Peel off the protective film from a new tailgate outer garnish seal.
HINT:
After removing the release liner, prevent the adhesive surface from contacting foreign matter.
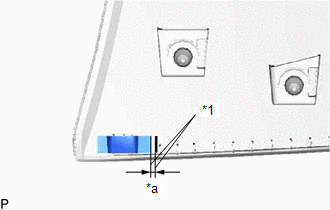
(d) Install the tailgate outer garnish seal as shown in the illustration. HINT: Align the tailgate outer garnish seal with the tailgate outer garnish alignment mark. |
|
5. INSTALL TAILGATE GARNISH MOLDING LOWER COVER
HINT:
- Using the same procedure, install the tailgate garnish molding lower cover.
- When installing the tailgate garnish molding lower cover, heat the rear spoiler with a heat lamp.
Heating temperature:
Item | Temperature |
|---|---|
Tailgate outer garnish |
20 à 30 °C |
CAUTION:
- Do not touch heated parts or the heat lamp. Touching them may cause burns.
*a
Hot Surface
*b
Heat Lamp
- Prolonged contact with heated parts may cause burns.
NOTICE:
Do not overheat the tailgate outer garnish.
(a) Clean the surface of the tailgate outer garnish.
(1) Using a heat lamp, heat the surface of the tailgate outer garnish.
(2) Remove the double-sided adhesive tape from the tailgate outer garnish.
(3) Remove any adhesive residue using a cleaning agent.
(b) Using a heat lamp, heat the tailgate outer garnish.
(c) Peel off the protective film from a new tailgate garnish molding lower cover.
HINT:
After removing the release liner, prevent the adhesive surface from contacting foreign matter.
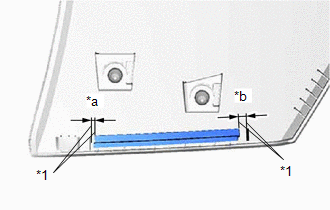
(d) Install the tailgate garnish molding lower cover as shown in the illustration. HINT: Align the tailgate garnish molding lower cover with the tailgate outer garnish alignment mark. |
|
6. INSTALL TAILGATE OUTER GARNISH COVER NO. 2
HINT:
- Using the same procedure, install the tailgate outer garnish cover No. 2.
- When installing the tailgate outer garnish cover No. 2, heat the rear spoiler with a heat lamp.
Heating temperature:
Item | Temperature |
|---|---|
Tailgate outer garnish |
20 à 30 °C |
CAUTION:
- Do not touch heated parts or the heat lamp. Touching them may cause burns.
*a
Hot Surface
*b
Heat Lamp
- Prolonged contact with heated parts may cause burns.
NOTICE:
Do not overheat the tailgate outer garnish.
(a) Clean the surface of the tailgate outer garnish.
(1) Using a heat lamp, heat the surface of the tailgate outer garnish.
(2) Remove the double-sided adhesive tape from the tailgate outer garnish.
(3) Remove any adhesive residue using a cleaning agent.
(b) Using a heat lamp, heat the tailgate outer garnish.
(c) Peel off the protective film from a new tailgate outer garnish cover No. 2.
HINT:
After removing the release liner, prevent the adhesive surface from contacting foreign matter.
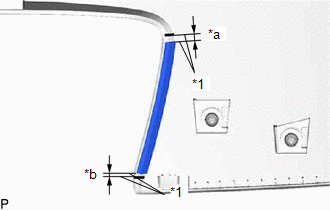
(d) Install the 2 tailgate outer garnish covers No. 2 as shown in the illustration. HINT: Align the tailgate outer garnish cover No. 2 with the tailgate outer garnish alignment mark. |
|
7. INSTALL TAILGATE OUTER GARNISH CUSHION
HINT:
- Using the same procedure, install the tailgate outer garnish cushion.
- When installing the tailgate outer garnish cushion, heat the rear spoiler with a heat lamp.
Heating temperature:
Item | Temperature |
|---|---|
Tailgate outer garnish |
20 à 30 °C |
CAUTION:
- Do not touch heated parts or the heat lamp. Touching them may cause burns.
*a
Hot Surface
*b
Heat Lamp
- Prolonged contact with heated parts may cause burns.
NOTICE:
Do not overheat the tailgate outer garnish.
(a) Clean the surface of the tailgate outer garnish.
(1) Using a heat lamp, heat the surface of the tailgate outer garnish.
(2) Remove the double-sided adhesive tape from the tailgate outer garnish.
(3) Remove any adhesive residue using a cleaning agent.
(b) Using a heat lamp, heat the tailgate outer garnish.
(c) Peel off the protective film from a new tailgate outer garnish cushion.
HINT:
After removing the release liner, prevent the adhesive surface from contacting foreign matter.
(d) Install the tailgate outer garnish cushion as shown in the illustration. HINT: Install the tailgate outer garnish cushion along the tailgate outer garnish line. |
|
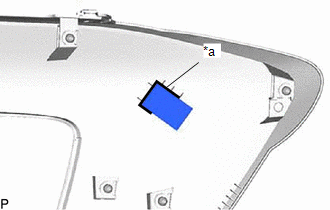
8. INSTALL TAILGATE OUTER GARNISH COVER NO. 1
HINT:
- Using the same procedure, install the tailgate outer garnish cover No. 1.
- When installing the tailgate outer garnish cover No. 1, heat the rear spoiler with a heat lamp.
Heating temperature:
Item | Temperature |
|---|---|
Tailgate outer garnish |
20 à 30 °C |
CAUTION:
- Do not touch heated parts or the heat lamp. Touching them may cause burns.
*a
Hot Surface
*b
Heat Lamp
- Prolonged contact with heated parts may cause burns.
NOTICE:
Do not overheat the tailgate outer garnish.
(a) Clean the surface of the tailgate outer garnish.
(1) Using a heat lamp, heat the surface of the tailgate outer garnish.
(2) Remove the double-sided adhesive tape from the tailgate outer garnish.
(3) Remove any adhesive residue using a cleaning agent.
(b) Using a heat lamp, heat the tailgate outer garnish.
(c) Peel off the protective film from a new tailgate outer garnish cover No. 1.
HINT:
After removing the release liner, prevent the adhesive surface from contacting foreign matter.
(d) Install the 1 tailgate outer garnish cover No. 1 as shown in the illustration. HINT: Align the tailgate outer garnish cover No. 1 with the tailgate outer garnish alignment mark. |
|
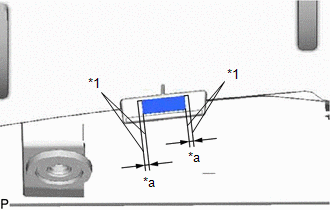
9. INSTALL LEFT TAILGATE GARNISH MOLDING COVER
HINT:
When installing the left tailgate garnish molding cover, heat the tailgate outer garnish and the tailgate outer garnish cover No. 2 with a heat lamp.
Heating temperature:
Item | Temperature |
|---|---|
Tailgate outer garnish and tailgate outer garnish cover No. 2 |
20 à 30 °C |
CAUTION:
- Do not touch heated parts or the heat lamp. Touching them may cause burns.
*a
Hot Surface
*b
Heat Lamp
- Prolonged contact with heated parts may cause burns.
NOTICE:
Do not overheat the tailgate outer garnish and the tailgate outer garnish cover No. 2.
(a) For the back door outer garnish side:
(1) Clean the surface of the tailgate outer garnish.
- Using a heat lamp, heat the surface of the tailgate outer garnish.
- Remove the double-sided adhesive tape from the tailgate outer garnish.
- Remove any adhesive residue using a cleaning agent.
(2) Using a heat lamp, heat the tailgate outer garnish.
(3) Remove the protective sheet from the new left back door garnish molding protector.
HINT:
After removing the release liner, prevent the adhesive surface from contacting foreign matter.
(4) Install the left back door garnish molding protector as shown in the illustration. HINT: Align the left back door garnish molding protector with the back door outside garnish alignment line. |
|
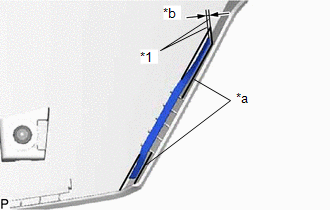
(b) For the No. 2 back door outer garnish side:
(1) Clean the No. 2 back door outside garnish surface.
- Using a heat light, heat the surface of the No. 2 back door outside garnish.
- Remove the double-sided tape from the No. 2 back door outside garnish.
- Remove any adhesive residue using a cleaning agent.
(2) Using a heat light, heat the No. 2 back door outside garnish.
(3) Remove the protective sheet from the new left back door garnish molding protector.
HINT:
After removing the release liner, prevent the adhesive surface from contacting foreign matter.
(4) Install the left back door garnish molding protector as shown in the illustration. HINT: Install the left back door garnish molding protector along the line on the No. 2 back door outside garnish. |
|
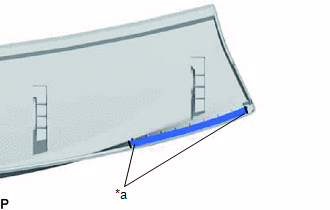
10. INSTALL RIGHT BACK DOOR GARNISH MOLDING PROTECTOR
HINT:
Perform the same procedure as for the left side.
11. INSTALL UPPER BACK DOOR GARNISH MOLDING PROTECTOR
HINT:
When installing the upper back door garnish molding protector, heat the No. 2 back door outside garnish using a heat light.
Heating temperature:
Item | Temperature |
|---|---|
No. 2 Back Door Outside Garnish |
20 à 30 °C |
CAUTION:
- Do not touch heated parts or the heat lamp. Touching them may cause burns.
*a
Hot Surface
*b
Heat Lamp
- Prolonged contact with heated parts may cause burns.
NOTICE:
Do not overheat the No. 2 back door outside garnish.
(a) Clean the No. 2 back door outside garnish surface.
(1) Using a heat light, heat the surface of the No. 2 back door outside garnish.
(2) Remove the double-sided tape from the No. 2 back door outside garnish.
(3) Remove any adhesive residue using a cleaning agent.
(b) Using a heat light, heat the No. 2 back door outside garnish.
(c) Remove the protective sheet from the new upper back door garnish molding protector.
HINT:
After removing the release liner, prevent the adhesive surface from contacting foreign matter.
(d) Install the upper back door garnish molding protector as shown in the illustration. HINT: Install the upper back door garnish molding protector along the back door outside garnish line. |
|
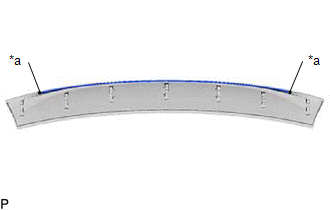
12. INSTALL BACK DOOR OUTSIDE GARNISH MOLDING PROTECTOR
HINT:
When installing the back door outside garnish molding protector, heat the No. 2 back door outside garnish using a heat light.
Heating temperature:
Item | Temperature |
|---|---|
No. 2 Back Door Outside Garnish |
20 à 30 °C |
CAUTION:
- Do not touch heated parts or the heat lamp. Touching them may cause burns.
*a
Hot Surface
*b
Heat Lamp
- Prolonged contact with heated parts may cause burns.
NOTICE:
Do not overheat the No. 2 back door outside garnish.
(a) Clean the No. 2 back door outside garnish surface.
(1) Using a heat light, heat the surface of the No. 2 back door outside garnish.
(2) Remove the double-sided tape from the No. 2 back door outside garnish.
(3) Remove any adhesive residue using a cleaning agent.
(b) Using a heat light, heat the No. 2 back door outside garnish.
(c) Remove the protective sheet from the new back door outside garnish molding protector.
HINT:
After removing the release liner, prevent the adhesive surface from contacting foreign matter.
(d) Install the back door outside garnish molding protector as shown in the illustration. HINT: Then install the back door outside garnish along the protector line on the back door outside garnish. |
|
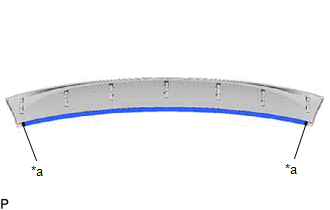
13. INSTALL LEFT BACK DOOR GARNISH SIDE PROTECTOR
HINT:
When installing the left back door garnish side protector, heat the No. 2 back door outside garnish using a heat light.
Heating temperature:
Item | Temperature |
|---|---|
Tailgate outer garnish |
20 à 30 °C |
CAUTION:
- Do not touch heated parts or the heat lamp. Touching them may cause burns.
*a
Hot Surface
*b
Heat Lamp
- Prolonged contact with heated parts may cause burns.
NOTICE:
Do not overheat the No. 2 back door outside garnish.
(a) Clean the No. 2 back door outside garnish surface.
(1) Using a heat light, heat the surface of the No. 2 back door outside garnish.
(2) Remove the double-sided tape from the No. 2 back door outside garnish.
(3) Remove any adhesive residue using a cleaning agent.
(b) Using a heat light, heat the No. 2 back door outside garnish.
(c) Remove the protective sheet from the new left back door garnish side protector.
HINT:
After removing the release liner, prevent the adhesive surface from contacting foreign matter.
(d) Install the left back door garnish side protector as shown in the illustration. HINT: Install the left back door garnish side protector with the mark on the No. 2 back door outside garnish. |
|
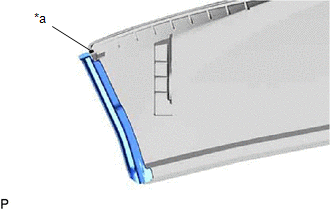
14. INSTALL RIGHT BACK DOOR GARNISH SIDE PROTECTOR
HINT:
Perform the same procedure as for the left side.
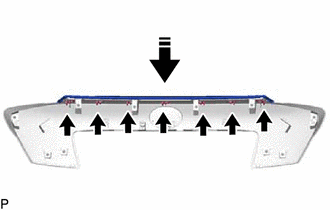
15. INSTALL NO. 2 BACK DOOR OUTSIDE GARNISH
(a) Install the No. 2 back door outside garnish and the 7 No. 1 outside molding retainers as shown in the illustration.
 |
Install in this direction |