Replacement
REPLACEMENT
PROCEDURE
1. RECOVER REFRIGERANT FROM REFRIGERANT SYSTEM
(a) Start the engine.
(b) Operate the compressor under the conditions below:
Item | Condition |
|---|---|
Operating time |
3 minutes minimum |
Temperature control setting |
Max cool |
Blower speed |
High |
Engine |
Idle |
A/C switch |
ON |
As a result, a large part of the compressor oil in the main components of the A/C system collects in the compressor.
HINT:
It is not necessary to operate the compressor if the A/C does not work due to a seized compressor, etc.
(c) Stop the engine.
(d) Recover the refrigerant from the A/C system using the refrigerant recovery equipment.
HINT:
Use the refrigerant recovery equipment in accordance with the manufacturer's instructions.
2. CHARGE AIR CONDITIONING SYSTEM WITH REFRIGERANT
(a) Evacuate using a vacuum pump or suitable equipment.
(b) Charge the air conditioning system with refrigerant.
Refrigerant type:
HFC-134a (R134a)
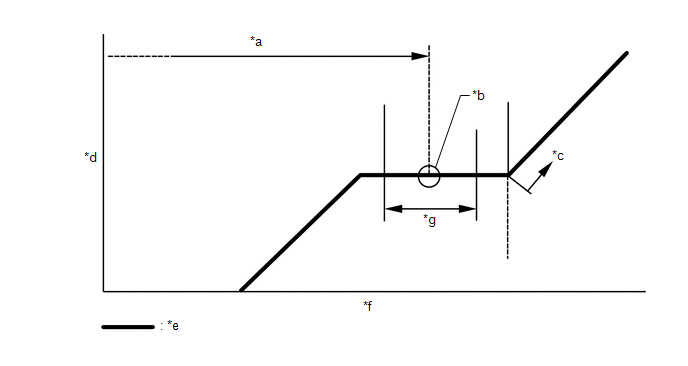
*a |
Standard charge quantity |
*b |
Mid-range value within the correct range |
*c |
Overcharge |
*d |
High pressure |
*e |
Secondary cooling system |
*f |
Refrigerant Amount |
*g |
+/-30 g (+/-1.05 oz.) |
- |
- |
Standard charge quantity:
380 to 440 g (13.4 to 15.5 oz.)
SST: 09985-20010
09985-02010
09985-02050
09985-02060
09985-02070
09985-02080
09985-02090
09985-02110
09985-02130
09985-02140
09985-02150
NOTICE:
- Do not turn the A/C switch ON before recharging the air conditioning system with refrigerant. This would operate the compressor without refrigerant, causing the compressor to overheat.
- The refrigerant quantity must be checked (by weight).
- The graph above is provided for reference only.
HINT:
Make sure a sufficient amount of refrigerant is available to top up the system using the refrigerant recovery equipment. Refrigerant recovery units are not always able to recover 100% of the refrigerant from an air conditioning system.
3. WARM UP ENGINE
(a) Keep the A/C switch ON for at least 2 minutes to warm up the compressor.
NOTICE:
To avoid damaging the compressor, be sure to warm up the compressor by turning on the air conditioning after removing and installing air conditioning system lines (including the compressor).
4. CHECK FOR REFRIGERANT LEAKS
(a) After recharging the air conditioning system with refrigerant, check for refrigerant leaks using a halogen leak detector.
(b) Perform the test under the following conditions:
- Turn the ignition switch OFF.
- Ensure adequate ventilation (if ventilation is insufficient, the halogen leak detector may react to volatile gases other than refrigerant, such as gasoline vapor or exhaust gas).
- Repeat the check 2 or 3 times.
- Measure the pressure to make sure some refrigerant remains in the air conditioning system.
Pressure when the compressor is off: approximately 392 to 588 kPa (3.9 to 5.9 kgf/cm2, 57 to 85 psi)
(c) Using a halogen leak detector, check for refrigerant leaks in the air conditioning system. |
|
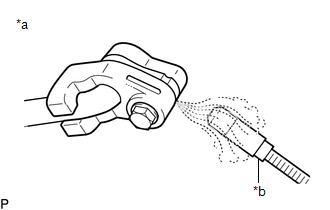
(d) Place the halogen leak detector near the cooler drain hose, with the detector power off, then turn the detector on. HINT:
|
|
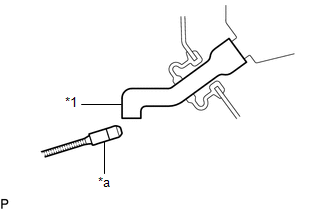
(e) If no refrigerant leak is detected at the cooler drain hose, remove the blower motor controller from the cooler unit. Then insert the sensor of the halogen leak detector into the unit and check for leaks.
(f) Disconnect the pressure sensor connector and leave it for approximately 20 minutes. Then place the halogen leak detector near the pressure sensor and check for leaks.
HINT:
When checking for leaks, oil-soaked dirt at a joint may indicate a leak.